
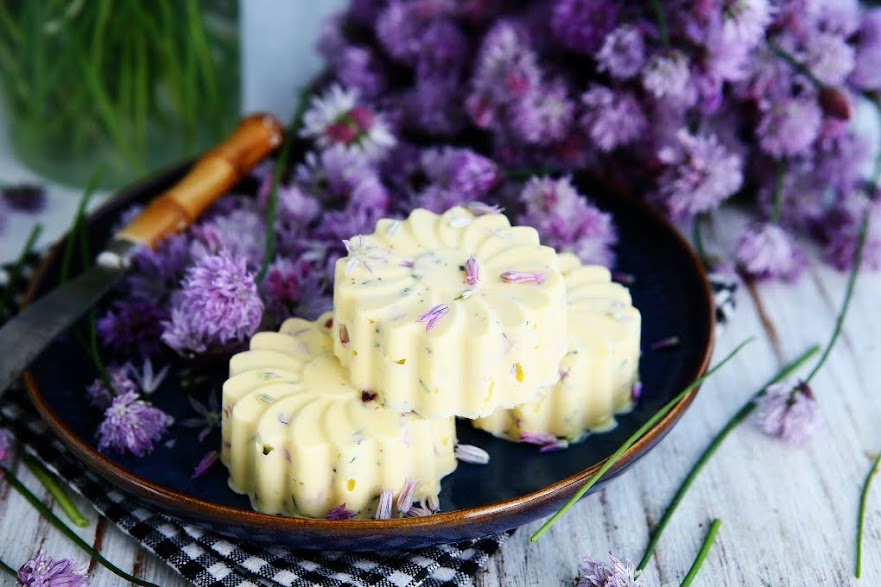
Chives Blossom Butter
 © 2022 | http://angiesrecipes.blogspot.com
 |
 |
 © 2022 | http://angiesrecipes.blogspot.com
Chive blossoms are a colorful and flavourful edible flower that will appear at the end of chive stalks in late springtime. These pale purple pompoms taste slightly stronger than the chive leaves, but still very mild, and they are simply beautiful in a wide range of recipes.
Chive bloosm flavoured butter is an easy compound butter, that makes food so much more interesting and better with that delicate onion flavour. The flowerless chive leaves are available all year round in supermarkets, but not the blossoms. If you don't grow chives, you might be able to find these scrumptious little gems at farmers markets in May and June, or forage them in the wild.
|
- Thoroughly wash the chive and the blossoms. Pat them dry with paper towels or dry them in a salad spinner. Finely chop the chives. Separate the flower petals from the stem.
- Mix salt into butter. When the salt is completely incorporated into the butter, add in the chopped chive and blossoms. Mix until well blended.
- Fill a few of silicone muffins cups with butter and freeze for 30 minutes. Once they are firm, it's very easy to remove them. Store the butter, covered or wrapped, in the fridge a couple of hours to let the flavours meld.
- You can simply throw the butter in a container or jar, or shape it into a log. Chill until firm. Use the chive blossom butter for bread, steak, fish, grilled vegetables or to toss with pasta.

© 2022 | http://angiesrecipes.blogspot.com

© 2022 | http://angiesrecipes.blogspot.com
 |
 |

© 2022 | http://angiesrecipes.blogspot.com

© 2022 | http://angiesrecipes.blogspot.com
Tripe with Harissa Sauce
 © 2022 | http://angiesrecipes.blogspot.com
| Beef Tripe / Kalb Pansen | Lamb Tripe / Lamm Pansen |
|---|---|
 |
 |
 © 2022 | http://angiesrecipes.blogspot.com
 © 2022 | http://angiesrecipes.blogspot.com
Embracing nose-to-tail eating can be daunting for those who didn't grow up eating offal. Heart, liver, tripe, tongue… there are so many options on offer when it comes to choosing what to eat or cook. In my grandparents’ generation all parts of an animal were valued and eating offal was as normal as eating mince. Offal isn't awful at all, on the contrary, it's very delicious if prepared right and highly nutritious. We waste massive quantities of food every single day and by using the whole animal, which helps reduce food waste, we are eating more mindfully and thoughtfully while ensuring that animal is fully appreciated.
Tripe is a type of organ meat that comes from the stomach lining of cow, sheep, goat or pig. Aside from being low in calories and fat, tripe is an excellent, healthy, and affordable source of lean protein and it’s also loaded with vitamins and minerals (zinc, choline, iron, potassium, magnesium, and calcium).
According to Healthline, there are four different kinds of beef tripe, classified depending on which stomach chamber the product was made from. The four types include:
- Blanket or flat tripe. This type is made from the first stomach chamber of cows. This smooth tripe is considered the least desirable.
- Honeycomb tripe. This variety stems from the second stomach chamber and resembles a honeycomb. It’s more tender than blanket tripe and has a more palatable flavor.
- Omasum or book tripe. Coming from the third stomach chamber, this type of tripe is described as a mix between blanket and honeycomb tripe.
- Abomasum or reed tripe. This variety is from the fourth stomach chamber. Its taste varies from strong to mild.
You either hate it or love it because of its distinctive aroma, bland flavour and chewy texture, it's often strongly spiced and most commonly prepared in dishes like soups and stews, or deep-fried as a snack. Although it isn’t as desirable as other cuts of meat, tripe remains very popular in the traditional cuisines of many cultures around the world.
The tripe fresh from the farm requires quite a bit of cleaning, the one you can purchase from the stores (I ordered mine here, where you can purchase all kinds of offal, from brain, spleen to testicles) are usually washed / bleached and parboiled. However, it still needs to be further prepared to soften the texture before it's ready for consumption.
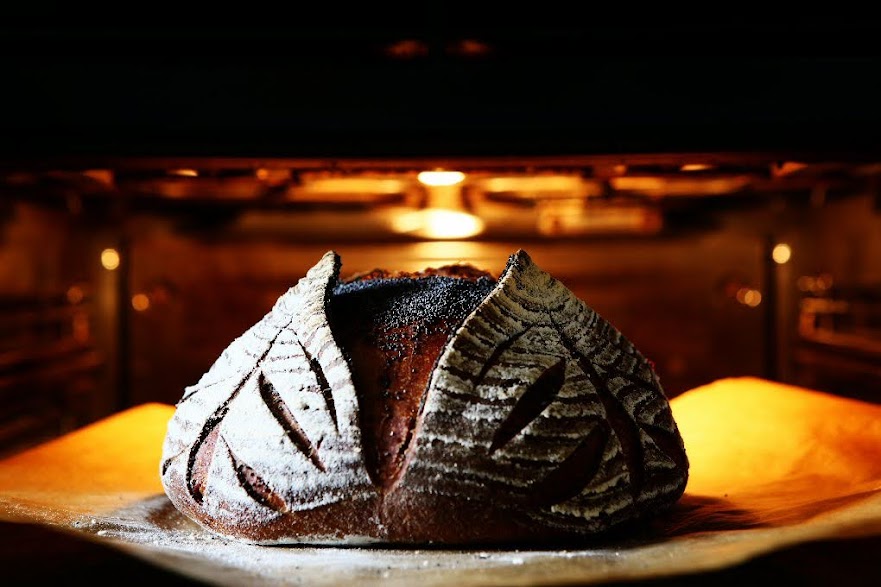
Rye Rolls / Roggenbrötchen
 © 2022 | http://angiesrecipes.blogspot.com
 © 2022 | http://angiesrecipes.blogspot.com
 |
 |
 © 2022 | http://angiesrecipes.blogspot.com
Brötchen (German word for small bread) is a staple food in Germany. It's basically a smaller bread with a crunch crust and a perfectly dense, chewy, soft crumb. If you haven't yet tasted a traditional German Brötchen, you're missing out!
Depending which part of Germany you are from, these small bread rolls are known by various names: Brötchen (in northern and central Germany), Schrippe (in Berlin), Weck (in southwest Germany), and Semmel (in Bavaria). It’s claimed that there are over a thousand different varieties of these little German buns throughout the different regions of Germany. Mine is made with a mix of wheat and rye. The wholemeal rye flour provides a hearty, aromatic taste, tender, moist crumb and a crispy crust. If you want a 100% wheat Brötchen, try this one.
You can enjoy these rolls for breakfast with butter, jam, cheese, or deli slices, or as a dinner roll to sop up extra sauce or gravy. These Roggenbrötchen taste best fresh the same day they are made, but if you have leftovers, just spray them lightly with water and place in a 200C/400F oven for a few minutes and the crust will be crispy again.
|
 |
 |
 |
 |
 |
 |
- Mix whole rye flour and bread flour in a bowl. Make a well in the flour and crumble the yeast into it. Add sugar beet syrup and mix with some of the water in the well to make a paste. Cover and let sit for 30 minutes.
- Add the rest of the water, olive oil, salt and spices, knead everything to form a firm dough. Cover the dough and let it rise for another 45 minutes.
- Divide the dough into 6 even-sized portions. Shape each portion of dough into an oval roll and place on a parchment-lined baking sheet. Cover with a clean kitchen towel and let them rest for 30 minutes.
- Preheat the oven to 230C/450F with an ovenproof bowl of water. Dust the buns with a little flour and cut each roll lengthwise with a sharp knife.
- Bake in the oven for about 10 minutes. Briefly open the oven door for 3-4 seconds to let the steam escape so that the crust will be even crispier.
- Reduce heat to 200C/400F and bake until golden brown, about 10-12 minutes. Remove from the tray and allow to cool on a wire rack.

© 2022 | http://angiesrecipes.blogspot.com
 |
 |

© 2022 | http://angiesrecipes.blogspot.com

© 2022 | http://angiesrecipes.blogspot.com
I am sending this to Food Wednesdays at Kathy's blog-Hummingbird Studio at the Lake.
Low-Carb Bread Rolls with Quark and Wheat Germ
 © 2022 | http://angiesrecipes.blogspot.com
 |
 |
 © 2022 | http://angiesrecipes.blogspot.com

© 2022 | http://angiesrecipes.blogspot.com
Soft, chewy and perfect for sandwiches - a low carb bread rolls recipe that tastes just like the real thing and perfect for those following a low carb lifestyle! They are great to enjoy with soup, stews, and salads, either toasted or simply as is! Quark (German fresh cheese with a smooth and soft texture) is said to be a cross between yogurt and cottage cheese. If you can't find Quark, a few of suitable substitutes for this recipe would be cottage cheese, ricotta cheese, or labneh (a thickened Greek yoghurt). I found this easy homemade Quark recipe here, in case you are interested in making your own.
Crispy Pork Belly with Basic Mole
 © 2022 | http://angiesrecipes.blogspot.com
 |
 |
 © 2022 | http://angiesrecipes.blogspot.com
Earthy, intense and rich Mole (pronounced moh-leh) is most representative of Mexican cuisine. The word Mole derives from the language of the Aztecs, molli (or mulli), which just means “sauce,” Mole is generally a thick, dense sauce, ranging from red to green to black, and should never be runny. There are hundreds of variations of mole in Mexico, depending on where you are and the season.
This basic (not exactly authentic, but delicious all the same) mole sauce is made by toasting and combining some dried chillies (guajillo chillies, Kashmiri red chillies, ancho chillies) spices (cinnamon, anise, coriander, cayenne, cardamom), dark chocolate, herbs (oregano, thyme and cilantro), thickeners (old bread, nuts or/and seeds) and homemade broth. Serve it as a main course with savoury, rich, crunchy pork belly, melt-in-mouth pulled pork and juicy, tender chicken or spoon over tacos and enchiladas. Once you’ve made the sauce, you can use it for practically anything. Pork belly is a staple at our dinner table and paired with the rich, complex mole sauce is literally heaven on earth.
| Pork Belly | Basic Mole |
|---|---|
|
|
- Place the pork belly in your slow cooker, add in spices, and salt. Fill the slow cooker with water. Cook for 3-4 hours on high. The pork belly should be tender, soft, but not fallapart. Remove the pork belly to a tray or plate and cool completely. I usually leave it in the fridge, uncovered, overnight, so the skin dries up. Reserve the broth.
- Poke lots of little holes on the pork belly and cut into 4 squares or any desired sized pieces. Season with more salt and pepper. Place them in the basket of your air fryer and cook for 15 minutes at 180C/350F. Increase the temperature to 200C/400F and cook for a further 3 minutes until the pork skin is golden, crispy and puffed up.
- Preheat the oven to 200C/400F. Place all the dried chillies to the aluminum foil–lined baking tray and toast, turning once, until dark and fragrant, about 3 minutes. Place peanuts, pumpkin seeds, bread pieces, and spices in another tray and set it at the bottom of the oven.
- Meanwhile, fill a medium saucepan with 500 ml of reserved broth. Set the saucepan over low heat. Transfer toasted chillies to the saucepan with broth. Remove another tray with peanuts, bread and spices and add all the ingredients to the saucepan too.
- Heat the ghee, butter or lard in a skillet over medium-high heat. Add in chopped shallot and stirfry for a couple of minutes. Add in crushed garlic cloves and fry for just a few seconds. Stir in raisins and herbs. Transfer the whole mixture together with the honey to the saucepan too. Bring the mixture to a gentle boil and remove from heat. Purée the mixture using a stick blender to make a smooth thick mole.
- Transfer the mole to a large skillet. Add in dark chocolate and enough of broth to allow the mixture to blend. Process until completely smooth.
- Cook the mole sauce over low heat for 10 minutes until it thickens, stirring frequently. Add in more garlic honey and/or broth as needed.
- Spoon some mole sauce on serving plates, arrange crispy pork belly over mole sauce and garnish with crushed peanuts and chopped cilantro.

© 2022 | http://angiesrecipes.blogspot.com
 |
 |

© 2022 | http://angiesrecipes.blogspot.com

© 2022 | http://angiesrecipes.blogspot.com
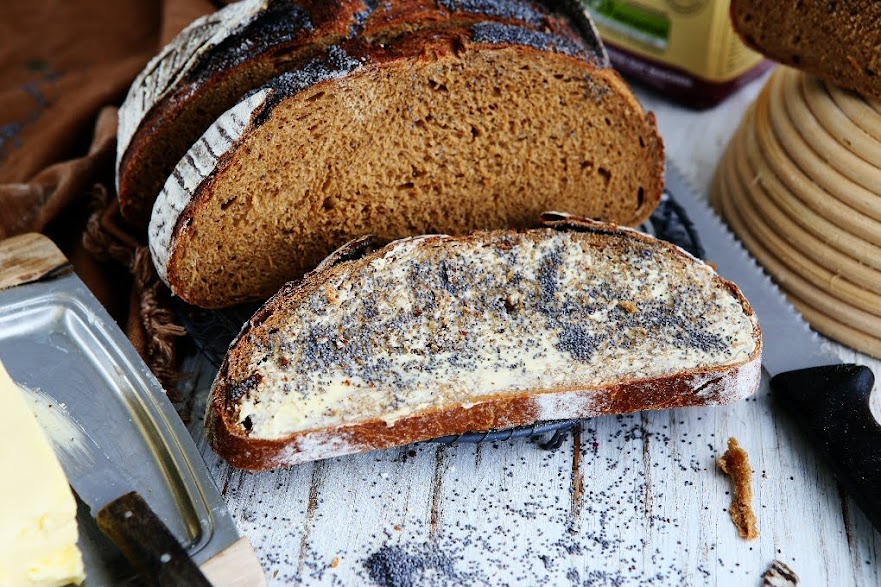
Poppy Bread with Pasta Madre Starter
 © 2022 | http://angiesrecipes.blogspot.com
 © 2022 | http://angiesrecipes.blogspot.com
 |
 |
 © 2022 | http://angiesrecipes.blogspot.com

© 2022 | http://angiesrecipes.blogspot.com
Pasta Madre (meaning ‘dough mother’ in Italian and has nothing to do with pasta), aka Lievito Madre (mother yeast), is a stiff sourdough starter, more like a dough which is widely used across Italy and favoured for both its active nature, mild flavour profile (no sour flavour) and ability to leaven egg and dairy-enriched doughs, like panettone, an Italian holiday cake that is eaten during the Christmas season. Check out here or here, if you want to learn more about this Italian mother yeast-Lievito Madra.
Last, but not the least, if you already have a liquid sourdough starter with 100% hydration at home, you can easily convert it to the solid pasta madre. Take out your liquid sourdough starter of 100 % hydration and leave it to come to room temperature (22C-24C / 72-75F) and give it 2-3 hours. Now you can start feeding the starter with a feeding ratio - 2:2:1 (2 parts liquid starter, 2 parts flour, 1 part water). For example, 20 g starter + 20 g strong flour + 10 g water. Feed 2 times every 5 hours, or until it doubles in size. You can also leave it in the fridge overnight, just feed the starter before going to bed and feed again in the morning. Repeat the process for 2 days or 3 days if making enriched breads.
White Asparagus with Sriracha Hollandaise
 © 2022 | http://angiesrecipes.blogspot.com
 |
 |
 © 2022 | http://angiesrecipes.blogspot.com
Unlike the green variety, white asparagus must be peeled before cooking and the woody base should also be removed as it is too stringy and hard to chew. Peel and boil the white asparagus for this simple and yummy recipe, then serve those “White Gold” with an easy blender Hollandaise spiked with sriracha sauce. If you are in a hurry, simply serve them with melted butter.
Hollandaise sauce, one of the 5 French mother sauces (Béchamel, Velouté, Espagnole, Hollandaise, and Tomato), is an emulsion of egg yolk, melted butter, and lemon juice. Despite having “Holland” in its name, Hollandaise sauce was first born in France and was originally known as Sauce Isigny, named after Isigny-sur-Mer, a small town in Normandy famous for its butter and cream. When Normandy’s dairy production was shut down during World War I, the sauce was renamed “Hollandaise” to reflect the usage of imported Dutch butter.
| Sriracha Hollandaise | |
|---|---|
|
|
- Bring a stockpot of water to a boil, add the salt, the sugar and the butter. Meanwhile peel the white asparagus and cut off the woody bottom ends.
- Place the peeled white asparagus in the boiling water and cook for 12-15 minutes until al dente. Melt the butter over a low flame until it begins to bubble. Remove from heat.
- In a wide mouth mason jar, add egg yolks, lemon juice, cayenne pepper and sea salt. Blend the ingredients with your immersion blender while slowly adding the melted butter, a couple of tablespoons at a time, to the jar. Blend as you gradually add in butter, moving the immersion blender up and down. The sauce should thicken in just a minute or two.
- Season the Hollandaise with sriracha or your favourite chilli sauce. Whisk until combined. Taste and add more sriracha if desired for more heat.
- Drain the white asparagus and arrange on plates with spicy Hollandaise sauce on a bed of thinly sliced heirloom tomatoes if using, and garnish with chopped parsley and chilli rings.

© 2022 | http://angiesrecipes.blogspot.com
 |
 |

© 2022 | http://angiesrecipes.blogspot.com


