Featured Recipe

Blood Orange Spelt Loaf Cake


http://schneiderchen.de | © 2011 | http://angiesrecipes.blogspot.com
A delightful blood orange loaf cake with a moist light texture, mouthwatering freshness and an irresistible burst of citrus flavour.
Blood Orange Spelt Loaf Cake
- inspired by Taste of Home
|
- Line a 30x11x7 cm loaf pan with baking paper. Preheat the oven to 180C/350F.
- In a large mixing bowl, whisk together the spelt pastry flour, sugars, baking powder, and salt. Add in corn oil, blood orange juice and the zest. Beat with a hand mixer until smooth.
- In the bowl of your stand mixer, beat the egg whites until stiff. Fold into blood orange-oil mixture in 2-3 additions until blended and smooth.
- Bake in the middle of hot oven for about an hour or until a toothpick inserted in the center of the loaf comes out clean. Cool for 10 minutes before removing from pan to wire rack to cool completely. Dust with powdered sugar or drizzle with caramel sauce if desired.

http://schneiderchen.de | © 2011 | http://angiesrecipes.blogspot.com


http://schneiderchen.de | © 2011 | http://angiesrecipes.blogspot.com
Soya and Almond Cookies
 http://schneiderchen.de | © 2011 | http://angiesrecipes.blogspot.com


http://schneiderchen.de | © 2011 | http://angiesrecipes.blogspot.com
Soya flour, an excellent source of iron, calcium and B-vitamins and naturally gluten-free, comes from either roasted or unroasted soybeans that have been ground into a fine powder. Not only will It give homebaked goods a protein boost, but it also adds a nutty and exceptional flavour. If you are interested in using soya flour, more information can be found here.
Soya and Almond Cookies
inspired by Gastromony
|
- Rinse and drain soya beans. Spread soya beans in a single layer on a baking sheet and roast at 150C/300F until lightly golden and aromatic, about 45 minutes. Stir occasionally. Add the beans to a grain mill or a coffee blender. Blend until it reaches the fine consistency of flour. Sift and measure the bean powder.
- Prepare two baking sheets with parchment paper. Preheat the oven to 165C/330F. Whisk together the ground almonds, sifted soya flour, baking powder and salt in a mixing bowl. Set aside.
- Cream the butter and light brown sugar until light and well blended. Add in eggs, one at a time, and beat until combined. Stir in flour mixture until combined.
- Shape cookie dough into 1-inch balls and coat with chopped almond if using. Place them on the prepared sheets. Bake 15-20 minutes. Remove and cool on racks. It makes approximately 40 cookies.

http://schneiderchen.de | © 2011 | http://angiesrecipes.blogspot.com

http://schneiderchen.de | © 2011 | http://angiesrecipes.blogspot.com

Cantaloupe Ribbons and Chorizo Salad
 http://schneiderchen.de | © 2011 | http://angiesrecipes.blogspot.com

http://schneiderchen.de | © 2011 | http://angiesrecipes.blogspot.com
This is a refreshing salad with an amazing combo of sweet, juicy cantaloupe, intriguing spicy smoky chorizo, and distinctly peppery rocket salad, dressed simply with olive oil.
Cantaloupe Ribbons and Chorizo Salad
inspired by My Recipes
|
- Heat a small skillet over medium heat. Add the chorizo slices and cook for 1-2 minutes or until the slices are crispy. Let cool, then break into small pieces.
- Shave off ribbons of cantaloupe, using a vegetable peeler or mandoline. Arrange arugula leaves and cantaloupe ribbons on two serving plates. Sprinkle the chorizo and crushed pink peppers over. Drizzle olive oil over salads.

http://schneiderchen.de | © 2011 | http://angiesrecipes.blogspot.com

http://schneiderchen.de | © 2011 | http://angiesrecipes.blogspot.com
Matcha Spelt Castella
 http://schneiderchen.de | © 2011 | http://angiesrecipes.blogspot.com

http://schneiderchen.de | © 2011 | http://angiesrecipes.blogspot.com

http://schneiderchen.de | © 2011 | http://angiesrecipes.blogspot.com
Castella, (or Kasutera) soft, delicate with sweet aroma, is a highly popular Japanese sponge cake, raised only by the air incorporated into the eggs and oil-free. The origin of castella is believed to have come from Portuguese merchants who introduced European sweets to Nagasaki Japan in the 16th century.
Castella cake is traditionally baked in a wood box, which helps to bake the cake evenly, but a standard baking tin would work just great. Unlike most cakes, castella cake is baked with bread flour (I used spelt bread flour), not cake or all purpose flour.
There are now many varieties of this sponge cake made with chocolate, honey, green tea, and brown sugar. If you have baked other foam cakes before, the process of creating castella is quite similar. Please do drop by Biren of Roti & Rice to read all the detailed instructions with beautiful photos. And if you are interested in learning more background of castella, please refer to Wise Geek.
You can also find castella on
Anncoo Journal
Nasi Lemak Lover
No Frills Recipes
|
- Line an 8-inch / 20x20-cm rectangular baking dish with aluminum foil. Whisk and sieve spelt bread flour, matcha powder and salt together 2-3 times into a mixing bowl. Warm sherry and honey in a bowl over a pot of hot water, stirring until honey completely dissolves. Set aside. Preheat the oven to 160C/320F.
- Beat the egg whites in the bowl of your stand mixer at high speed until foamy, about 30 seconds. Beat in sugar in 3 additions until firm peaks form, about 3-4 minutes. Add in egg yolks, one at a time, at medium-low speed until well combined, about 1 minute.
- Now add in prepared flour mixture, still at medium-low speed, and stir until just combined. Pour in the sherry-honey mixture and continue to stir for another minute until well-combined and smooth.
- Pour the cake batter from a 30-cm / 1-foot height directly into the prepared baking dish. Tap the baking dish on the counter to remove bubbles. Using a spatula, smooth the surface to remove any remaining bubbles.
- Bake in the center of the hot oven for 50 minutes until evenly brown. Remove and drop it from a 30-cm / 1-foot height onto the counter to prevent shrinkage. Cool the cake on the counter for 5 minutes. Lift the cake from the pan and invert it onto a piece of parchment paper. Peel the aluminum foil. Wrap the cake with a plastic wrap and store in the refrigerator overnight to preserve moisture.
- To serve, trim off the sides of the cake with a sharp serrated knife, then cut up into the even slices.

http://schneiderchen.de | © 2011 | http://angiesrecipes.blogspot.com

http://schneiderchen.de | © 2011 | http://angiesrecipes.blogspot.com
Pineapple Apple Salsa
 http://schneiderchen.de | © 2011 | http://angiesrecipes.blogspot.com

http://schneiderchen.de | © 2011 | http://angiesrecipes.blogspot.com
A delicious blend of fresh pineapple, apples, tomatoes, onions and rock leaves makes up this sweet, spicy and tangy fruit salsa. Enjoy them as a snack with some taco chips or serve with an array of seafood.
|
- Combine all ingredients in a bowl. Cover and refrigerate for at least an hour to allow the flavours to blend together.

http://schneiderchen.de | © 2011 | http://angiesrecipes.blogspot.com

http://schneiderchen.de | © 2011 | http://angiesrecipes.blogspot.com
Spelt Blood Orange Crostata
 http://schneiderchen.de | © 2011 | http://angiesrecipes.blogspot.com

|

|
A crostata is an Italian tart with fruit or cream filling that is baked flat on a pastry crust rather than in a tart pan. Crostata can be prepared with seasonal fruit, as well as any range of canned preserves and even with canned fruits. It’s easy to make and great for a family dessert or a sweet treat at a party.
| Short Crust Pastry | Filling |
|---|---|
|
|

- To make the pastry, freeze the butter cubes on a baking sheet for 10 minutes. Place the spelt flour, sugar, and salt in the bowl of a food processor. Pulse a few times to combine. Add the butter cubes, and toss with your fingers to coat each cube with the flour. Pulse quickly on and off until the mixture is the size of small peas. Add the ice water and pulse several times until until moistened crumbs form. Turn the crumbs out onto a work surface and shape into a rough ball. Wrap the dough in plastic and chill for 30 minutes or until firm.
- Roll the dough into an 11-inch circle on a lightly floured surface and transfer it to a baking sheet lined with parchment paper. Refrigerate for 15 minutes until chilled.
- Meanwhile, peel the blood oranges, removing all of the bitter white pith. Thinly slice 2 of the oranges crosswise. Remove the pits and place the orange slices to a plate. Working over a sieve set over a bowl, cut in between the membranes of the remaining oranges, releasing the sections into the sieve. Remove the pits and gently shake out as much juice as possible without mashing the sections. You will need 1 cup of sections. Reserve the orange juice for another use.
- Arrange the orange sections on the pastry, leaving a 2-inch border all around. Sprinkle half of the light brown sugar over the oranges. Using a paring knife, thinly slice the butter over the oranges. Fold the dough border toward the center of the tart, , leaving most of the oranges uncovered.
- Beat the egg yolk and water in a small bowl. Brush the pastry with the egg wash and sprinkle with half of the remaining brown sugar. Arrange the orange slices on top, leaving a 1-inch border of pastry all around. Sprinkle the rest of brown sugar on top. Freeze the tart until solid, at least 4 hours or preferably overnight.
- Preheat the oven to 190C/375F and position a rack in the center. Bake the tart directly from the freezer for 1 hour and 15 minutes, until the fruit is bubbling and the pastry is deeply browned. Remove and cool the tart on a rack for 10 minutes and serve warm, with whipped cream or caramel sauce if desired.

http://schneiderchen.de | © 2011 | http://angiesrecipes.blogspot.com

http://schneiderchen.de | © 2011 | http://angiesrecipes.blogspot.com

http://schneiderchen.de | © 2011 | http://angiesrecipes.blogspot.com
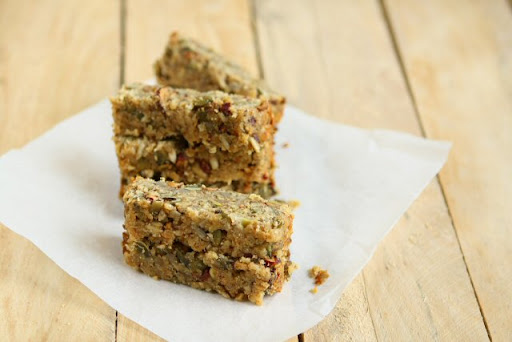
Chinese Red Dates and Seeds Power Bars
 http://schneiderchen.de | © 2011 | http://angiesrecipes.blogspot.com

http://schneiderchen.de | © 2011 | http://angiesrecipes.blogspot.com
These homemade power bars are absolutely delicious, filling, and they're packed with protein, healthy unsaturated fats, fiber and antioxidant. They take little time to make and you can vary the ingredients to satisfy the personal taste, be creative and enjoy!
Chinese Red Dates and Seeds Power Bars
Inspired by Robyn Cooks
|
- Preheat oven to 175C/350F. Stir together the ground flaxseed and the water in a small bowl and let soak for 10 minutes until it forms a gel.
- Meanwhile, in a large mixing bowl, combine the oats, dried Chinese red dates, and roasted pepitas.
- In a separate medium microwave-safe bowl, microwave the sesame paste, inverted sugar syrup, and vanilla for 30 seconds. Stir together until well mixed. Add the banana and mash with a fork to combine. Stir in the gelatinized flax mixture.
- Add the wet ingredients to the dry ingredients and stir to combine. Press the mixture firmly into a lightly greased 20x22-cm baking dish and bake for 15 minutes. Remove and cool in the pan on the counter for 15-20 minutes, then chill in the fridge for about 45 minutes before slicing. Store leftovers in the fridge for up to 5 days, or individually wrap and freeze for up to 2 months.

http://schneiderchen.de | © 2011 | http://angiesrecipes.blogspot.com
http://schneiderchen.de | © 2011 | http://angiesrecipes.blogspot.com
Dutch Crunchy Whole Wheat Bread
 http://schneiderchen.de | © 2011 | http://angiesrecipes.blogspot.com

http://schneiderchen.de | © 2011 | http://angiesrecipes.blogspot.com
Dutch crunch is one of many names (tiger bread, giraffe bread, or mottled bread) given to the bread made with a distinct mottled topping, which is made with rice flour, yeast, oil, salt, sugar and water. Mine actually has more resemblance to a tortoise. The crust tastes slightly sweet and crunchy. It’s best beaten the day they were baked or the crust will lose its crunchiness and become soft. These bread rolls go great with soup or salad.
If you brush the paste on the dough before the final proofing stage, the mottling is greater and brushing it on just right before baking results in a more even coating. The paste is fermented by the yeast, and it grows while the dough grows. But because the rice flour has very little gluten to hold it together, it spreads apart and then gelatinizes and caramelizes when the bread is baked. Besides rice flour, other low-gluten flours, like semolina flour, potato starch could be the ideal alternatives.
Dutch Crunchy Whole Wheat Bread
inspired byBaking Bites
Baking with Passion by Dan Lepard, Richard Whittington

©Baking with Passion Page 61
The Bread Baker's Apprentice by Peter Reinhart

©The Bread Baker's Apprentice Page 264
| Bread | Dutch Crunchy |
|---|---|
|
|
- Combine together rye flour and water in a small pot until the mixture is well blended and lump free. Cook the mixture over the medium heat, frequently stirring, until it has turned into a thick paste and the thermometer reads about 65C/150F. It takes about 2-3 minutes. Cool the mixture to the room temperature and cover with a plastic wrap while you prepare other ingredients.
- In the pan of your bread machine, pour in prepared rye paste, milk, egg, olive oil, sugar, salt, bread flour, ground whole wheat, and the yeast. Program the bread machine to dough cycle.
- Mix up the ingredients of topping until well-combined and smooth about 35 minutes before the end of the dough cycle. Cover and let rise in a warm place until bubbly and doubled in volume.
- After the machine has beeped to indicate the dough cycle is done, scrape the dough out onto a lightly floured work surface and press it down to flatten. Divide the dough into 4 portions of 70 grams and 3 portions of 240 grams.
- Shape each portion of dough into a round. Place 3 portions of 240 grams dough balls in a standard loaf pan and 4 portions of 70 grams dough balls on a parchment paper lined baking sheet.
- Stir the coating and spread the mixture evenly over the top of each bread. Let rise, uncovered, 45 minutes, until loaf rises level with the top of the pan and the rolls are doubled in size.
- Preheat the oven to 190C/375F. Place the bread in the oven and bake 20 minutes for the bread rolls, 35 minutes for the loaf, until they are beautifully golden brown and crisp.

http://schneiderchen.de | © 2011 | http://angiesrecipes.blogspot.com

http://schneiderchen.de | © 2011 | http://angiesrecipes.blogspot.com