Featured Recipe

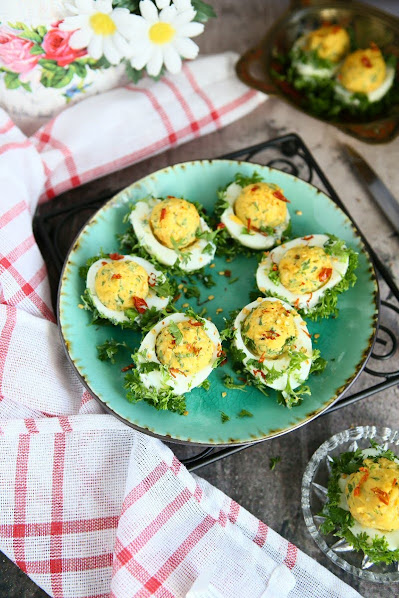
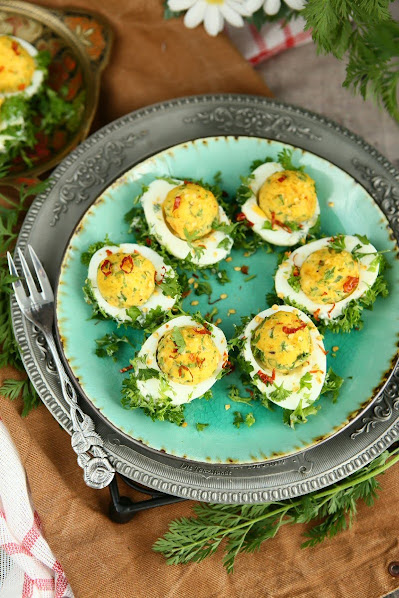
Devilled Eggs with Parsley and Quark
 © 2021 | http://angiesrecipes.blogspot.com
 |
 |
 © 2021 | http://angiesrecipes.blogspot.com
Deviled eggs are hard-boiled eggs that have been peeled, halved, then stuffed with a mixture made from the yolks and other ingredients. Traditionally, the filling is made with yolks, mayonnaise, mustard, cayenne or paprika powder, salt and pepper. I left out the mayonnaise and used some German fresh cheese instead and some fresh herbs since it's Spring. You can also swap out mayo for creamy ripe avocado. They are protein rich, keto-friendly, and taste so good. Serve them as an appetizer or picnic food.
|
- Place eggs in a single layer in a saucepan and cover with enough water that there's 1 1/2 inches of water above the eggs. Place saucepan over medium-high heat and bring to a boil. Turn off heat, cover and let sit for 10-12 minutes.
- Drain, rinse under cold water and crack egg shells and carefully peel under cool running water. Gently dry with paper towels.
- Halve eggs lengthwise, and carefully scoop out yolks. Place yolks in a bowl and set whites aside. Mash the yolks into a fine crumble using a fork. Add in Quark, chopped parsley, cayenne pepper, salt, and pepper, and mix well.
- Coat the bottom of egg white halves with yoghurt, then roll in chopped parsley. Arrange them on a serving platter.
- Wet your hands and gently shape the egg yolk mixture into 10 small balls and fill each egg white half with one. Garnish with chilli flakes if using.

© 2021 | http://angiesrecipes.blogspot.com
 |
 |

© 2021 | http://angiesrecipes.blogspot.com
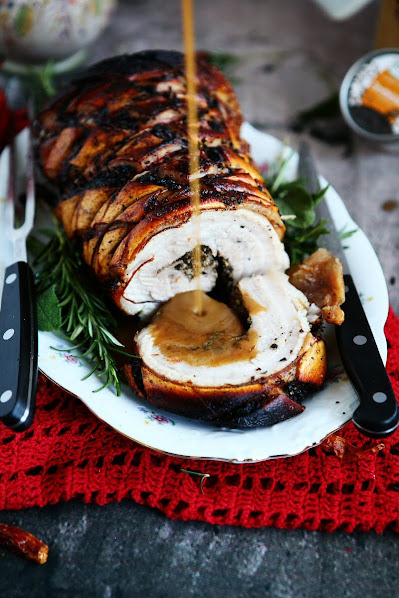
Porchetta with Cinnamon Flower Buds and Herbs
 © 2021 | http://angiesrecipes.blogspot.com
 |
 |
 © 2021 | http://angiesrecipes.blogspot.com
Most porchetta recipes call for pork belly and loin, but I prefer this simplified version using just pork belly. The result is an extra aromatic and juicy roast with a super crisp crackling skin, which I can't get enough. The recipe feeds a family of 4 plus some leftovers, which make excellent sandwiches for lunch the next day.
Traditonally this pork roast is flavoured with fennel seeds, herbs, garlic, lemon, and wine, but I am using one of my favourite spices - cinnamon flower buds for this recipe. So, do feel free to substitute or alter herbs and spices according to your taste.
Cinnamon flower buds, also known as cassia buds, are the dried, unripe fruits of the cinnamon tree - cinnamomum cassia which is an evergreen tree of the plant family of laurel family and grows in China and elsewhere in South and Southeast Asia.They have a unique, fine and light cinnamon flavor, mixed with carnation, also musky, sweet and slightly peppery. If you don't have them, use cumin or fennel seeds instead.
|
 |
 |
 |
- Use a mortar and pestle to crush the cinnamon flower buds, and black peppercorns. Finely chop the herbs and 4 of the garlic cloves. Place crushed spices, finely chopped herbs, garlic, chilli pepper flakes, lemon zest and salt in a bowl. Add in olive oil to make a marinade paste.
- Pat the pork belly dry with paper towel. Place pork belly skin-side down on a large cutting board. With a paring knife, score the meat 2mm deep in a criss-cross pattern. Flip the meat over and score the skin in a criss-cross pattern, being careful not to pierce the meat on this side.
- Rub the marinade all over the pork belly, including the sides and the skin. Place the marinated pork belly skin-side up and fold the pork belly to enclose. Secure tightly with kitchen string at 3cm intervals. Place in a baking dish. Refrigerate, uncovered, overnight or at least 6 hours. This helps dry out the skin, resulting in crunchy crackling.
- Next day, remove pork from refrigerator 1 to 2 hours before you want to cook it. Preheat oven to 220C/450F fan-forced. Place sliced onion in a roasting tray and add pork belly on top.
- Add white wine to pan with water. Roast for 30 minutes. Rotate the roasting tray half way though. Reduce oven temperature to 150C/300F fan-forced. Roast for an additional 2 hours 30 minutes or until internal temperature of pork reaches 70C/160F . Check at intervals and if the liquid has evaporated, add a little more water.
- Set aside for 15 minutes to rest. Remove kitchen string from pork. Cut into slices to serve.
- Pour the pan juice together with onions into the blending cup of your immersion blender. Add in the reserved garlic clove. Blend everything until smooth and creamy. Taste an season. Serve with the porchetta.

© 2021 | http://angiesrecipes.blogspot.com

© 2021 | http://angiesrecipes.blogspot.com
 |
 |
 © 2021 | http://angiesrecipes.blogspot.com
Baharat Lamb Scotch Eggs
 © 2021 | http://angiesrecipes.blogspot.com
 |
 |
 © 2021 | http://angiesrecipes.blogspot.com
 © 2021 | http://angiesrecipes.blogspot.com
 © 2021 | http://angiesrecipes.blogspot.com
Scotch eggs are soft or hard-boiled eggs encased in sausage meat, breaded and fried (or baked). Served with pickles and a mustard sauce. According to Culinary Delights of Yorkshire, they originated in Whitby, Yorkshire, England, in the 19th century, and were originally covered in fish paste rather than sausage meat. They were supposedly named after William J. Scott & Sons, a well-known eatery which sold them.
Scotch eggs are a common picnic food, but they make a wonderful starter or a simple snack. Instead of using ready made sausage meat, I use lamb mince flavoured with baharat, garlic and parsley. Any kind of ground meat would work.
| Crust | |
|---|---|
|
|
- Place 4 eggs in a saucepan of water. Bring to the boil, then reduce heat to low and cook for 4 minutes for soft-boiled eggs. Drain eggs and plunge immediately in a bowl of iced water until cool. Peel eggs and pat dry with paper towel. Dust with flour and set aside.
- Place lamb mince, Baharat spice mix, minced garlic and chopped parsley in a bowl. Mix until combined. Season with salt and pepper, then divide the mixture into 4 portions.
- Place plain flour and breadcrumbs in separate shallow bowls. Whisk the large egg in a bowl. Set aside until needed.
- Place 1 portion of meat between 2 sheets of clingfilm and press to flatten until about 1 cm thick. Place a boiled egg in the centre and mould mince around egg to enclose, ensuring there are no cracks. Repeat with remaining mince and eggs.
- Place each coated egg in a layer of flour (tapping off any excess), then roll in the egg, and lastly in the breadcrumbs.
- Fill a saucepan with lard and heat over medium heat to 170C/340F. Gently drop two eggs into the hot lard and fry, turning halfway, for 4-6 minutes or until crisp and golden.
- Remove with a slotted spoon and drain on paper towel. Repeat with the remaining two eggs. Enjoy hot on a bed of salad and mustard sauce or serve at room temperature.

© 2021 | http://angiesrecipes.blogspot.com
 |
 |

© 2021 | http://angiesrecipes.blogspot.com

© 2021 | http://angiesrecipes.blogspot.com
Hot Cross Bread
 © 2021 | http://angiesrecipes.blogspot.com
 |
 |
 © 2021 | http://angiesrecipes.blogspot.com
Easter is almost upon us, and nothing says Easter better than the taste of hot cross buns with the traditional flavours of dried fruit and mixed spices fresh from the oven. Plus the scent of freshly baked bread wafting from the oven is just heavenly. Sweetened with coconut sugar and a maple syrup glaze, this giant spiced holiday bun studded with fruit won't last long, but any leftover bread can be served toasted the next day.
| Bread | Cross Paste & Glaze |
|---|---|
|
|
- Heat the milk in a saucepan over medium heat until lukewarm. Combine1 teaspoon of coconut sugar, yeast and 100 g flour with the warm milk in a bowl, stirring until smooth. Cover with a clean tea towel and leave in a warm place for 25 minutes or until bubbles form on the surface.
- In a large bowl, sift together the spices, remaining 300 g flour and salt. Stir in the coconut sugar and dried fruit, then add the yeast mixture, cooled melted butter and egg. Mix to form a soft dough. Turn out onto a lightly floured surface. Knead dough for about 10 minutes or until smooth and elastic. Or transfer to the mixing bowl of your stand mixer with a hook attached and knead until you have a smoth dough.
- Grease a 18cm springform cake pan. Shape the dough into a round and place in the prepared springform pan. Cover with a clean tea towel and leave to rise in a warm place for 1 hour 30 minutes. The dough should rise to just above the rim of the pan.
- Preheat the oven to 200C/400F. For the cross decoration, combine the bread flour with cold water in a bowl, mixing until you have a smooth paste. Transfer the mixture to a small plastic bag, pushing into a corner, then snip off corner and pipe a cross on top of the bun.
- Place the pan in the oven and bake for 35 to 40 minutes until golden and cooked through. Brush the top with maple syrup. Cool slightly in the pan before turning out onto a wire rack. Serve warm with butter.

© 2021 | http://angiesrecipes.blogspot.com
 |
 |

© 2021 | http://angiesrecipes.blogspot.com
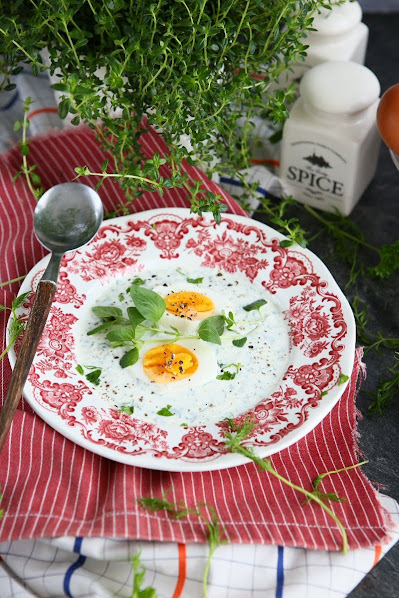
Eggs with Herb Sour Cream Sauce
 © 2021 | http://angiesrecipes.blogspot.com
 |
 |
 © 2021 | http://angiesrecipes.blogspot.com
This is a very quick and easy vegetarian dish, originated in Frankfurt Germany, that you’ll enjoy with your friends and family. The sauce is usually made of seven different kinds of herbs: borage, chervil, cress, parsley, salad burnet, sorrel and chives. I couldn't find some of them, so I just use a mixture of parsley, chervil and chives. You can also include dill, lemon balm, and tarragon.
Traditionally it's served with cold hard-boiled eggs and boiled (or baked) potatoes during the spring and summer seasons when the many herbs required by the recipe are found in abundance.
Eggs with Herb Sauce - Eier mit grüner Kräutersauce
adapted from Küchen Götter
|
- Wash and clean all the herbs. Spread them out on a dry towel or kitchen paper. Gently pat off water. Finely chop all the herbs.
- In a large bowl, add in yoghurt, sour cream, and mustard. Stir until combined and smooth. Stir in chopped herbs and season with salt and black pepper. Cover and refrigerate at least 30 more minutes.
- Meanwhile bring a saucepan of water to a boil over medium-high heat. Using a slotted spoon, carefully lower eggs into water one at a time. Cook 6 minues, maintaining a gentle boil. Immediately transfer eggs with a slotted spoon to a bowl of ice water and stir until cool enough to handle. Drain, pat dry, and peel eggs.
- Spoon the sauce onto plates. Slice the eggs in half lengthwise and arrange them on the sauce. Garnish with fresh herbs.

© 2021 | http://angiesrecipes.blogspot.com

© 2021 | http://angiesrecipes.blogspot.com
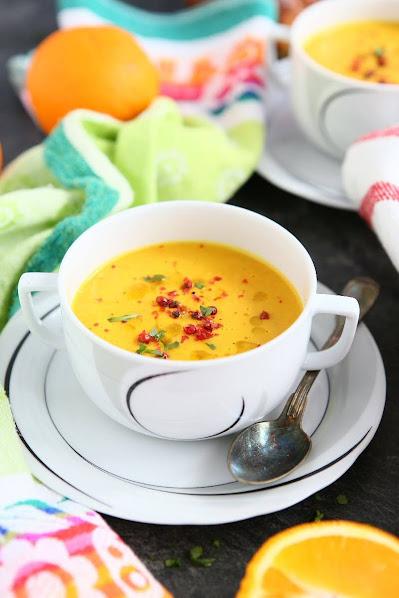
Fruity Carrot Soup
 © 2021 | http://angiesrecipes.blogspot.com
 |
 |
 © 2021 | http://angiesrecipes.blogspot.com
Keep the family warm, healthy and happy with this creamy fruity carrot soup topped with chopped parsley and pink peppercorns. Adding fresh orange juice to the soup to bring out the sweetness of carrots. I also added some white beans because they make the soup even creamier and richer when blended! Next time I will for sure add a few pinches of chilli flakes for some extra heat.
|
- Heat a large saucepan over medium heat. Add in olive oil. Cook chopped carrots and sliced garlic, stirring often, for 5 minutes or until just soft.
- Add in white beans, grated ginger, and curry powder. Stir briefly. Pour in broth and freshly squeezed orange juice. Reduce heat to medium-low. Simmer for 20 minutes or until carrot is tender.
- Use a stick blender to puree until smooth. Stir in crème fraîche and season with salt and cayenne pepper.
- Ladle into serving bowls, then scatter with chopped parsley and pink peppercorns if using. Drizzle with a little olive oil and serve immediately.

© 2021 | http://angiesrecipes.blogspot.com
 |
 |

© 2021 | http://angiesrecipes.blogspot.com