Featured Recipe

Arabic Style Baked Chicken With Dried Plums and Herbs
 http://schneiderchen.de | © 2013 | http://angiesrecipes.blogspot.com
 |
 |
The Arabic cuisine is mainly a combination of Mediterranean, Middle Eastern, and Indian food. It has been affected by the mingling of Arab and non-Arabs over the centuries.
Sumac is an essential ingredient and adds a tangy, lemony taste to the dishes. The dried plums are a popular cooking ingredient and impart a sweet and sour flavour. Serve the baked chicken breast with a side of couscous or steamed Basmati rice.
Arabic Style Baked Chicken With Dried Plums and Herbs
adapted from Eat Smarter
|
- Rinse and dry the chicken breast. Season the chicken breast well with salt, pepper, sumac and paprika powder. Cover and place in the refrigerator to marinate for at least one hour.
- Peel, and cut the onion into wedges. Slice each tomato into 4 wedges. Rinse the lemon clean with hot water. Finely grate the lemon zest and squeeze the juice.
- Wash, dry the chives, thyme and parsley. Cut the chives into rings and finely chop the parsley and thyme leaves. Cut the dried plums into smaller pieces. Preheat the oven to 180C/350F.
- Heat the oil in a large skillet. Add in chicken breast and sear until golden on both sides. In a baking dish, add in tomatoes, onions wedges, thyme, chives, half of the parsley, dried plums, lemon juice, zest and chicken broth. Place the pan-seared chicken breast fillets on top. Season with salt, pepper and paprika powder. Cover the baking dish with a piece of aluminum foil.
- Bake the chicken in the middle of the hot oven for about 40 minutes. Remove the aluminum foil after 30 minutes and continue to roast the chicken until done. Sprinkle the rest of parsley over and serve.

http://schneiderchen.de | © 2013 | http://angiesrecipes.blogspot.com
 |
 |
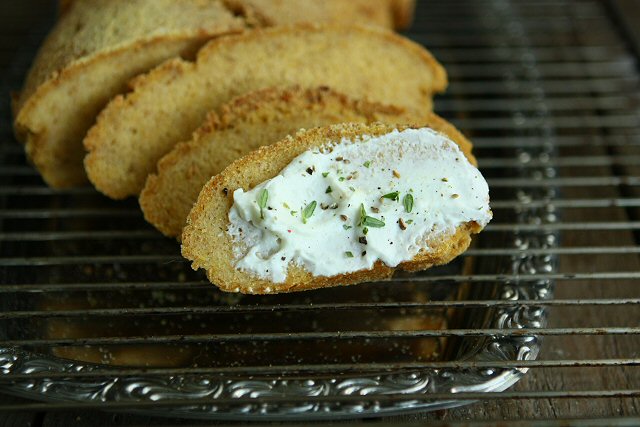
Black Olive Sesame Spelt Bread
 http://schneiderchen.de | © 2013 | http://angiesrecipes.blogspot.com
 http://schneiderchen.de | © 2013 | http://angiesrecipes.blogspot.com
 |
 |
This is one of my favourite bread recipes from Dan Lepard, via Guardian. It is studded generously with black olives and coated with a mix of sesame seeds, oregano, thyme, sumac, and lemon zest. Since the spelt flour (I used bread spelt flour here) is more “water soluble” than wheat, therefore, using the same amount of liquid will result in a more sticky dough. Thus, if you plan to use wheat flour, then you need 250ml of liquid that the original recipe calls for, instead of 220ml that I used for this spelt version.
|
- Strain the olives, then measure the liquid and top up with warm water to make 210ml. Put the strained olives and the liquid into a bowl, then stir in the yeast, sugar and 50g of sesame seeds. Add the spelt bread flour, mix to a soft, sticky dough, cover and leave for 10 minutes.
- Turn out the dough on a lightly oiled work surface, then give the dough a short, 10-second knead. Return the dough to the bowl, cover and leave for 10 minutes more. Repeat this quick knead twice more at 10-minute intervals, then leave the dough, covered, for 90 minutes.
- Meanwhile, line the base of a tray with nonstick baking paper, grind the herbs as fine as you can, then tip on to a large dinner plate and mix with a tablespoon of sesame seeds, the sumac (if using) and lemon zest. On another plate, have ready a wet square of kitchen towel.
- Pat the dough into a rectangle on a clean worktop dusted with a little flour, then roll it up tightly into a snug scroll, making sure all the olives are tucked in. Next, tightly roll the ends of the loaf, so they pinch in and the loaf has a shape a bit like a lemon. Roll the loaf on the wet towel, then roll it in the herb and spice mix.
- Place on the tray seam-side down, cover and leave to rise for 90 minutes. Slash the top and bake at 220C/425F for about 40 minutes until golden brown and crisp.

http://schneiderchen.de | © 2013 | http://angiesrecipes.blogspot.com

http://schneiderchen.de | © 2013 | http://angiesrecipes.blogspot.com

http://schneiderchen.de | © 2013 | http://angiesrecipes.blogspot.com

http://schneiderchen.de | © 2013 | http://angiesrecipes.blogspot.com
 |
 |
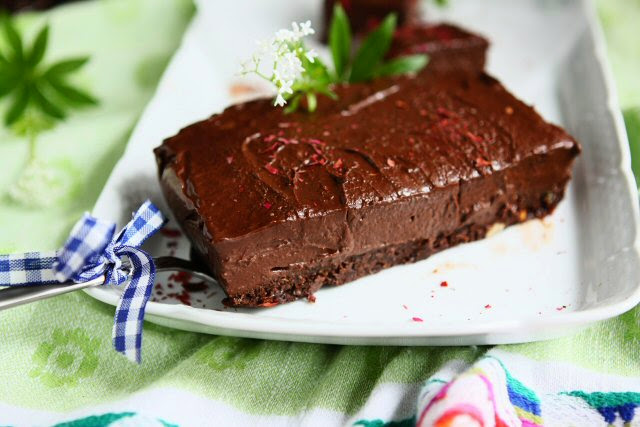
Vegan Gluten Free Fudge Brownies
 http://schneiderchen.de | © 2013 | http://angiesrecipes.blogspot.com
 |
 |
These fudge brownies are gluten-free, vegan, rich yet truly healthy, free from all processed ingredients. A delicious combination of fudge brownie with nuts, honey and fruit. Delicious desserts are unnecessary fatty, sugary and calorie intensive.
Vegan Gluten Free Fudge Brownies
adapted from Fitsugar| Crust | Topping |
|---|---|
|
|
- Mix together all crust ingredients in a food processor until well blended.
- Press it into a loaf pan lined with tin foil or plastic wrap until evenly distributed and set in the fridge while preparing the topping.
- Place all the ingredients for the topping in a food processor and process until well blended. Spread topping onto the crust layer base until evenly distributed. Place in the freezer for at least 30 minutes. Cut into 16 squares. Serve and refreeze the rest.
http://schneiderchen.de | © 2013 | http://angiesrecipes.blogspot.com
 |
 |

http://schneiderchen.de | © 2013 | http://angiesrecipes.blogspot.com
Roasted Cauliflower with Parsley Sauce
 http://schneiderchen.de | © 2013 | http://angiesrecipes.blogspot.com
 |
 |
Thick "steaks" are cut from a head of cauliflower, simply seasoned and drizzled with olive oil, then baked until tender. They are served with a very simple parsley sauce, which can be prepared up to 3 days in advance. This way of preparing cauliflower is very simple and wonderfully delicious!
| Parsley Sauce | |
|---|---|
|
|
- Preheat oven 200C/400F degrees. Drizzle a large baking sheet with 1 tablespoon of olive oil.
- Wash the cauliflower and remove the tough outer leaves of the cauliflower and discard. Cut cauliflower vertically into 1/4-inch-thick slices. Arrange in a single layer on prepared pan. Drizzle cauliflower with remaining tablespoon of olive oil. Sprinkle with salt and pepper. Bake for 30 minutes or until golden brown.
- While the cauliflowers are roasting, combine all of the ingredients except the olive oil for the green sauce in a blender and process into a smooth sauce. With the motor running, open lid and slowly drizzle in olive oil. Serve with roasted cauliflowers.

http://schneiderchen.de | © 2013 | http://angiesrecipes.blogspot.com
 |
 |
Coconut Cream White Chocolate Mousse
 http://schneiderchen.de | © 2013 | http://angiesrecipes.blogspot.com
 |
 |
 |
 |
A delightful combination of rich white chocolate and silky coconut cream, with a complimentary raspberry sauce in one creamy and luscious sweet treat.
Coconut Cream White Chocolate Mousse
adapted from nigella| Raspberry Sauce | Mousse |
|---|---|
|
|
- Defrost the unsweetened frozen raspberries in the microwave. Once the berries have completely thawed, force the juice from the berries by gently pressing the berries with the back of a spoon. Throw away the seeds and, to the strained juice, stir in the honey until combined. Serve or store in an airtight container, refrigerated, for up to 5 days.
- Put the can of coconut milk in the refrigerator for several hours (or overnight). Scrap off the solid top layer of creamy coconut, careful not to include any of the liquid on the bottom of the can. The coconut water can be used in making the smoothie or baking bread.
- Whip the coconut cream with an electric mixer until it has the airy texture of whipped cream, about 5 minutes. Chill, covered, the whipped coconut cream in the fridge and go ahead to prepare the white chocolate.
- Melt the white chocolate in a heatproof bowl over a saucepan of simmering water. Remove from heat.
- Whip the egg whites and lemon juice until stiff peaks form, then fold into the chocolate mixture, in 2 batches, until well combined. Remove the whipped coconut cream from the fridge and fold into the chocolate mixture.
- Divide into 4 glasses and refrigerate for 4 hours or overnight until just set. Serve topped with raspberry sauce.

http://schneiderchen.de | © 2013 | http://angiesrecipes.blogspot.com
 |
 |

http://schneiderchen.de | © 2013 | http://angiesrecipes.blogspot.com
Gluten Free Polenta Bread with Psyllium Husks and Yoghurt
 http://schneiderchen.de | © 2013 | http://angiesrecipes.blogspot.com
 |
 |

http://schneiderchen.de | © 2013 | http://angiesrecipes.blogspot.com
 http://schneiderchen.de | © 2013 | http://angiesrecipes.blogspot.com
Due to the lack of gluten, the gluten free breads usually have a heavier, solider consistency and smaller volume compared to the standard wheat bread. Gluten, or protein, in the bread, helps the standard bread to rise and makes them soft and flexible. Psyllium husk, derived from the outer coating of the psyllium seed, is a complete natural fiber and does not contain any additives or preservatives. It is a top herb used in weight control and for general intestinal health. Psyllium is sold as whole husks and powder. Get the whole psyllium husks if have access to them. I have used finely ground polenta flour in this recipe, but other gluten free flours (teff, rice, or sorghum) will work fine too.
Gluten Free Polenta Bread with Psyllium Husks and Yoghurt
adapted from here
|
- In a mixing bowl, mix the lukewarm water, honey and fresh yeast. Let sit for 5 minutes to activate the yeast. Whisk the yoghurt, 50ml olive oil, crushed flaxseed and psyllium husks into the yeast mixture. Let stand for 2 minutes to let the flaxseed and psyllium release their gelatinous substances.
- Toss together the polenta flour and salt in another mixing bowl. Pour the wet ingredients into the dry and mix together with a large wooden spoon until thick. Then knead the dough on a worktop to mix everything until incorporated. Return the dough to the bowl, cover and moist towel and leave for 30-45 minutes.
- Line a baking tray with baking paper. Form the dough into an oval shape, that is approximately the length of the pan, then brush with extra olive oil, cover and leave to rise for 45 minutes.
- Heat the oven to 240C/465F, uncover the dough and slash the top with a small sharp knife, sprinkle with a little polenta to give it a floured look and bake for about 40 minutes, or until golden-brown in colour. Leave to cool on a wire rack before slicing.
 |
 |

http://schneiderchen.de | © 2013 | http://angiesrecipes.blogspot.com

http://schneiderchen.de | © 2013 | http://angiesrecipes.blogspot.com
Five Grain Spelt Bread with Grapeseed Flour and Malt Extract
 http://schneiderchen.de | © 2013 | http://angiesrecipes.blogspot.com
 |
 |
 http://schneiderchen.de | © 2013 | http://angiesrecipes.blogspot.com
This nutritiously delicious homemade bread with perfectly moist crumb and lightly chewy crust, made with soaked 5 grains, grape seed flour, and spelt bread flour along with liquid barley malt extract, which adds so much more flavour and complexity to the taste. Grape seed flour, naturally high in protein, and OPC (one of the most potent antioxidants known — 50 times as powerful as vitamin E), is known for its great taste and can be added to almost every meal.
Five Grain Spelt Bread with Grapeseed Flour and Malt Extract
adapted from Brot-Bernd Armbrust
©angiesrecipes
|
- Pour the boiling water over crushed 5-grain mix in a large bowl. Cover and let it swell for at least 4 hours or overnight until the water has been all absorbed.
- Dissolve the fresh yeast and malt extract in the lukewarm water. Add in spelt bread flour, grape seed flour and salt. Stir for 2 minutes until combined. Now add in the soaked 5-grain mixture. Stir at low speed for 3 minutes, then increase the speed and knead for a further 5 minutes.
- Transfer the dough ono a floured work surface. Fold the dough a few times and shape into a round. Cover the dough with a kitchen towel and rest for 25 minutes. Do a stretch-and-fold every 15 minutes. Line two loaf pans with baking paper.
Divide the dough into two portions and form each into a log. Place each into a loaf pan. Brush the tops with water and sprinkle with pumpkin seeds. Cover with kitchen towel and proof for 30 minutes. - At the same time, preheat the oven to 220C/410F with a shallow tray filled with water sitting at the bottom of the oven. Once the oven has reached the desired temperature, remove the tray filled with water and bake the loaves in the center of the hot oven for about 50 minutes.

http://schneiderchen.de | © 2013 | http://angiesrecipes.blogspot.com
 |
 |

http://schneiderchen.de | © 2013 | http://angiesrecipes.blogspot.com

http://schneiderchen.de | © 2013 | http://angiesrecipes.blogspot.com