Featured Recipe

Crispy Greek Chicken with Pumpkin Puree
 © 2021 | http://angiesrecipes.blogspot.com
 |
 |
 © 2021 | http://angiesrecipes.blogspot.com
This is truly one of the great ways to cook chicken – the golden brown colour and crispiness of the chicken skin is just irresistible. I have used Greek gyros spice mix to marinate the chicken, but you can use any of your favourite spice blend. Any root vegetable puree is great with chicken--celeriac, sweet potato or parsnip, just experiement and enjoy!
| Pumpkin Puree | |
|---|---|
|
|
- For the pumpkin puree, place the diced butternut in a saucepan and add cold water until it sits just below the top of the pumpkin. Add in half of the sea salt and simmer until soft, about 20 minutes. Drain any remaining water and set aside.
- Meanwhile, heat 30 g of butter in a heavy-based saucepan over low heat. Add the onion and the remaining sea salt and saute until the onion is very soft, about 5 minutes. Add in the drained butternut pumpkin and cook for a further 2 minutes. Reserve some for the garnish if desired. Puree the rest in a food processor or blender. Stir in the remaining butter until completely melted. Taste and season with salt and pepper.
- For the chicken, remove them from the refrigerator 1-hour before cooking. Season the chicken drumsticks with Gyros spice.
- Heat the olive oil and the butter in a heavy-based skillet over a medium-high heat. Add the chicken drumsticks, skin side down, and cook for 5 minutes, or until the skin is nice and brown. Turn the chicken pieces over. Cover and reduce the heat to low and cook for 15 more minutes.
- To serve, spoon the pumpkin puree onto serving plates, top with crispy chicken, chopped parsley and reserved pumpkin dices.

© 2021 | http://angiesrecipes.blogspot.com

© 2021 | http://angiesrecipes.blogspot.com
Arugula White Bean Salad with Grapes and Feta
 © 2021 | http://angiesrecipes.blogspot.com
 |
 |
 © 2021 | http://angiesrecipes.blogspot.com
This is basically a clean-out-fridge salad. Just throw whatever you have in the fridge or pantry in the bowl, toss it altogether and enjoy. This recipe is flexible enough that you can make ingredient changes based on what you have on hand. It is a healthy, quick, easy and full of delicious pesto flavour. And honestly, it's one of the favourites, plus that it uses up those bits and pieces from my over crowded fridge and reduce food waste.
| Arugula Pesto | Salad |
|---|---|
|
|
- In a food processor, combine the walnuts, garlic, arugula, Parmesan, and salt and pulse to blend. With the machine running, pour in the olive oil through the food tube in a slow, steady stream and process until smooth, stopping to scrape down the sides of the bowl as needed. Taste and adjust the seasonings.
- Divide arugula, white beans, and quartered tomatoes onto two serving plates. Top with grapes and Feta. Generously drizzle the pesto over. Gently toss together and enjoy!

© 2021 | http://angiesrecipes.blogspot.com

© 2021 | http://angiesrecipes.blogspot.com
Pepita Bundt Cake with Spelt and Buckwheat
 © 2021 | http://angiesrecipes.blogspot.com
 |
 |
 © 2021 | http://angiesrecipes.blogspot.com
 © 2021 | http://angiesrecipes.blogspot.com
A pepita, which gets its name from the Spanish word for "little seed of squash" is harvested from specific hulless pumpkin variety, known as Styrian pumpkin, which was developed in the province of Styria in Austria. Any other variety of pumpkin produces a hulled seed that’s slightly fibrous and less tender. Both pumpkin seeds and pepitas are packed with a ton of nutrients. Pepitas are a good source of healthy fats and make for a tasty snack.
You can always substitute pepitas for pumpkin seeds, but it’s best to only substitute pumpkin seeds for recipes that call for pepitas as a garnish. So you wouldn’t want to use regular pumpkin seeds to make this cake or pepita pesto recipe, but when it comes to using them as a garnish for the soup Feel free to swap away.
|
- Thoroughly grease a standard-size bundt cake pan with lard or butter. Then take a spoonful of flour and lightly dust the greased pan. Shake off any excess flour. Set aside. Preheat the oven to 180C/350F.
- Beat egg yolks and powdered sugar in a mixing bowl until light and fluffy. Add in pumpkin seed oil, sparkling water and salt. Continue to whip until combined.
- Whisk the spelt, buckwhweat, baking powder and pepitas together. Add the mixture into the egg yolk mixture. Fold to combine.
- Beat the egg white until the glossy stiff peaks form. Add the egg whites to the batter and fold to combine. Spread the batter to the prepared pan and smooth the surface.
- Bake in the middle of the hot oven for about 50-60 minutes until a skewer inserted into centre comes out clean.
- Cool in the pan for 5 minutes and turn out on a wire rack to cool completely. Dust with powdered sugar if desired.

© 2021 | http://angiesrecipes.blogspot.com

© 2021 | http://angiesrecipes.blogspot.com

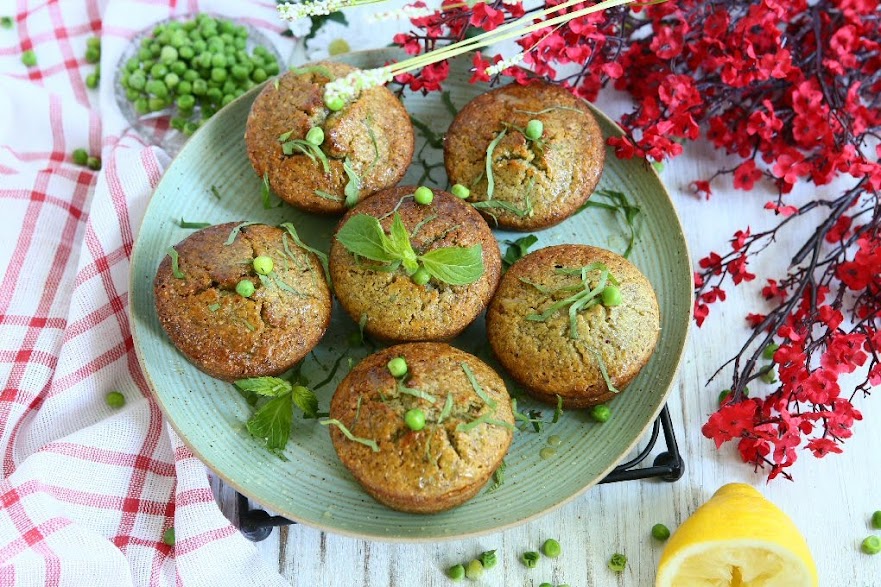
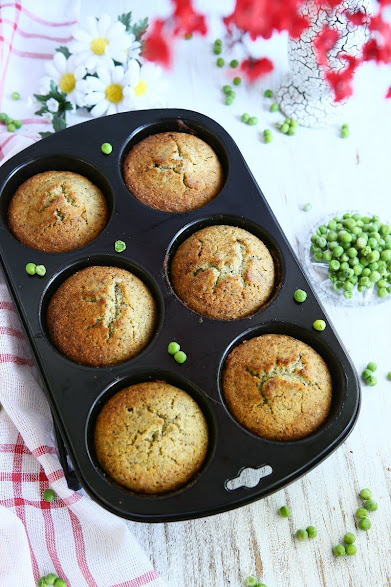
Pea and Hazelnut Friands
 © 2021 | http://angiesrecipes.blogspot.com
 |
 |
 © 2021 | http://angiesrecipes.blogspot.com
These friands are easy to make, delicate, delicious and make a perfect afternoon treat with friends. A friand is a small tea cake, similar to the French financier, that are traditionally made with almonds only and browned butter, while friands made with just melted butter and can be flavoured with fruits, and other ingredients. If you don't have oval friand baking pan, by all means use the regular muffin pan.
You can't really see the green colour in those friands as I used ground hazelnuts. Try almond meal from skinless, blanched almonds if you want green colour from the garden peas to stand out. Lemon syrup can be made a week ahead and stored in a jar in the fridge.
| Friands | Lemon Honey Syrup |
|---|---|
|
|
- In a small saucepan, combine the honey, lemon juice and water. Cook over medium heat stirring occasionally until boiling. Continue to boil until the mixture is reduced to a third. Cool.
- Cook peas in a small saucepan of boiling water for 1 minute or until they rise to the surface. Drain immediately. Refresh with cold water and drain again. Blend until smooth.
- Beat egg whites in a large bowl until soft peaks form. Fold pea puree through egg whites. Meanwhile, preheat oven to 180C/350F. Grease a jumbo 6-hole muffin pan.
- Sift ground hazelnuts, flour, powdered sugar and salt into a mixing bowl. Fold three-quarters of the dry ingredients into egg white mixture. Add butter and remaining dry ingredients. Stir until just combined (do not over mix). Spoon mixture into pan holes.
- Bake friands for 25-28 minutes or until a skewer inserted into the centre comes out clean and a small cracked mound appears on each friand. Leave friands in pans for 5 minutes before turning, top-side up, onto a wire rack to cool.
- Drizzle the friands with prepared honey lemon syrup. Garnish with some shredded mint leaves.

© 2021 | http://angiesrecipes.blogspot.com
 |
 |

© 2021 | http://angiesrecipes.blogspot.com
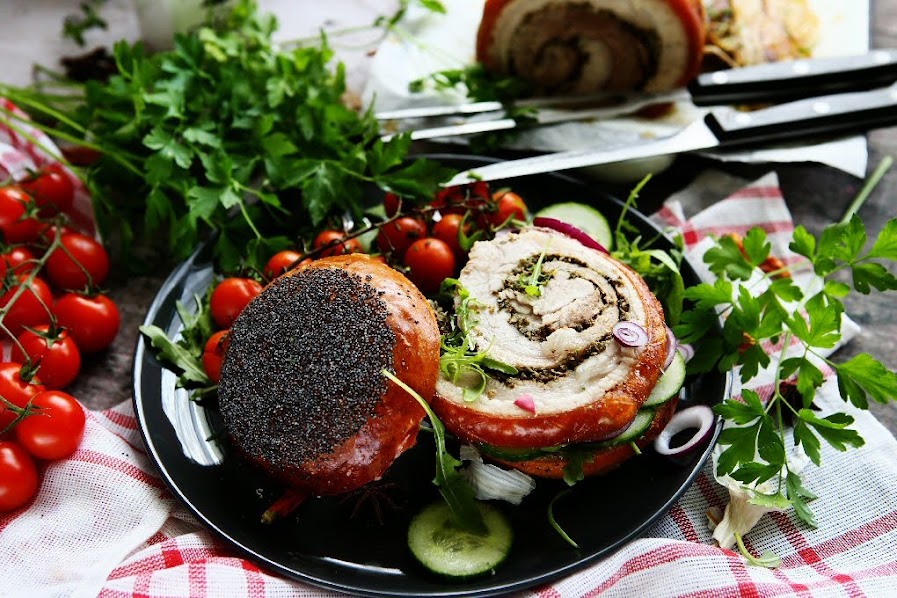
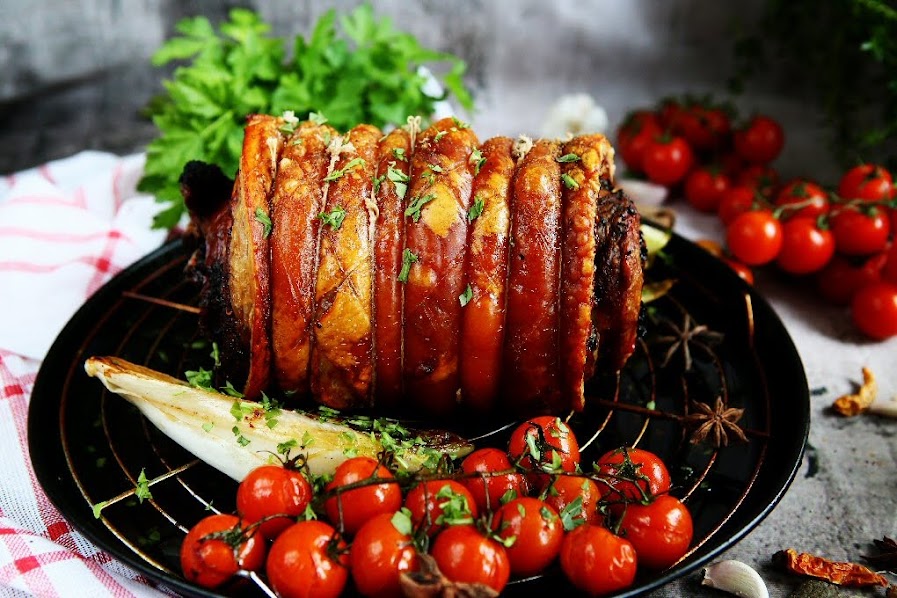
Asian Inspired Porchetta
 © 2021 | http://angiesrecipes.blogspot.com
 |
 |
 © 2021 | http://angiesrecipes.blogspot.com
 © 2021 | http://angiesrecipes.blogspot.com
 © 2021 | http://angiesrecipes.blogspot.com
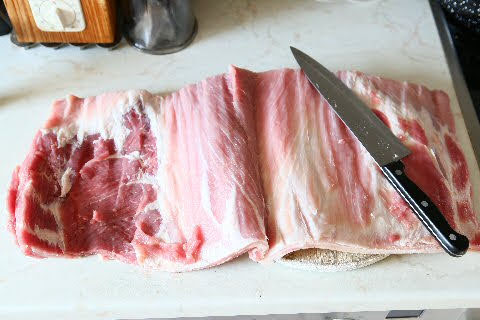
Porchetta is an Italian classic but I turned it Asian by giving it a twist replacing fennel rosemary with a mixture of Sichuan peppercorns, cilantro/coriander, star anise, garlic, cumin, chilli and cinnamon and serving it with some roasted vegetables flavoured with the drippings, and if desired, some sambal sauce. It's rich, fatty, juicy, herby, aromatic with crunchy pork cracklings that I can't get enough. (imagine an audible crackling sound when you bite into it!!! Just heavenly). I would have added lemongrass to the spice paste if I had it. Again I didn't use pork loin for the stuffing. Instead of just rolling up some belly, which works great, I scored the skin then butterfly it (using a very sharp knife to separating the meaty side from the skin and opening it like a book) and roll it up. This technique gives you more flavour and much easier to shape the porchetta.
This recipe is good for 4 persons with some leftover, that make the most delicious sandwiches.
| Spice Herb Paste | |
|---|---|
|
|
 |
 |
 |
 |
 |
 |
 |
 |
- Pat the pork belly dry with paper towel. Use a sharp knife to score the skin in a crosshatch checkerboard pattern, cutting just into the fat layer at 1cm intervals. Generously season pork rind with salt, rubbing salt into score marks.
- Place the pork belly on a cutting board with scored skin side down. Hold a really sharp knife parallel to the cutting board and place the blade halfway up the belly. Draw the blade along the edge carefully and gently start splitting the belly in half making it half as thick, leaving one end attached. So now you have one single rectangular piece.
- To make the spice-herb paste, combine all the ingredients in a food processor and process until smooth.
- Spread the paste evenly over the pork belly. Gently roll up the pork into a log and tie it firmly with kitchen string at 3cm intervals to secure. Transfer to a large roasting pan and place in the fridge, uncovered, overnight to dry out the skin. You can also place the pork on a wire rack set on a baking tray if you don't have a roasting pan.
- Remove the pork from the fridge about two hours before cooking to allow it to come to room temperature. Preheat oven to 210C/410F fan forced.
- Pat the pork skin dry with paper towel. Roast for 30 minutes or until the skin starts to crackle. Reduce oven to 150C/300F fan forced. Roast for a further 1 hour 30 minutes until cooked through. Add tomatoes and endive halves next to the pork at the last 15 minutes and brush with the drippings. Remove from the oven and allow to rest for 20 minutes before slicing.
© 2021 | http://angiesrecipes.blogspot.com
 © 2021 | http://angiesrecipes.blogspot.com
 |
 |

© 2021 | http://angiesrecipes.blogspot.com

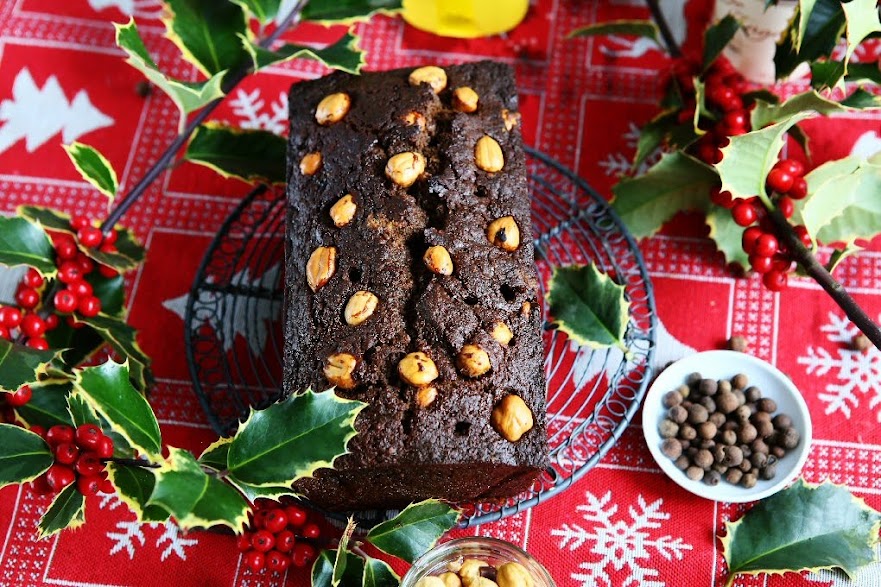
Quick Gingerbread Loaf with Hazelnuts
 © 2021 | http://angiesrecipes.blogspot.com
 |
 |
 © 2021 | http://angiesrecipes.blogspot.com
 © 2021 | http://angiesrecipes.blogspot.com
A nutty version of the classic gingerbread that's wonderfully moist and full of flavour. It's spiced with ground ginger and allspice and sweetened with raw sugar and molasses. The earthy toasted hazelnuts complement this tender, robustly flavoured gingerbread perfectly. The use of molasses adds real depth of flavour and creates a slightly sticky exterior that's just irresistible. Enjoy on its own or with custard or a dollop of sweetened whipped cream. You can also take this holiday cake up a notch with this 6-Week Long Maturing Spelt Gingerbread Loaf if you could plan ahead and so you're not trying to do it all at the last minute!
|
- Preheat the oven to 180C/350F. Grease and flour a 20x10cm loaf pan or line the pan with parchment paper.
- In a small saucepan, combine the butter, raw sugar, molasses, and milk. Bring to the boil, then remove from heat and set aside.
- Sieve the flour, ground hazelnuts, ginger, allspice and baking soda into a large bowl. Stir in the boiled mixture until just blended. Fold the roasted hazelnuts into the batter and pour into the prepared pan.
- Turn down the oven to 160C/320F and bake for about 70 minutes or until the top of the loaf springs back when lightly touched and a wooden pick inserted in center comes out clean. Cool in pan on a wire rack.

© 2021 | http://angiesrecipes.blogspot.com
© 2021 | http://angiesrecipes.blogspot.com
 |
 |