
Chicharrones Colombian Fried Pork Belly
 © 2021 | http://angiesrecipes.blogspot.com
 |
 |
 © 2021 | http://angiesrecipes.blogspot.com
Chicharrones are skin-on pork belly, sliced and fried until the skins are blistered and crisp. For this heavenly Colombian styled pork belly I first slow-cooked the meat in water with bay leaf, black peppercorns, star anise and Szechuan peppercorns for 3 hours until very tender, then dry them over night before frying them in the lard until a crackling top and tender, succulent meat are achieved. The best pork belly that I have ever had. I have tried air-frying, oven-roasting, and broiling, but nothing came out as good as frying in lard. If you don't have a slow cooker, then do it on the stovetop with a large saucepan or in your instant pot for 45 minutes.
|
 |
 |
 |
- Combine the pork belly, bay leaves, black peppercorns, star anise, Szechuan peppercorns and salt in the slow cooker. Cover with water and leave on high for 3 hours until pork belly slices are tender.
- Remove the pork belly from the slower cooker and set on a wire rack. Poke holes on the skin using a toothpick or a fork. Leave to cool to room temperature, then chill, uncovered, in the fridge overnight.
- Remove from the fridge and rub the pork belly generously with salt. Melt lard in a large saucepan over medium-low heat.
- Add in dried pork belly slices into the oil and deep fry until evenly golden, about 25 minutes. Turn off the heat and remove the pork belly. Place pork on a wire rack to cool to room-temperature, about an hour.
- Heat the lard over high heat. Return the cooled pork belly slices into the saucepan and deep fry for 5 minutes until crispy and golden brown.

© 2021 | http://angiesrecipes.blogspot.com

© 2021 | http://angiesrecipes.blogspot.com

© 2021 | http://angiesrecipes.blogspot.com
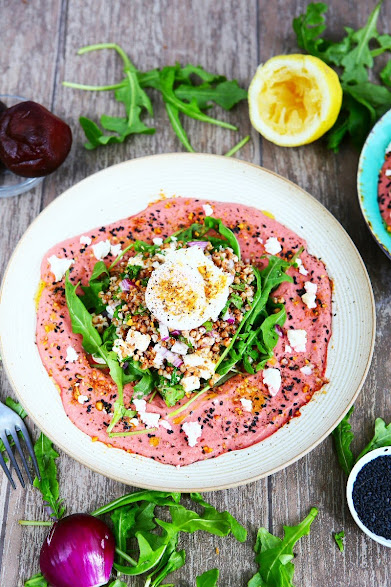
Beetroot Borani with Buckwheat and Feta
 © 2021 | http://angiesrecipes.blogspot.com
 |
 |
 © 2021 | http://angiesrecipes.blogspot.com
Borani, a common and popular Persian yoghurt dip, can be made from almost any vegetables you like, from eggplant, spinach, butternut squash, carrot to beet. I have a bag of cooked organic beets sitting in the back of the cupboard begging to be used, hence this beet borani. Use fresh beets, red or golden, if have them, just cook beets (steam or roast), and then blend with yoghurt, lemon juice and garlic in a food processor until creamy. Easy, quick and delicious. I paired it with a simple buckwheat salad with Feta topped with a poached egg, but you can use couscous or bulgur instead, or enjoy the dip with flatbread.
|
- Cook the buckwheat following pack instructions, then transfer into a mixing bowl and add 1 tablespoon of olive oil and the juice of half a lemon. Season and mix well. Add the mixed leaves, cubed Feta and diced red onion. Roughly toss together.
- Place the beetroot into a blender or food processor with the yoghurt, juice of half a lemon, garlic and a good pinch of salt and pepper. Blend until smooth.
- Add the ACV to a pan of simmering water. Swirl the water around with a spoon and crack an egg into the centre. Poach for 3-4 minutes. Remove with a slotted spoon and leave to drain on kitchen paper on a warm plate. Repeat with the remaining eggs.
- To serve, spoon some beetroot borani into 3 serving plates and divide the buckwheat among the plates. Top with a poached egg. Scatter the black sesame seeds and dukkah over. Serve immediately.

© 2021 | http://angiesrecipes.blogspot.com

© 2021 | http://angiesrecipes.blogspot.com
Tomato Egg Salad with Parsley Pepita Pesto
 © 2021 | http://angiesrecipes.blogspot.com
 |
 |
 © 2021 | http://angiesrecipes.blogspot.com
An easy, low-calorie and protein rich recipe that works as a starter or light lunch. It's great to serve the family on a lazy weekend. With just a few simple ingredients, you can make this salad in minutes! A delicious parsley and radish top pesto dressing brings sweet ripe cherry tomatoes and hard-boiled eggs perfectly together. Homemade pesto is for sure fresher and more tasty than store-bought varieties, but if you are short on time, it's perfectly fine to use a good store-bought one.
| Parsley Pepita Pesto | |
|---|---|
|
|
- Place eggs in a saucepan. Cover with cold water. Bring to boil. Reduce heat to low. Simmer for 7 minutes for hard boiled eggs. Drain and refresh under cold running water. Carefully peel and quarter eggs. Season with salt and pepper.
- Wash and dry the cherry tomatoes. Cut them in half and season with salt and pepper.
- Rinse and dry the parsley and radish greens. Roughly chop the herbs and garlic cloves. Place them in a food processor together with pepitas. Pulse a few times to roughly chop the seeds. You don't want it pureed completely. Transfer the mixture into a bowl, season and stir in olive oil. You can also use a mortar and pestle to pound the chopped ingredients into a chunky sauce.
- Divide the tomatoes and eggs on two serving plates. Spoon some pesto over. Enjoy!

© 2021 | http://angiesrecipes.blogspot.com

© 2021 | http://angiesrecipes.blogspot.com
Honey Pain de Mie
 © 2021 | http://angiesrecipes.blogspot.com
 |
 |
 © 2021 | http://angiesrecipes.blogspot.com
 © 2021 | http://angiesrecipes.blogspot.com
The bread’s tender soft texture and subtle sweetness come from duck fat and honey. Pullman bread, or Pain de mie is a type of French sandwich bread traditionally baked in a Pullman loaf pan, which gives it a uniformly rectangular shape. Pain de mie, “bread of crumb” in French, is a fluffy white bread with a tight crumb and very thin crust. If you don't have a pullman loaf pan, which usually features a lid, you can also place a baking sheet over the loaf pan.
|
- Place all the ingredients, following liquids-first-then-dry method, into the pan of a bread machine and snap the bread pan into place. Set on the dough cycle. When the program is done, it should form a a nice elastic and smooth ball. If the dough is too moist, add flour, a tablespoon at a time. The same is true if the dough is looking dry and gnarly. Add warm water, a tablespoon at a time.
- Turn out the dough and shape into a ball. Place in a lightly greased bowl, cover the bowl and allow the dough to rise until puffy though not necessarily doubled in bulk, about 1- 1 1/2 hours, depending on the warmth of your kitchen. I usually leave the bowl, covered with a plastic film, in the oven with the light on.
- Lightly grease a 30x11x8cm pullman pan with butter. Gently deflate the dough, transfer it to a lightly greased work surface, shape it into a 28cm log, and fit it into the pan. Cover the pan with lightly greased plastic wrap, and allow the dough to rise until it's just below the lip of the pan, 45 minutes to 1 hour.
- Towards the end of the rising time, preheat the oven to 200C/400F. Remove the plastic, and place the cover on the pan. Bake the bread for 35-40 minutes.
- Remove bread from the oven and unmold it onto a large wire rack. Cool it top side up about 1 hour to make for easier slicing.

© 2021 | http://angiesrecipes.blogspot.com
 |
 |

© 2021 | http://angiesrecipes.blogspot.com
Steak Tartare with Anchovy Cornichon Vinaigrette
 © 2021 | http://angiesrecipes.blogspot.com
 |
 |
 © 2021 | http://angiesrecipes.blogspot.com
Steak tartare is a classic French delicacy made from raw premium minced beef. It is usually flavoured and served with onions, capers, and other seasonings and often served with a raw egg yolk on top of the dish. It's completely safe to enjoy beef raw as long as they are fresh. Typically this is a dish that you will enjoy when dining out, but are afraid to prepare at home. But a little courage and top-notch ingredients are all you need to make great beef tartare at home. It's best to get meat directly from a specialized butcher rather than from the supermarket. Keep the meat cold in the fridge until you are ready to prepare it.
The mince-like tenderloin is flavoured with a simple yet divine vinaigrette made with anchovy, caper, cornichon, eschalot, sriracha and Worcestershire sauce. You can also use sirloin, which is more affordable and provides the perfect flavour and texture combination for the tartare.
Spiced Chicken Drumsticks with Coconut Peanut Dip
 © 2021 | http://angiesrecipes.blogspot.com
 |
 |
 © 2021 | http://angiesrecipes.blogspot.com
With a savoury, sweet, citrusy, tangy and a little spicy coconut peanut dip, these well spiced chicken drumsticks are perfect for a budget-friendly TV dinner with some seasonal leafy greens and crispy roasted potatoes. The flavours come out best when the chicken drumsticks remain infused in the marinade for at least 1 hour, but not more than 6 hours as the marinade contains lime juice, which can worsen the texture by making it too dry if sitting too long. Longer is not always better. Stabbing the chicken with a fork allows the marinade to penetrate deep inside of the meat and enhance the flavour.
| Coconut Peanut Dip | |
|---|---|
|
|
- Soak the dried chillie peppers in 3 tbsp of hot water. Set aside for 30 minutes. In a blender, add the soaked chillie peppers with water, ginger, garlic, black pepper powder, cumin powder, cayenne powder, turmeric powder, lime juice and olive oil. Process all the ingredients into a paste.
- Stab each chicken drumstick all over with a fork and place them in a baking pan. Season with salt and rub marinade generously on the surface of the chicken and make sure all the sides are thouroughly coated with the marinade paste. Cover and let marinate for 1 hour.
- Preheat the oven to 200C/400F. Roast the chicken for 35 minutes until golden and cooked through.
- Combine peanut butter, coconut milk, lime juice, zest, ginger, soya sauce, chilli powder, and oils together in a bowl. Top with chopped peanuts and herbs.
- Serve chicken with lime wedges, tomato wedges if using, and prepared coconut peanut dip.

© 2021 | http://angiesrecipes.blogspot.com
 |
 |

© 2021 | http://angiesrecipes.blogspot.com
Beetroot Penne with Parmigiano-Reggiano and Arugula
 © 2021 | http://angiesrecipes.blogspot.com
 |
 |
 © 2021 | http://angiesrecipes.blogspot.com
This fuss-free, low-cost and delicious pasta meal only takes 10 minutes to make, perfect for a simple lunch for any weekday and is guaranteed to be a crowd pleaser. Deep purple-red beet juice is used to transform the plain penne into a vibrant, fun and exciting pasta dish. Use gluten-free pasta if you have a gluten intolerance or other gluten-related disorders.
|
- Cut the beetroot into 1/2cm thick slices, then slice each into 4-5cm long sticks. Set aside.
- Place water and beetroot juice in a medium saucepan and bring the mixture to a boil. Add in pasta and cook, uncovered, over high heat for about 7 minutes. Add in beetroot sticks, and lower the heat to medium, and cook 3 more minutes until the beet juice mixture is almost absorbed and the pasta al dente.
- Wash and dry scallions, then cut into fine rings. Season the pasta with your favourite sea salt and freshly milled black pepper.
- Divide arugula and beet pasta between serving plates. Sprinkle chopped scallions over and top with shaved Parmigiano-Reggiano. Scatter some chopped toasted walnuts over if you desired.

© 2021 | http://angiesrecipes.blogspot.com

© 2021 | http://angiesrecipes.blogspot.com


