
Pineapple, Matcha, and Puffed Teff Granola Wedges
 © 2020 | http://angiesrecipes.blogspot.com
 © 2020 | http://angiesrecipes.blogspot.com
 |
 |
 © 2020 | http://angiesrecipes.blogspot.com
Give your granola bars a nutritious boost with matcha- a fine green tea powder, packed with antioxidants. These granola wedges are naturally gluten-free, dairy-free, and refined-sugar-free. Substitute your favorite dried fruit, nuts and/or seeds for the pumpkin seeds and/or dried pineapple in these granola bars. Puffed teff can be substituted with quinoa or amaranth pops too.
|
- Preheat oven to 160C/320F. Combine rolled oats and pumpkin seeds on a baking sheet and bake for 15 minutes, stirring once or twice, until the oats are lightly toasted and have a nutty aroma. Remove and set aside to cool.
- In a small saucepan over low heat, combine the maple syrup, almond butter, coconut oil, and vanilla paste. Whisk to combine.
- In a large bowl, combine the cooled oats and pumpkin seeds with the dried pineapple, puffed teff, sea salt, and matcha powder. Pour the almond butter mixture over the oat mixture and stir quickly to mix.
- Spread the mix into an 9-10 inch springform pan lined with plastic wrap or baking paper. Press down the mixture firmly. Place in the fridge for a couple hours to firm up, then remove from fridge and slice into wedges. Keep leftovers in the fridge for up two weeks.

http://schneiderchen.de | © 2020 | http://angiesrecipes.blogspot.com
 |
 |

http://schneiderchen.de | © 2020 | http://angiesrecipes.blogspot.com

http://schneiderchen.de | © 2020 | http://angiesrecipes.blogspot.com

http://schneiderchen.de | © 2020 | http://angiesrecipes.blogspot.com
Flower Pot Whole Spelt and Rye Bread with Hazelnuts and Quark
 © 2020 | http://angiesrecipes.blogspot.com
 |
 |
 © 2020 | http://angiesrecipes.blogspot.com
These are some fun, totally foolproof, yeast-free and delicious bread to bake in a flower pot, which I have adapted from this Quark-Nussbrote found on eatsmarter. The dough is prepared with a mix of whole spelt and rye flour with Quark (a type of German fresh cheese), spices and whole hazelnuts that would result a rustic, hearty bread packed with nutrition and flavour with slightly denser and chewy texture.
|
- Whisk together the spelt, rye flours, and baking powder together with all the spices in a mixing bowl. Now add in olive oil, 160 ml of the milk, eggs, and sea salt. Use a hand mixer fitted with dough hooks to beat all the ingredients until a smooth dough forms.
- Turn the dough out on a lightly floured work surface and knead in the hazelnuts. Cut out two portions of dough, each weighs about 150 grams. Shape each into a ball and place each into a small greased or parchment-lined flower pot. Shape the rest of the dough into a ball and place into a large grease or parchment-lined flower pot. Brush the top with the rest of the milk.
- Fill an oven-safe bowl with water and place it at the bottom of your oven. Preheat the oven to 180C/350F fan forced.
- Bake the small ones for 30 minutes and the large one for 60-70 minutes until nicely golden brown. Remove and cool briefly. Turn out the bread and cool on a wire rack completely before slicing.

http://schneiderchen.de | © 2020 | http://angiesrecipes.blogspot.com
 |
 |

http://schneiderchen.de | © 2020 | http://angiesrecipes.blogspot.com
Chickpea Flour Hummus with Olives and Pine Nuts
 © 2020 | http://angiesrecipes.blogspot.com
| |
 |

http://schneiderchen.de | © 2020 | http://angiesrecipes.blogspot.com
A silky smooth, flavourful and healthy hummus that is so easy and fast to make. The secret is to use chickpea flour (also known as gram flour or besan) instead of whole chickpeas. Hummus made with the whole cooked chickpeas is great, but if you want ultra silky, light as air texture, and don't want to go to all the bother of peeling the skin off chickpeas, then chickpea flour is the answer. The dip will generally keep for up to 5 days in the fridge.
|
- In a medium saucepan, mix together the chickpea flour and water until lump free and well-combined. Bring the mixture to a boil. Cook on medium-high heat for 1-2 minutes, stirring constantly. Reduce the heat to medium-low and cook another 5-7 minutes, stirring constantly. Let cool.
- Transfer the chickpea paste into the pitcher of your immersion blender. Add the garlic, tahini, lemon juice, cumin and hot sauce. Blend until smooth. Season with salt. If the mixture is too thick, add a little olive oil.
- Scrape into a bowl and cover a thin layer of olive oil. Sprinkle some olives, pine nuts and parsley over. Serve with flatbread, crackers or vegetable sticks.

http://schneiderchen.de | © 2020 | http://angiesrecipes.blogspot.com

http://schneiderchen.de | © 2020 | http://angiesrecipes.blogspot.com

http://schneiderchen.de | © 2020 | http://angiesrecipes.blogspot.com
Classic Pain de Mie / French Sandwich Loaf
 © 2020 | http://angiesrecipes.blogspot.com
 |
 |
 © 2020 | http://angiesrecipes.blogspot.com
Pain de mie (literally means crumb bread) is a fine-crumb, soft tender French sandwich bread baked in a special bread pan with a lid, which keeps the loaf from crowning, giving it a flat surface and square-edged slices and keeps the crust as thin and soft as possible. The main difference between pain de mie and regular white bread is that pain de mie uses milk, whereas most white bread recipes call for water.
If you don't have a pullman pan, just cover a normal bread pan first with a piece of baking paper, then with a heavy baking tray as the weight to hold it down. Besides sandwiches, this bread makes amazing toast, grilled cheese, and French toast.
|
- Dissolve the dry yeast in warm milk and set aside for 5 minutes. Place flour, raw sugar, and salt in the bowl of your mixer fitted with a dough hook.
- Add in milk-yeast mixture and mix at low speed for about 1-2 minutes. Then increase the speed to medium and knead for 4-6 minutes.
- With the mixer running at medium speed, add the butter one tablespoon at a time. Once all of the butter has been incorporated into the dough, stop the mixer and turn out the dough on a lightly floured work surface. Shape the dough into a ball and place it into an oiled bowl, cover with plastic wrap, and let rise for about 2 hours until double in volume.
- Gently deflate the dough and shape into a ball. Cover with a plastic wrap and set aside to rest for 15 minutes. Grease a 26x12x9cm pullman loaf pan with butter. Set aside.
- Pat the dough out into a rectangle. Roll it up just like you do the jelly roll and pinch the seam together. Place into the prepared loaf pan with seam side down. Cover loaf pan with plastic wrap. Let rise in a warm place for about an hour until almost 2 inches from the top rim of the loaf pan.
- Preheat the oven to 190C/375F. Remove the plastic wrap and cover the loaf pan with its lid. Bake for about 30 minutes in the center of hot oven.
- Open the lid and let cool for 10 minutes before turning out onto a wire rack and let cool completely.

http://schneiderchen.de | © 2020 | http://angiesrecipes.blogspot.com
 |
 |

http://schneiderchen.de | © 2020 | http://angiesrecipes.blogspot.com
 © 2020 | http://angiesrecipes.blogspot.com
Whole Spelt Fruitcake
 © 2020 | http://angiesrecipes.blogspot.com
 |
 |
 © 2020 | http://angiesrecipes.blogspot.com
This sensational winter loaf cake contains a wonderful mix of dried fruits and nuts and simply perfect for the holidays. Feel free to substitute your own favorites; you'll need about 350 g dried fruit and 150 g nuts total. Date syrup can be replace with honey or maple syrup too. Brush the cake with Port or Brandy or leave it out. Either way, it's very delicious and addictive with all the nuts, dried fruits and spices.
|
- Preheat the oven to 150C/300F, fan forced. Sift the flour into a mixing bowl together with baking powder and spices. Set aside. Grease a 20cm loaf pan generously with butter.
- Beat the eggs until combined. Slowly drizzle in date syrup and beat until well combined and fluffy. Stir in flour-spice mixture until well combined.
- Add in chopped dried apricots, rainsin and Port wine. Stir until well combined. Spread the mixture into prepared pan. Level top with a spatula.
- Bake for 1 hour or until a skewer inserted in centre comes out clean. If cake is browning too much, cover with foil after 45 minutes. Brush the hot cake with 1 extra tablespoon Port wine. Cool the fruit cake in the pan for 5 minutes before turning out onto a wire rack to cool completely. Slice and enjoy!

http://schneiderchen.de | © 2020 | http://angiesrecipes.blogspot.com
 |
 |
 © 2020 | http://angiesrecipes.blogspot.com
Roasted Bone Marrow with Fresh Herbs and Hawaiian Black Lava Salt
 © 2020 | http://angiesrecipes.blogspot.com
 |
 |

http://schneiderchen.de | © 2020 | http://angiesrecipes.blogspot.com
 © 2020 | http://angiesrecipes.blogspot.com
Marrow bones are generally the leg bones from either beef or veal. The marrow not only just boastes of its heavenly buttery taste but also offers various health benefits. This most nutrient-dense superfood contains a substantial amount of good fats and energy and provides an exceptional source of the omega-3 required for healthy brain development and anti-inflammation. It also contains minerals (iron, phosphorus, and trace amounts of thiamin and niacin), collagen, stem cells that turn into blood cells inside the body when ingested and a group of compounds called alkylglycerols that help boost and maintain our immune system. You can use marrow bones to make bone broth, or you can roast the bones and use the marrow the same way you would use butter -- spread it on toast, toss with vegetables or melt over the steak.
| Salad | |
|---|---|
|
|
- Preheat the oven to 230C/450F. Place the bones in a baking dish. Finely chop the rosemary and thyme leaves. Sprinkle the chopped herbs over the marrow bones.
- Transfer them to the hot oven and roast for 15 to 20 minutes until no longer pink inside. Meanwhile prepare the side salad and crusty bread if using.
- Combine the salad leaves, onion rings and chopped parsley in a small mixing bowl. Toast the bread until crunchy if using.
- After 15 minutes, check the bones. The marrow should be hot, with a soft and jelly-like consistency, but not liquid. You want to catch it before the marrow begins to "leak out" of the bones. Roast another five minutes if needed.
- Drizzle the salad with olive oil and white balsamic vinegar.
- Season the marrow with lava salt and freshly milled black pepper. Serve while still hot with salad and crusty bread if using. Use a spoon to scoop out the marrow and enjoy! Once you enjoy the marrow, save the bones and dripping to make bone broth.

http://schneiderchen.de | © 2020 | http://angiesrecipes.blogspot.com

http://schneiderchen.de | © 2020 | http://angiesrecipes.blogspot.com

http://schneiderchen.de | © 2020 | http://angiesrecipes.blogspot.com
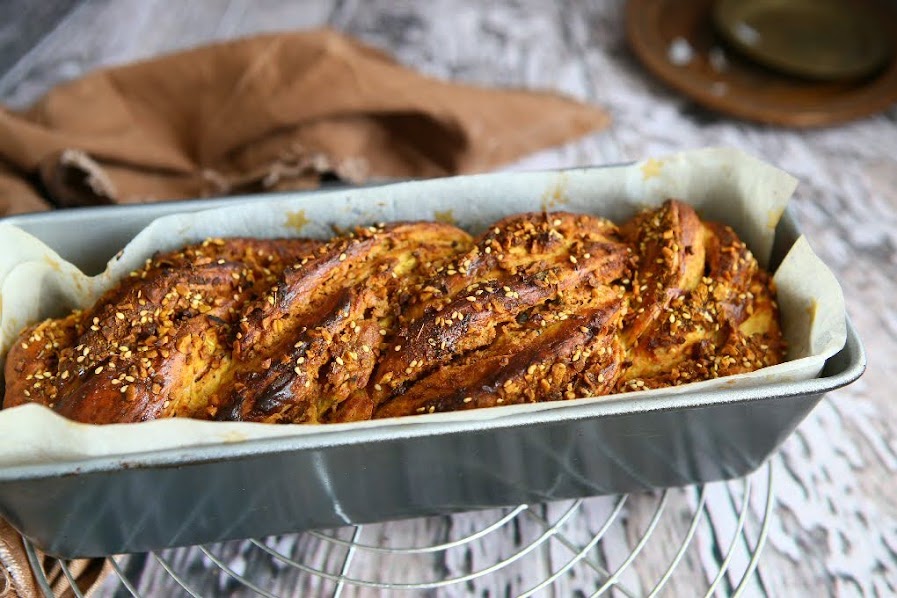
Pumpkin Dukkah Bread
 © 2020 | http://angiesrecipes.blogspot.com
 |
 |

http://schneiderchen.de | © 2020 | http://angiesrecipes.blogspot.com
Dukkah is traditionally a middle Eastern spice blend consisting of a mixture of herbs, nuts and spices. It is typically used as a dip with bread and olive oil. It can also be used to sprinkle the salads, top the soups and to season meat. Here I am using it as the filling and topping to dress up the pumpkin bread loaf. If stored in an airtight container in a cool, dry place, dukkah will keep for at least 1 month. So you might want to double the recipe and make enough to keep around.
| Dukkah | |
|---|---|
|
|
- For the dukkah, spread the hazelnuts over a baking tray and toast in 180C/350F preheated oven for 5 minutes or until toasted. Rub the hazelnuts between a clean tea towel to remove as much skin as possible. Place the toasted hazelnuts in the bowl of a food processor and process until coarsely chopped. Transfer to a large bowl.
- Heat a medium frying pan over medium heat. Add the sesame seeds and cook, stirring, for 1-2 minutes or until golden. Add to the bowl with the hazelnuts.
- Place coriander, cumin and peppercorns in a dry frypan over high heat for 1 minute or until aromatic. Transfer to a mortar and pestle. Pound until finely crushed (alternatively, use a coffee or spice grinder). Add the spices and salt to the hazelnut mixture and mix well.
- Line a 30cmx12cm loaf pan with parchment paper.
- Roll out the dough into a 24x35cm rectangle. Spread the peanut sauce over and sprinkle the dukkah, reserving a tablespoon for the topping, over the peanut sauce. Roll it up from the shorter end and pinch the sides together. Place the roll seam side up and use a sharp knife to cut the roll lengthwise in half along the seam. Tightly weave the two pieces together, leaving the cut sides exposed. Place it into the prepared pan.
- Cover with a plastic film or kitchen towel and let rise until doubled for about an hour. Preheat the oven to 180C/350F. Sprinkle the top with the reser
http://schneiderchen.de | © 2020 | http://angiesrecipes.blogspot.com
http://schneiderchen.de | © 2020 | http://angiesrecipes.blogspot.com


