
Beet Juice Pickled Eggs
 © 2021 | http://angiesrecipes.blogspot.com
 |
 |
 © 2021 | http://angiesrecipes.blogspot.com
One of fun ways to pickle eggs is in beet juice so that the egg whites turn a pretty pink. The beet brine, which is guaranteed to add a little magic to your food, contains beet juice, apple cider vinegar, allspice, bay leaf, chilli pepper and salt. I didn't add extra sugar because the beet juice is sweet enough. You can use other spices like cloves, mustard seeds, onion, caraway seeds, and peppers to the brine. Allow to sit for 48 hours or more for maximum flavour. Serve with a salad for a light meal or enjoy them as a snack.
|
 |
 |
- Bring a small saucepan of water to the boil. Add eggs and simmer for 6 minutes for soft-boiled or 9 minutes for hard-boiled eggs. Plunge the eggs into cold water to stop the egg from cooking any further.
- Combine the beet juice, ACV, cinnamon bark, allspice, bay leaf, chilli pepper, and salt in a saucepan. Bring it to a boil and allow it to simmer for 5 minutes. Turn the heat off and set aside to cool.
- Peel the eggs and place in a jar or bowl. When the brine has cooled, carefully pour over the eggs, making sure all the eggs are fully submerged in the liquid.
- Cover the bowl or close the jar and refrigerate at least overnight for slightly pickled eggs. If you want them to fully seasoned to the yolks, leave it 3 days. They will keep for months if fully submerged in the brine.
- Slice the egg and serve with a salad as an appetizer or a light lunch.

© 2021 | http://angiesrecipes.blogspot.com

© 2021 | http://angiesrecipes.blogspot.com

Hazelnut and Clementine Frangipane Tart
 © 2022 | http://angiesrecipes.blogspot.com
 |
 |
 © 2022 | http://angiesrecipes.blogspot.com
Made with gorgeous frangipane filling this clementine tart is a best served with a dollop of whipped cream or ice cream. With seedless, juicy and sweet clementines, this fruity bake is a perfectly tasteful treat to finish off your weekend dinner or a delightful afternoon treat with friends and family or for when you need an impressive dessert that's sure to please a crowd. You can use any kind of citrus fruit for this cake. Next time I'll change up the fruit and nuts for a different twist.
| Tart | Hazelnut Frangipane |
|---|---|
|
|
- Place the flour, hazelnut meal, icing sugar and butter in a food processor and process until mixture resembles fine breadcrumbs. Add the egg yolk and water and process until dough just comes together. Shape into a log and cover with plastic wrap. Place in the fridge for 30 minutes to rest.
- Roll out the pastry on a lightly floured surface to a 3mm-thick round. Line the base and sides of an 24cm / 8inch tart pan, with removable base, with the pastry. Trim the edges and place in the fridge for a further 30 minutes to rest.
- Preheat oven to 200C/400F. Line the pastry case with baking paper and fill with pastry weights or rice. Bake for 10 minutes. Remove the paper and weights or rice and bake for a further 10 minutes or until golden. Remove from oven. Reduce oven temperature to 180C/350F.
- To make the frangipane filling, use an electric mixer to beat the butter and sugar in a bowl until pale and creamy. Add the egg and beat to combine. Add the hazelnut meal and flour and stir until combined.
- Spread the frangipane evenly over the crust. Arrange the nectarines over the frangipane and sprinkle with chopped hazelnuts. Bake for 30-35 minutes or until the frangipane filling is golden and firm to touch. Set aside to cool.
- Microwave the orange jam on highfor 30 seconds or until jam melts. Strain through a fine sieve. Brush the hot jam evenly over tart. Cut into slices to serve, with whipped cream or ice cream.

© 2022 | http://angiesrecipes.blogspot.com

© 2022 | http://angiesrecipes.blogspot.com

Dandelion Salad with Almond Dressing
 © 2022 | http://angiesrecipes.blogspot.com
 |
 |
 © 2022 | http://angiesrecipes.blogspot.com
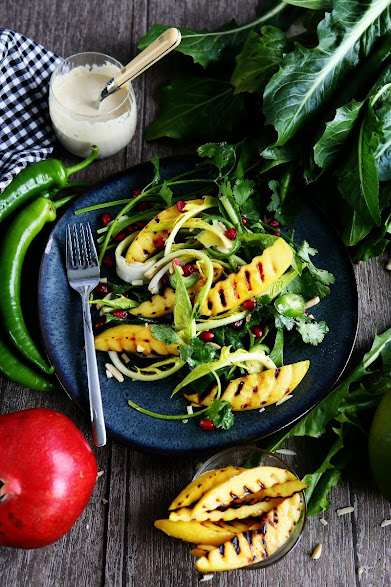
Dandelion, just like other dark leafy greens, is rich in so many vitamins (A, B, C and K), minerals (magnesium, potassium and phosphorus) and of course fiber - Inulin. Inulin is a type of dietary fiber that's believed to help promote the growth of good gut bacteria and to help lower cholesterol.
To balance and complement the earthy, tangy taste with a distinctive, bitter nature (similar to the taste of radicchio and endive) of this extremely nutritious and flavourful edible weed, it's best to pair dandelions with nuts/nut oils, cheese, beets, eggs, citrus and bacon. If you can't find the exact ingredients for the recipe, just be creative and give this delicious salad a try!
| Almond Dressing | Salad |
|---|---|
|
|
- Heat a grill pan on high until hot. Brush both sides of mango wedges with peanut oil. Grill for 3 minutes on each side until nicely charred.
- Meanwhile prepare the dressing for the salad. Except olive oil, place all the ingredients in a bowll and stir vigorously, then drizzle in the olive oil while stirring. As soon as the dressing becomes creamy and blended, season with freshly milled salt and pepper.
- Place dandelion leaves, sliced pointed pepper, and cilantro in a large salad bowl. Drizzle dressing over greens, and toss to coat. Arrarnge some charred mango slices over the salad. Sprinkle the almond sticks, and pomegranate seeds over and serve immediately.

© 2022 | http://angiesrecipes.blogspot.com

© 2022 | http://angiesrecipes.blogspot.com
Easy German Bauernbrot / Weizenmischbrot
 © 2022 | http://angiesrecipes.blogspot.com
 |
 |
 © 2022 | http://angiesrecipes.blogspot.com
 © 2022 | http://angiesrecipes.blogspot.com
Mischbrot made with 60% Dark Rye
 © 2022 | http://angiesrecipes.blogspot.com
Experience the flavor and texture of German farmer's bread like fresh from the German bakery! Dense yet tender, chewy, crusty, packed with nutrition and full of flavour, this Germany's most popular wheat-rye mixed bread (Weizenmischbrot or Graubrot) is wonderful served right out of the oven with your choice of butter, jam, Nutella, cheese, or cold cuts.
Traditionallly this bread is made with a rye sourdough starter, which gives the bread a very light and pleasant sour taste. But it takes time plus, not all the home bakers have a sourdough starter. This hearty mixed wheat bread recipe is the easiest one that you can bake at home and still produces the typical taste, aroma and texture of Bauernbrot with the addition of Backmalz or dry malt powder in English. Dry malt powder help promote a strong rise, enhance the crust browning and adding a mild natural malt flavour. I have read that maca powder is a good substitution for dry malt powder. But I haven't tried it. You can also use malt extract too and the best substitute of malt extract is sugar beet syrup (Zuckerrübensirup). Both dry malt powder and sugar beet syrup can be easily found on amazon.
You can also vary the proportions of rye to wheat flour according to your preference. Just keep in mind that wheat contains more gluten than rye, and therefore wheat dough tends to rise more than rye dough. As a result, bread made with a higher ratio of wheat is usually fluffier, and a with higher ratio of rye more compact. In Germany, rye mix bread (Roggenmischbrot) is usually made with at least 50% but less than 90% rye. Experiment with ratios and find out what you enjoy the most.
Belgian Endive Gratin
 © 2022 | http://angiesrecipes.blogspot.com
 |
 |
 © 2022 | http://angiesrecipes.blogspot.com
 © 2022 | http://angiesrecipes.blogspot.com
A relative of chicory and escarole, Belgian endive, aka French endive or witloof, is slightly bitter, crisp, cream-coloured vegetable shaped like a bullet or tulip. It is grown in complete darkness to avoid turning green and to preserve its delicate flavor. It is available throughout the year, with a peak season from September to May. When cleaning your endives, don’t wash or soak them, as it brings out their bitterness. If they need to be cleaned, wipe them with a moist, damp paper towel.
Belgian endive makes a great addition to salads, especially those that contain cheese, bacon, eggs, citrus and nuts. Crisp and somewhat bitter when raw, Belgian endive develops a mellow, slightly nutty flavor when cooked. It shines when quickly stir-fried, lightly braised, steamed, grilled or roasted. It's hard to go wrong with this incredibly versatile and nutrient-dense vegetable.
|
 |
 |
 |
 |
 |
 |
 |
 |
- Lightly grease a large baking dish or a cast iron pan. Discard any of the endive’s bruised or wilted outer leaves. Cut away a thin slice from the root end to remove the discolored stem. Cut each head of endive in half lengthwise.
- Bring a large pot of lightly salted water with lemon juice to a boil over medium-high heat. Place the endives into the water. Cook until tender, about 5 minutes. Take the endives out and transfer them to a colander to drain thoroughly. Gently squeeze them if needed, but without damaging them.
- Preheat the oven to 220C/410F. Drain the tomatoes and place them in a skillet together with garlic and coconut milk or heavy cream. Bring it to a boil. Transfer the mixture into the measuring cup of a stick blender and process until combined. Add in half of chopped parsley and grated Parmesan. Season well with salt and pepper.
- Arrange the drained endive halves into the prepared baking dish or pan. Sprinkle the remaining half of chopped parsley over. Pour over the sauce and sprinkle the remaining Parmesan. Bake for 15-18 minutes in the middle of hot oven.

© 2022 | http://angiesrecipes.blogspot.com

© 2022 | http://angiesrecipes.blogspot.com

© 2022 | http://angiesrecipes.blogspot.com

© 2022 | http://angiesrecipes.blogspot.com
Potato and Egg Salad with Pesto
 © 2021 | http://angiesrecipes.blogspot.com
 |
 |
This quick pesto potato salad with eggs actually makes a complete meal. It's quick, simple, but very delicious and satisfying. It is a salad that can be done throughout the entire year! Prepare it the night before, the flavours will have time to be mingled together. Sprinkle some crispy bacon bites over if you desired.
| Salad | Almond Pesto |
|---|---|
|
|
- For the pesto, place all ingredients in a food processor and whiz until smooth. Season and set aside.
- Place potatoes in a saucepan of cold salted water. Place over medium-high heat and bring to a simmer. Cook for 15-20 minutes until fork tender. Drain and set aside to cool completely, then halve.
- Bring a saucepan of water to the boil over medium-high heat. Cook eggs for 7 minutes for hard-boiled or cooked to your liking. Drain and run under cold water.
- Place potatoes in a bowl with half the pesto and toss to combine. Add the arugula leaves, dill or herb of your choice and tomatoes.
- Peel the eggs and halve. Place on top of the salad and serve with extra pesto.

© 2021 | http://angiesrecipes.blogspot.com

 © 2021 | http://angiesrecipes.blogspot.com


