
Beetroot Raisin Loaf
 © 2021 | http://angiesrecipes.blogspot.com
 |
|
 © 2021 | http://angiesrecipes.blogspot.com
 © 2021 | http://angiesrecipes.blogspot.com
A simple and fun raisin bread made with sweet beet juice and topped with chopped hazelnuts for an extra crunch. Original recipe from Taste calls for 1/3 cup of sugar for the filling, which I have completely omitted, since I used sweet beet juice instead of water. It is pleasantly sweet with a hint of earthy beetroot flavour. Great to enjoy with (nut) butter for the breakfast or snack anytime. Egg and butter free too! The bread freezes well, so double the recipe if you wish.
|
- Place yeast, sugar and warm beet juice in a jug. Whisk with a fork until yeast has dissolved. Stand in a warm place for 10 minutes or until frothy.
- Sift flour into the bowl of your mixer. Stir in salt, yeast mixture, olive oil and cinnamon. Mix at slow speed until the dough comes together. Increase the speed and knead the dough for 5 minutes or until smooth and elastic. Knead in raisins for the last 2 minutes of kneading time.
- Turn out the dough and shape into a ball. Grease your mixer bowl with a bit of olive oil. Return the dough to the bowl. Cover and set aside in a warm place for 1 hour or until doubled in size.
- Punch dough down and knead until smooth. Meanwhile, preheat oven to 200C/400F. Grease a 10cm x 22cm loaf pan well with olive oil or line with a baking paper.
- Remove dough to a lightly floured surface and pat into a rectangle about 9 inches long and 5 inches wide. Roll up from the short end into a log. Place the log in the prepared pan. Cover with lightly greased plastic wrap. Set aside in a warm place for 45 minutes or until dough has almost doubled in size.
- Brush the top of the dough with water and sprinkle the chopped hazelnuts over. Bake for 30 to 35 minutes. Remove from oven and immediately and turn the loaf onto a cooling rack.

 |
 |

© 2021 | http://angiesrecipes.blogspot.com

Cherry Labneh Tart with Pistachios and Honey
 © 2021 | http://angiesrecipes.blogspot.com
 |
 |
 © 2021 | http://angiesrecipes.blogspot.com
 © 2021 | http://angiesrecipes.blogspot.com
Labneh, a thick strained yoghurt, is the base for the filling in a sweet vanilla flavoured tart crust, which is then sealed with a thin layer of melted white chocolate couverture to prevent the pastry getting soggy. You can use mascarpone instead of the yoghurt cheese or a mix of two for the filling. All the seasonal berries, currants, or stone fruits are fantastic as the topping. The cherry labneh tart is then finished off with a sprinkle of chopped raw pistachios that not only makes it look pretty but also adds extra flavour.
| Crust | Filling |
|---|---|
|
|
- For pastry, whiz spelt flour, sugar, butter and a pinch of salt in a food processor to fine crumbs. Add egg and extra egg yolk and pulse until a smooth dough forms. Enclose in plastic wrap and chill for 30 minutes.
- Preheat the oven to 180C/350F. Grease a 22cm loose-bottomed tart pan. Roll out pastry on a lightly floured surface until 4mm thick, then use to line pan. Trim excess, leaving 2mm above the sides. Chill for 30 minutes. Line the pastry with baking paper and fill with pastry weights. Bake for 15 minutes, then remove weights and paper. Bake for a further 5 minutes or until golden. Remove and set aside.
- Melt the white chocolate couverture and spread thinly over the tart case. Set aside until the crust is completey cool and the chocolate set.
- Combine labneh and icing sugar in a bowl, then spread into case. Top with cherries, pistachios and drizzle with honey, if using, to serve.

© 2021 | http://angiesrecipes.blogspot.com
 |
 |

© 2021 | http://angiesrecipes.blogspot.com
Chilled Radish Soup
 © 2021 | http://angiesrecipes.blogspot.com
 |
 |
 © 2021 | http://angiesrecipes.blogspot.com
A few easy ingredients and this radish soup comes together quickly. Unpeeled cherry radishes are blended with buttermilk to create a light, yet creamy soup with a delicate pink blush. The spiciness and pungency of radishes is tempered by tangy buttermilk and rich crème fraîche. The soup turned out absolutely delightful. I used round "Cherry Belle", but the elongated "French Breakfast" is just as good. Serve this nourishing and wonderfully refreshing soup cold like a raw tomato gazpacho in summer for grilling and barbecue.
|
- Wash and clean radishes. Reserve 2 for the topping and thinly slice them. Set aside. Cut the rest into quarters. Place the quartered radishes in the cup of your immersion blender together with buttermilk. Blend until smooth.
- Add in lemon zest, juice, crème fraîche, agave syrup, Dijon mustard, and olive oil. Stir to mix well. Season with salt and pepper.
- Refrigerate the soup for several hours until well chilled. Divide the chilled soup between 2 bowls. Garnish the soups with reserved sliced radishes and herbs. Drizzle a little bit of olive oil over if desired.

© 2021 | http://angiesrecipes.blogspot.com

© 2021 | http://angiesrecipes.blogspot.com
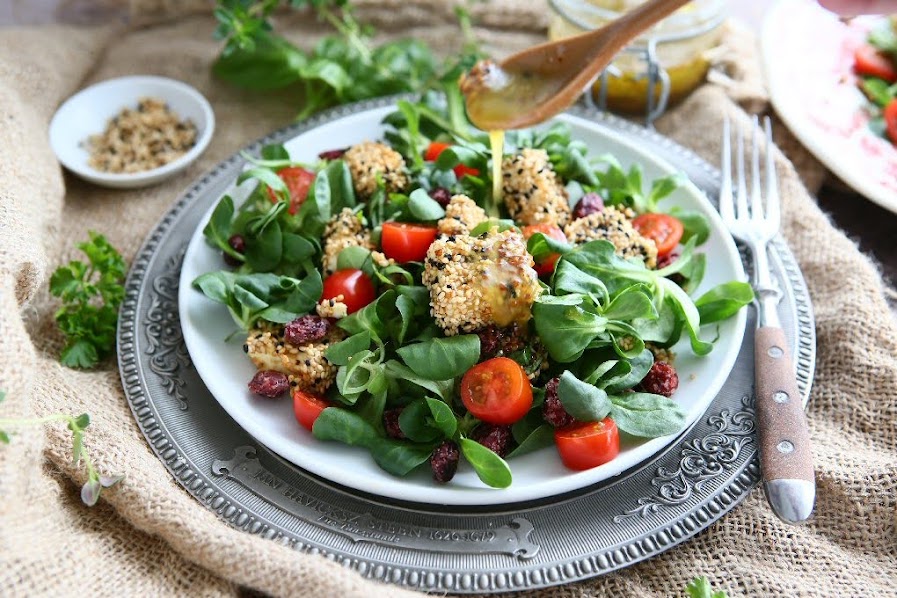
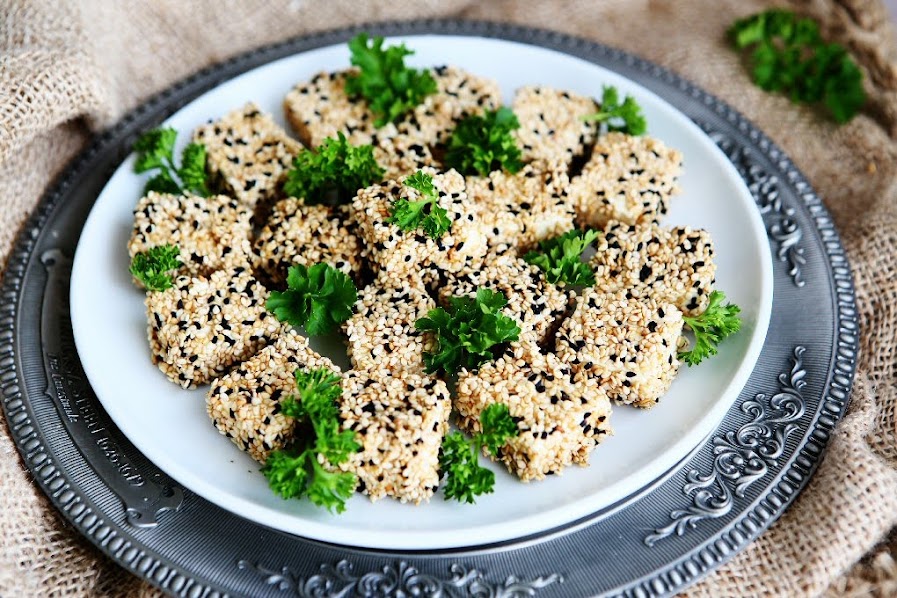
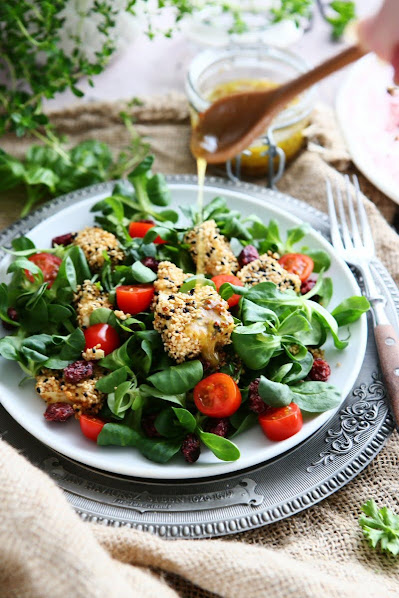
Lamb’s Lettuce with Sesame Crusted Feta
 © 2021 | http://angiesrecipes.blogspot.com
 |
 |
 © 2021 | http://angiesrecipes.blogspot.com
This simple salad featuring lamb's lettuce and warm, salty, and tangy Feta cheese encased in a crispy golden sesame crust. Lamb’s lettuce, also known as corn salad, has a mild, almost nutty flavour. (Feldsalat, Ackersalat, Schafmaul, Mäuseöhrchen, Rebkresse or Rapunzel - this green salad has plenty of names in Germany. Nüsslisalat in Switzerland and Vogerlsalat in Austria.) The unusual name reputedly comes from the lettuce’s resemblance to the size and shape of a lamb’s tongue. Feel free to substitute baby spinat for lamb's lettuce, and halloumi for Feta.
| Maple Dijon Vinaigrette and Salad | Sesame Crusted Feta |
|---|---|
|
|
- Thoroughly and properly rinse, wash and dry lamb's lettuce. (I usually soak them in water for 8-10 minutes, so the dirts and sand sink to the bottom. Rinse them under water and dry them in a salad spinner.) Arrange them on two plates with grape tomatoes and dried cranberries.
- For the dressing, add white balsamic vinegar, maple syrup, and Dijon mustard to a jar, and blend shortly. Slowly stream in olive oil and blend again. Season to taste with salt and pepper.
- For the crusted Feta, dry the cheese with kitchen paper and cut into 16-18 squares. Whisk the egg in a soup plate and sesame seeds in another.
- Dip the cubed Feta in egg and then coat with sesame seeds. Heat the lard or oil in a pan over a medium-high heat until hot. Gently place in Feta in 2-3 batches and fry until golden brown. Remove and drain on a piece of kitchen paper.
- Drizzle the vinaigrette over the salad and top with a few pieces of sesame crusted Feta.

© 2021 | http://angiesrecipes.blogspot.com

© 2021 | http://angiesrecipes.blogspot.com
Cumin Roasted Baby Carrots with Spiced Buckwheat Granola
 © 2021 | http://angiesrecipes.blogspot.com
 |
 |
 © 2021 | http://angiesrecipes.blogspot.com
 © 2021 | http://angiesrecipes.blogspot.com
If you can find tender baby carrots, they are wonderful to roast whole. Just give them a good scrub—no peeling required. Save the greens for the pesto. Otherwise, regular carrots are okay too. Don't over cook the baby carrots or they would get mushy.
The sweet and savoury buckwheat granola makes the BEST topping for roasted vegetables, salads or soups. You can of course use other seeds, or spices to make this to suit your taste. Quinoa is another great alternative.
| Spiced Buckwheat Granola | Cumin Roasted Carrots |
|---|---|
|
|
- Preheat oven to 180C/350F. Line a baking sheet with parchment paper.
- Mix all the ingredients for the granola in a bowl then spread mixture onto prepared baking sheet. Bake in the middle of hot oven until golden brown, about 20 minutes. Remove from oven and let cool.
- Wash carrots, peel and trim off tops, leaving some small stems if desired. Preheat oven to 200C/400F.
- Spread carrots onto a baking tray. Drizzle with avocado oil to coat them. Sprinkle with cumin seeds, red pepper flakes, salt and pepper. Toss to coat thoroughly.
- Roast for 18-22 minutes, depending on size, until tender when tested with the point of a knife. Remove from oven and transfer to a serving plate. Sprinkle with spiced granola and chopped carrot greens.

© 2021 | http://angiesrecipes.blogspot.com
 |
 |

© 2021 | http://angiesrecipes.blogspot.com

© 2021 | http://angiesrecipes.blogspot.com
Crumbed Meatballs with Green Pea Salad
 © 2021 | http://angiesrecipes.blogspot.com
 |
 |
 © 2021 | http://angiesrecipes.blogspot.com
A deliciously different way to enjoy meatballs. Beef mince (or any other kinds of mince), Parmesan cheese and herbs are formed into meatballs, coated in breadcrumbs, fried and served with a baby Romaine lettuce and pea salad tossed with a herb dressing. The crumbed meatballs are crunchy on the outside and so tender and tasty on the inside. Don't skip the Parmigiano-Reggiano as it adds so much more flavours to the meatballs. Next time I will add some grated Parmesan in the breadcrumbs too. They can be served stuffed into pita pockets with tzatziki or over some pasta with marinara sauce.
Pepper Crusted Eye-of-Round Roast
 © 2021 | http://angiesrecipes.blogspot.com
 |
 |
 © 2021 | http://angiesrecipes.blogspot.com
 © 2021 | http://angiesrecipes.blogspot.com
 © 2021 | http://angiesrecipes.blogspot.com
For this roast beef recipe I used an eye of round roast. This budget-friendly cut of meat comes from the hind quarter, or round, and is very lean and flavourful. This usually means that you want to cook the meat low and slow, but in this recipe, you should start the roast at a high heat, then turn off the oven and leave it for 1 hour 30 minutes or longer if your roast is heavier. The eye of the round is best (for me) when it's cooked to medium-rare, which is a range between 54.4C/130F or 57.2C/135F. But someone in the house prefer it medium-well, so I had to comproise. So if you prefer medium-rare, take it out of the oven once it hits 54.4C/130F as the roast continues to cook from residual heat.


