
Chickpea Salad With Fresh Herbs
 © 2021 | http://angiesrecipes.blogspot.com
 |
 |
 © 2021 | http://angiesrecipes.blogspot.com
 © 2021 | http://angiesrecipes.blogspot.com
A lighter, easier take on creamy potato salad, this recipe uses organic canned chickpeas in place of potatoes and a dressing made with Greek yoghurt and homemade olive oil mayonnaise. It's mega creamy, delicious and really easy to make. You can add lots of other ingredients to this salad, it's really versatile. Bell peppers, cherry radishes, cucmber, apples, and hard-boiled eggs are all great as the add-ins. You might not need all the dressing. The leftover can be stored in the fridge for up to 3 days.
|
- In a small bowl, combine the yoghurt, mayonnaise, lemon juice, mustard, salt and pepper. Whisk until smooth, then stir in the chopped herbs. Set aside.
- Place the chickpeas in a large bowl and using a fork, lightly mash about 1/3 of them. Add the diced celery and shallot and toss to combine.
- Pour half of the dressing over the salad, toss well, and set aside at room temperature for at least 30 minutes before serving. Sprinkle with more dill and parsley and serve.

© 2021 | http://angiesrecipes.blogspot.com
 |
 |

© 2021 | http://angiesrecipes.blogspot.com

© 2021 | http://angiesrecipes.blogspot.com
Pineapple Coconut Muesli Bars with Puffed Teff and Date Syrup
 © 2021 | http://angiesrecipes.blogspot.com
 |
 |
 © 2021 | http://angiesrecipes.blogspot.com
If you need an energy boost to get you through the day, these simple, soft and chewy muesli bars are the one for you. They are packed with energy and nutrients, easy to make and cheaper than buying prepackaged. Amaranth or quinoa pops can be easily used in place of puffed teff. You can always add in some chocolate chips or drizzle with chocolate at the end too!
|
- Preheat the oven to 160C/320F. Line a baking form (20x26cm) with parchment paper. Place butter and date syrup in a saucepan over a low heat and cook until the butter melts and the mixture are well combined. Cool slightly.
- Simply squeeze the cardamom pods and remove the seeds. Place them in the mortar and finely grind the seeds with the pestle.
- Add dried pineapples and cashew nuts together in a blender and grind roughly. Add it to the butter-date syrup mixture together with the rest of the ingredients. Mix well.
- Tip the mixture into the prepared baking pan, spread out evenly and press down firmly with the back of a spoon. Bake for 35 minutes. Set aside to cool completely in the tin before removing and cutting into bars. Store in a box in the fridge for up to a week.

© 2021 | http://angiesrecipes.blogspot.com

© 2021 | http://angiesrecipes.blogspot.com

© 2021 | http://angiesrecipes.blogspot.com
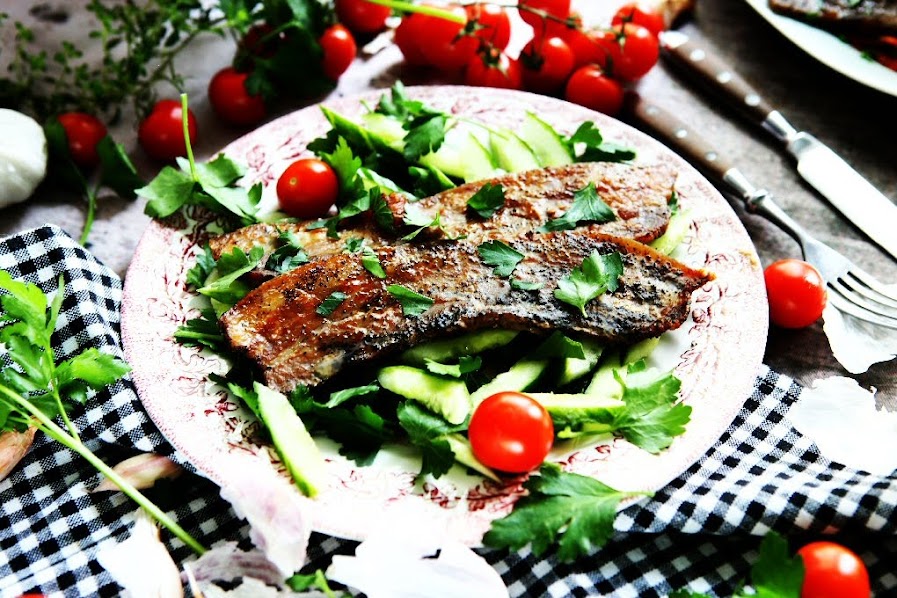
Spring Salad with Cod Liver and Toum
 © 2021 | http://angiesrecipes.blogspot.com
 |
 |
 © 2021 | http://angiesrecipes.blogspot.com
The salad recipe is simple and fast, especially if have made garlic sauce and boiled eggs a day before. Cod liver requires absolutely no preparation, just open the tin and it is ready to be added to the salad. I use arugula and a mix of Lollo Rosso, Lollo Bionda and red Oakleaf for the salad, but feel free to use any seasonal salad greens. In addition, you can add nuts, olives, and cheese to the salad too. You actually don't need a dressing for this, just toss it with all the juice and oil from the tin. But I love this garlic sauce so much that I want to use it on everything plus cod liver goes really well with garlic.
Toum, literally means garlic, is a Lebanese garlic sauce. It's very versatile and can be used in grilled meat, falafels, roasted vegetables, potatoes, pastas and salads...pretty much anything. It's made with just 4 ingredients (garlic, oil, salt and lemon juice) and can be stored in a tight-lid mason jar in the fridge for months. If you don't want garlic sauce turn golden, use nuetral oil instead of olive oil. I personally perfer olive oil. Avocado oil is a good alternative.
Cod liver is incredibly tasty and so good for you as it is chock full of fat-soluble vitamins A and D, and rich in Omega-3 fatty acids EPA and DHA. It has a milder flavour than sardines, less fishy, pure taste and a pink-beige colour.
| Salad | Toum Garlic Sauce |
|---|---|
|
|
- Peel the garlic cloves and place them with grey salt in the bowl of your food processor. Pulse a few times until the garlic is well minced, stopping to scrape down the sides. Add 1/3 of lemon juice and pulse a few times until everything is combined, again scraping down the sides as necessary.
- While the food processor is running, drizzle the olive oil in slowly, one tablespoon at a time. Don't try to rush the process or it won't be creamy and emulsified. Once the garlic looks emulsified by the a few tablespoons of oil, increase the speed of adding the oil and alternate with the rest of lemon juice until all the oil and lemon juice is incorporated. After about 10 minutes, it will look thickened, light and airy. Transfer to a tight-lid mason jar and store in the fridge until ready for use.
- Bring a small saucepan of water to the boil. Add eggs and simmer for 8 minutes for hard-boiled eggs. Plunge the eggs into cold water to stop the egg from cooking any further. Peel and quarter the eggs.
- Tear the salad leaves into bite-size pieces and cut the cucumber into slices. Arrange salad leaves, cucumber slices and herbs in a salad bowl or platter. Drain the cod liver (save the oil and juice to dip the bread or drink it as I did) and cut into smaller chunks. Arrange the cod liver chunks and egg quarters on the top of the salad. Sprinkle the pomegranate seeds over. Season with salt and pepper. Serve with the prepared garlic sauce.

© 2021 | http://angiesrecipes.blogspot.com
 |
 |

© 2021 | http://angiesrecipes.blogspot.com
Baked Coffee Coconut Sugar Brined Pork Belly Slices
 © 2021 | http://angiesrecipes.blogspot.com
 |
 |
 © 2021 | http://angiesrecipes.blogspot.com
Pork belly is soaked in a brine of coffee, coconut sugar and juniper berries, baked to golden-brown and served on a bed of your favourite salad. The acidity of coffee, like tannic acid in wine and tea, act as a tenderizer, helps break down fibers in meat, making it juicier, more tender and flavourful.
This coconut sugar sweetened brine, which adds more flavour and helps meat retain more moisture when cooked, is also excellent with chicken thighs and drumsticks, and pork chops or beef ribs.
|
- For the brine: In a large mixing bowl, add ground coffee. Pour in boiling water. Allow it to brew for a couple of minutes. (Strain the coffee if you want, I didn't) Stir in coconut sugar, salt, and spices. Whisk until salt and coconut sugar are fully dissolved and everything is incorporated. Cool.
- Place the pork belly in a container and pour in the cooled brine. Place the container in the refrigerator and allow to brine at least 8 hours or overnight.
- Heat the oven to 180C/350F fan-forced. Drain the brine from the pork belly and spread out into a large roasting tray in a single layer.
- Bake in the middle of hot oven for 40-60 minutes until deep golden brown. If you wish to caramelize the pork belly, turn the oven temperature to 200C/400F fan-forced and cook 20 more minutes until caramelised. (I didn't bother) Serve with your favourite salad.

© 2021 | http://angiesrecipes.blogspot.com

© 2021 | http://angiesrecipes.blogspot.com

© 2021 | http://angiesrecipes.blogspot.com
Tomato Salad with Fourme d'Ambert and Fresh Herbs
 © 2021 | http://angiesrecipes.blogspot.com
 |
 |
 © 2021 | http://angiesrecipes.blogspot.com
A refreshing and delicious everyday salad with a mix of tomatoes and fourme d'ambert - one of France's oldest and most-prized cheeses, dressed with a simple truffle vinaigrette.
Fourme Ambert is a mild blue cheese that was traditionally made with raw cow's milk in Auvergne region of France. It is known for its narrow cylindrical shape and has delicate aromas and unique flavour. “Fourme” in French means “mould”, as in the container that is used to shape the cheese. A village called “Ambert” was the centre of production for Fourme d’Ambert Cheese.
| Truffle Vinaigrette | |
|---|---|
|
|
- In a small bowl whisk together all the ingredients to make a uniform dressing. Store in the fridge until ready for use.
- Rinse and dry cherry tomatoes. Slice them in half and place in a large bowl. Add in chopped red onion and fresh herbs. Add in half of the dressing and gently toss to combine.
- Place the leafy greens on a serving platter. Spoon the tomatoe salad over. Sprinkle the fourme d'ambert cubes on top. Serve with the remaining dressing.

© 2021 | http://angiesrecipes.blogspot.com
 |
 |

© 2021 | http://angiesrecipes.blogspot.com
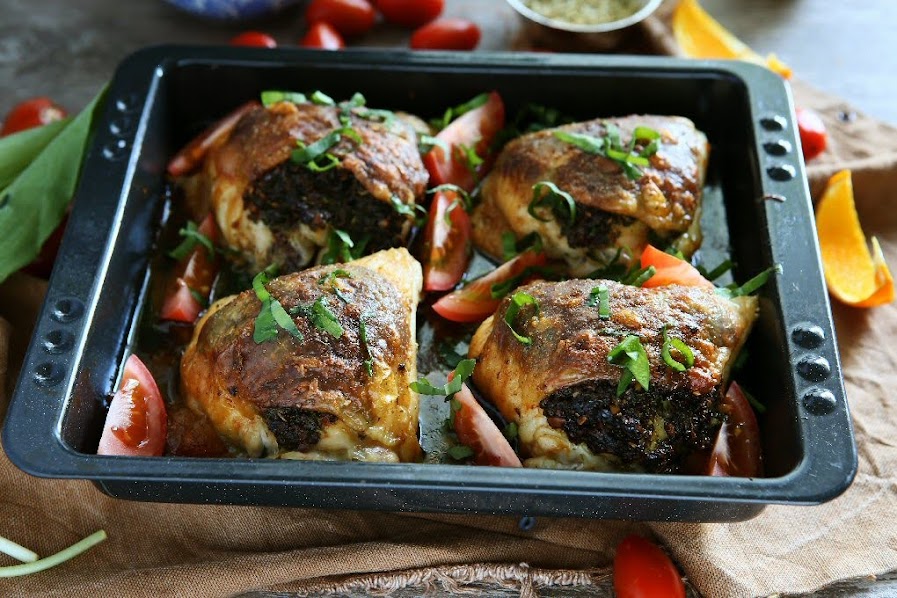
Roasted Stuffed Chicken Thighs
 © 2021 | http://angiesrecipes.blogspot.com
 |
 |
 © 2021 | http://angiesrecipes.blogspot.com
Chicken thighs are super cheap and bursting with flavour. These are filled with a wild garlic stuffing for a tasty and budget-friendly meal. You can stuff chicken thighs with anything you like, herbs, garlic, fruit, quinoa, nuts, cheese and vegetables. Try your favourite combinations and be creative.
|
- Rinse wild garlic thoroughly and dry. Roughly chop them. Crush the fennel seeds and peppercorns finely in a mortar and pestle. Place chopped wild garlic in a vegetable chopper together with crushed fennel seeds and peppercorns, lemon zest, nuts, seeds, and olive oil. Process until the mixture has a paste-like consistency.
- Preheat the oven to 200C/400F. Loosen the skin of each chicken thigh, then ease the paste under it. Season all over, then put in a baking tray and roast for 40 minutes or until the meat is cooked and the skin is crisp. Serve with pearly barley salad or simply with a side salad.

© 2021 | http://angiesrecipes.blogspot.com

© 2021 | http://angiesrecipes.blogspot.com
Turkish Simit with A Twist
 © 2021 | http://angiesrecipes.blogspot.com
 |
 |
 © 2021 | http://angiesrecipes.blogspot.com

© 2021 | http://angiesrecipes.blogspot.com
 © 2021 | http://angiesrecipes.blogspot.com
Simit, Turkish sesame bread ring, is the most well-known and popular street food in Turkey. The dough is first twisted and shaped into a ring, then dipped in a grape molasses solution diluted with water, which helps the seeds stick to the simit and gives them a hint of sweetness. It's crusty, filling and very tasty. Great as a breakfast with butter, cheese and olives, or as an easy lunch with a bowl of soup or simply plain. However, I thought I would experiement it with some beet juice and poppy seeds instead of the more traditional sesame seeds. I guess not all the Turkish friends would approve, but it's FUN. So why not? Sunflower seeds and pepitas would be great as the coating too.
| Dough | Topping |
|---|---|
|
|
- Mix water, beetroot juice and yeast in a bowl. Leave for 5-10 minutes for the yeast to activate.
- Mix the flour and salt in the bowl of your stand mixer. Add in yeast mixture. Mix on slow speed for 3-4 minutes until the dough comes together. Increase the speed to medium and knead until the dough becomes smooth and elastic, about 5-6 minutes.
- Turn out the dough and shape into a ball. Return to the bowl and cover with a plastic wrap or clean kitchen towel. Set aside to proof for 45-60 minutes.
- Mix the molasses and water in a bowl until well combined. Divide the dough into 8 even portions. Roll each portion into a 45cm long rope. Take two dough ropes and place them alongside one another. Braid them together and squeeze the two ends together to form a ring. Repeat with the remaining ropes to make 4 simits.
- Preheat the oven to 220C/430F. Dip each bread ring into the molasses mixture and coat with poppy seeds. Place it on a baking tray lined with parchment paper and set aside for 10 minutes.
- Bake for about 18 minutes until nicely golden brown and cooked through. Enjoy it with butter while they are still warm.

© 2021 | http://angiesrecipes.blogspot.com
 |
 |

© 2021 | http://angiesrecipes.blogspot.com

© 2021 | http://angiesrecipes.blogspot.com


