
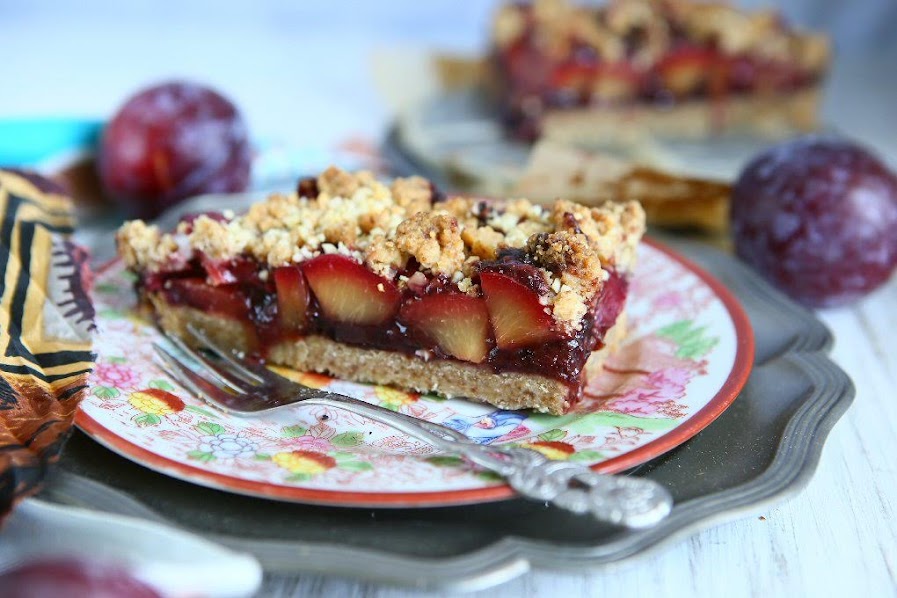
Plum Hazelnut Crumble Cake
 © 2020 | http://angiesrecipes.blogspot.com
 © 2020 | http://angiesrecipes.blogspot.com
 |
 |
 © 2020 | http://angiesrecipes.blogspot.com
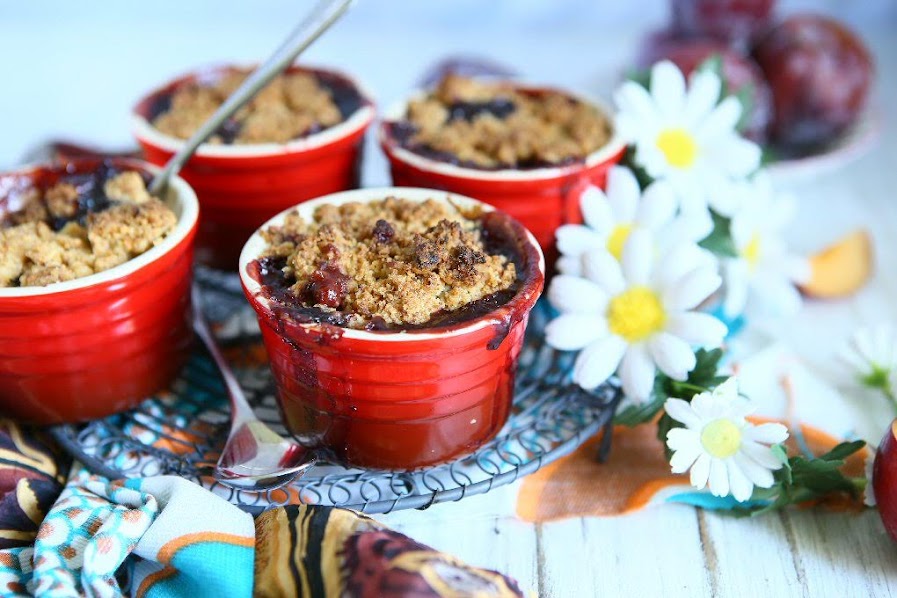
The cake requires only half of the plum filling. The rest I used to make 4 individual ramekin crumble. So you might want to make an extra portion of streusel for the ramekins later. They're excellent with a scoop of vanilla ice cream or chantilly cream. A scrumptious single-serving dessert without the mess, perfect for portion control, satisfying, and guilt-free.
| Filling | Crust and Crumble |
|---|---|
|
|
- Melt the butter in a heavy-based pan and add the remaining filling ingredients, except 2 plums. Simmer for 10-15 minutes or until the plums are cooked, some of the liquid evaporates and the mixture becomes a bit jammy. Set aside to cool.
- Heat oven to 190C/375F, and line a 20-22cm springform pan with parchment paper. In a mixing bowl, stir together the spelt flour, hazelnut meal, coconut sugar and sea salt. Cut in butter and vanilla paste. Rub everything together until the mixture forms streusel-like crumbs.
- Press 2/3 of the crust into the bottom of the prepared pan, reserving the rest for the topping.
- Spread cooled plum jam in an even layer over crust. Top with the chopped plums, then sprinkle remaining streusel mixture over top of fruit. (the cake requires only half of the plum filling. Use the rest to make individual ramekin crumbls or for breakfast) Sprinkle some chopped hazelnuts over if using.
- Bake until jam bubbles at edges and topping is lightly browned, 30 to 35 minutes. Cool completely before slicing into bars or wedges.

http://schneiderchen.de | © 2020 | http://angiesrecipes.blogspot.com

http://schneiderchen.de | © 2020 | http://angiesrecipes.blogspot.com
 © 2020 | http://angiesrecipes.blogspot.com
 |
 |
 © 2020 | http://angiesrecipes.blogspot.com
Roquefort Walnut Banana Cake
 © 2020 | http://angiesrecipes.blogspot.com
 |
 |
 © 2020 | http://angiesrecipes.blogspot.com
Pair Roquefort with banana in a cake? Yes, the combination works surprisingly well and tastes so good. The blue cheese adds just right amount of depth and robust flavor to the banana bread which is moist, soft and so delicious. Once cooled, the cake is then topped with a simple thin glaze and walnuts for a perfect dessert your family will love.
Roquefort is a blue mold cheese made from sheep milk from France. If it's too intense for you, then use the Gorgonzola mild, Cambozola Black or Danish Blue instead.
| Cake | Glaze and Topping, optional |
|---|---|
|
|
- Preheat oven to 180C/160C fan-forced/350F. Grease a 20cm x 10cm x7cm loaf pan. Line base and sides with baking paper. Set aside. Whisk together spelt flour, baking soda and salt.
- In a mixing bowl, combine together the melted butter, erythritol and coconut sugar. Add in eggs, vanilla and lemon juice. Mix well.
- Stir flour mixture into the butter mixture until smooth. Fold in the crumbled Roquefort, walnuts and bananas. Spread the batter evenly into the prepared pan. Smooth the surface.
- Bake in the middle of the hot oven for 50 minutes, cover the cake with a piece of parchment paper or aluminum foil until a toothpick inserted into the center of the loaf comes out clean, about 10 minutes. Remove and cool the cake in the pan for 5 minutes before turning onto a wire rack to cool completely.
- Whisk icing sugar, cream and vanilla extract together in a bowl. Stand for 2 minutes or until slightly thickened. Using a spatua or spoon, spread icing over top of cake. Sprinkle the chopped walnuts over. Set aside for 30 minutes to set. Slice and enjoy!

http://schneiderchen.de | © 2020 | http://angiesrecipes.blogspot.com
 |
 |

http://schneiderchen.de | © 2020 | http://angiesrecipes.blogspot.com

http://schneiderchen.de | © 2020 | http://angiesrecipes.blogspot.com
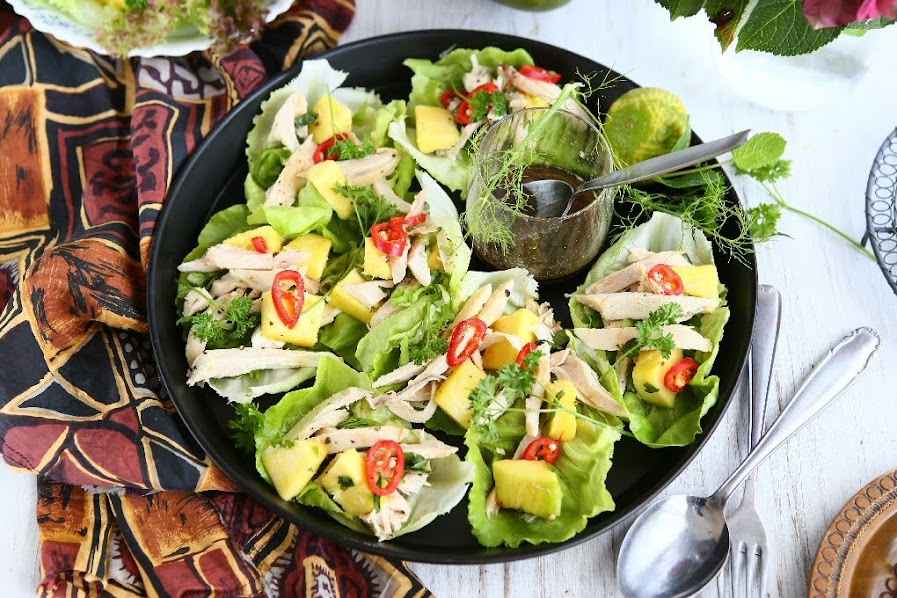
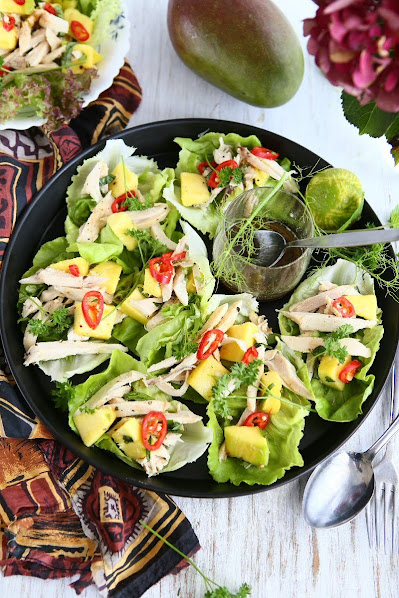
Coconut Chicken Salad with Mango
 © 2020 | http://angiesrecipes.blogspot.com
 |
 |
 © 2020 | http://angiesrecipes.blogspot.com
For an appetiser that's bursting with freshness and packed full of flavour, you can't go past these Asian inspired lettuce cups with coconut milk poached chicken and mango salad. Poaching chicken breast in lemongrass-coconut milk ensures that it's tender, moist and flavourful. With sweet juicy mangoes and a sweet tangy lime dressing, this salad will be a guaranteed hit with your family.
| Dressing | Salad |
|---|---|
|
|
- Stir the dressing ingredients together in a small bowl or a glass. Chill until ready for use.
- Place the chicken breast, lemongrass paste and coconut milk in a saucepan. Add enough water to cover the chicken. Bring to a simmer over high heat. Reduce the heat to low and simmer for 8-10 minutes or until chicken is cooked through. Set aside in the poaching liquid to cool completely.
- Remove chicken from the pan and coarsely shred the chicken. (the poaching coconut liquid can be used to cook rice or bake bread) Place them in a bowl together with the mango, lime juice, zest, spring onion, cilantro or parsley and chilli pepper. Combine and season.
- Arrange the lettuce leaves on a serving platter. Fill with spoonfuls of salad and drizzle over the dressing.

http://schneiderchen.de | © 2020 | http://angiesrecipes.blogspot.com

http://schneiderchen.de | © 2020 | http://angiesrecipes.blogspot.com
Taboon Bread with Za'atar
 © 2020 | http://angiesrecipes.blogspot.com
 |
 |

http://schneiderchen.de | © 2020 | http://angiesrecipes.blogspot.com
Taboon bread is a staple of Middle Eastern cuisine traditionally baked in a taboon oven. In the old days these ovens were built below the ground, and a key to heating them was hot, smooth stones that were at the bottom of the oven. The bread dough would be placed directly on the stones creating the signature bumps that distinguishes taboon bread from other types. Taboon ovens these days are built above ground, but the hot stones remainded as a way to bake the bread.
While most of us don't have such a clay oven at home, we can still use the conventional oven with a tray of pebbles (or a pizza stone or a cast iron skillet) to bake these Palestinian flatbread.
You can serve this flatbread with yoghurt, olive oil with zaatar (it's pronounced za-ah-tar), hummus, sumac chicken or even use it to make Turkish Lahmacun.
Za'atar, the Middle Eastern spice mixture is a blend of dried herbs (thyme, oregano or marjoram), sumac, cumin and coriander with sesame seeds. You can purchase pre-made za'atar or easily make your own.
| Bread | Za'atar |
|---|---|
|
|
- Mix all the ingredients for the spice blend together in a small bowl. Store in an airtight container. Store the za'atar in a cool, dark place in an airtight container for up to 6 months.
- For the dough, sieve the plain flour into a large bowl. Mix in the yeast, raw sugar, za'atar and sea salt. In a separate bowl mix the warm water and olive oil together before adding to the dry ingredients. Mix until you have a soft, sticky dough then cover with a cloth and set aside to prove for 10 minutes.
- Turn out the dough onto a floured work surface, and knead the dough for 10 minutes until you have a soft, shiny dough.
- Grease a bowl with a bit of olive oil. Transfer the dough to the bowl and turn it round so that its entire surface has a thin coat of olive oil. Cover with cling film and set aside to prove for up to an hour.
- Flour your hands and knock back the dough by turning it over three to four times in its bowl. Turn out onto a floured work surface and divide the dough into 4-6 equal pieces and form each piece into a ball. Roll each ball out to form a rough circle approximately 20 cm. Place the bread circle on a lightly floured cloth.
- Spray the dough circles lightly with water and sprinkle za'atar and sumac over the surface. Leave to prove again for 20-30 minutes.
- Preheat the oven to 275C/525F or to maximum temperature. The oven needs to be very hot. Place a roasting tray lined with pebbles, a cast iron skillet, or pizza stone on the middle shelf. Leave it to heat up for 20 minutes before baking the flatbreads.
- Bake two flatbreads at a time for 5-7 minutes, or until the flatbreads are puffy and brown spots start to develop. Remove the flatbreads from the oven and cover with a clean kitchen towel to keep them soft. Bake the remaining dough circles.

http://schneiderchen.de | © 2020 | http://angiesrecipes.blogspot.com
 |
 |

http://schneiderchen.de | © 2020 | http://angiesrecipes.blogspot.com
 © 2020 | http://angiesrecipes.blogspot.com
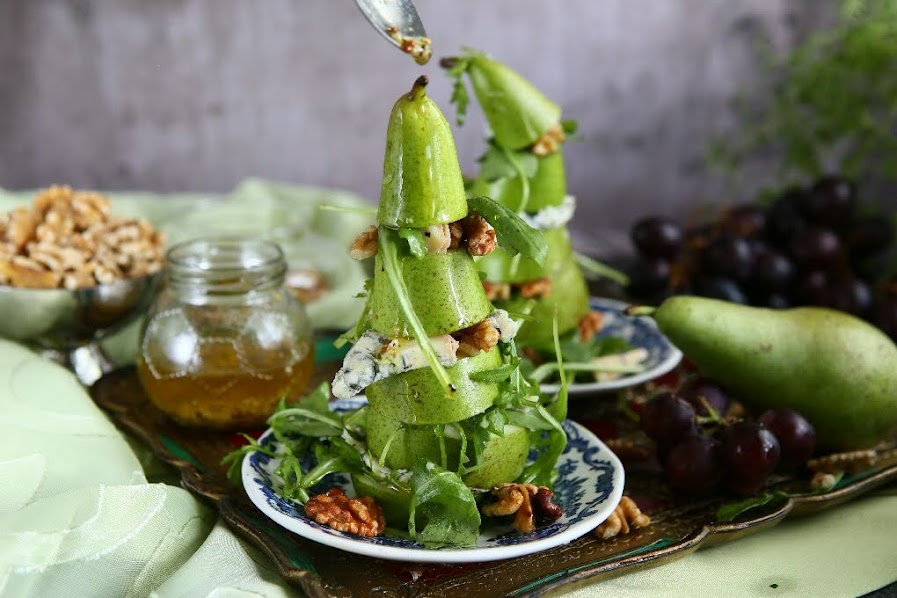
Stacked Pear Salad
 © 2020 | http://angiesrecipes.blogspot.com
 |
 |
 © 2020 | http://angiesrecipes.blogspot.com
This simple salad has a perfect mix of bitter peppery arugula, creamy, pungent blue cheese and crunchy walnuts dressed in a sweet tangy vinaigrette and nestled in layers of juicy, sweet Conference pears. The star of this Autumn salad is a whole pear that's been sliced and stacked - a fun way to make salads more exciting and tempting. Devour this salad as a light meal or serve it alongside grilled steak or fatty salmon.
| Dressing | |
|---|---|
|
|
- Slice each pear horizontally into 4-5 slices depending on the size, retaining the core and stem. Toss the pears with freshly squeeze lime juice to keep them from browning.
- In a bowl or glass jar, mix together olive oil, walnut oil, vinegar, maple syrup / honey, Dijon mustard and minced garlic. Taste and season with salt and pepper.
- Place arugula, toasted walnuts and blue cheese in a salad bowl. Drizzle some prepared dressing over and gently toss to coat.
- Assemble the pears on individual plates, with the arugula salad in between each slice. Drizzle a bit of vinaigrette over the pear and serve.

http://schneiderchen.de | © 2020 | http://angiesrecipes.blogspot.com

http://schneiderchen.de | © 2020 | http://angiesrecipes.blogspot.com

http://schneiderchen.de | © 2020 | http://angiesrecipes.blogspot.com
Spicy Baked Chicken Quarters
 © 2020 | http://angiesrecipes.blogspot.com
 |
 |
 © 2020 | http://angiesrecipes.blogspot.com
The chicken uses a spice rub of cayenne pepper, cumin, garlic powder, dried thyme, smoked paprika, smoked salt and pepper. They are simple to make and packed with flavour! I prefer using bone-in, skin-on chicken, as they retain moisture and don't dry out in the oven plus the skin gets extra crispy as it bakes. As a matter of fact, I ate all the skin first from 4 quarters after baking...they are just the best. I guess I will have to do a few more rounds of burpees and starjumps to burn the fat off.
|
- Preheat oven to 190C/375F. Line a baking dish with aluminum foil.
- Wipe the chicken quarters with paper towels and place them onto the baking dish.
- In a bowl, whisk together all the ingredients for the rub.
- Pour the paste over the chicken quarters and, using your hands, rub it well into the chicken pieces, on all sides. Place the onion slices around the chicken if using.
- Bake the chicken quarters until cooked through and juices run clear, about 50 minutes. Remove from oven, garnish with fresh herbs, and serve immediately.

http://schneiderchen.de | © 2020 | http://angiesrecipes.blogspot.com

http://schneiderchen.de | © 2020 | http://angiesrecipes.blogspot.com

http://schneiderchen.de | © 2020 | http://angiesrecipes.blogspot.com
Zucchini Soup with Scallion and Mascarpone
 © 2020 | http://angiesrecipes.blogspot.com
 |
 |
 © 2020 | http://angiesrecipes.blogspot.com
 © 2020 | http://angiesrecipes.blogspot.com
Zucchini contains very few calories and have a high water content and significant amout of vitamin C and potassium, which is the key to controlling blood pressure and helps to keep our muscles working properly.
This delicious zucchini soup recipe is the perfect use for the abundant summer squash in your garden or from the farmer market, and a little mascarpone makes it thick and luscious while scallion adds depth and sweetness to the soup too. It can be eaten hot or cold.
|
- Heat the olive oil in a pan over a medium heat and cook the scallion white part with a pinch of salt for 5 minutes until softened but not coloured. Add the garlic and cook gently for a few minutes then tip in the sliced zucchini and cook gently for 10-15 minutes.
- Pour in the vegetable stock and bring to the boil for a few minutes. Use a stick blender to process the soup until completely smooth, then stir in the mascarpone and green part of scallions. Puree again and season.
- Spoon into bowls and top with more mascarpone or soft boiled egg or sprout and mint leaves, and some lemon zest, if you like.

http://schneiderchen.de | © 2020 | http://angiesrecipes.blogspot.com

http://schneiderchen.de | © 2020 | http://angiesrecipes.blogspot.com

http://schneiderchen.de | © 2020 | http://angiesrecipes.blogspot.com


