
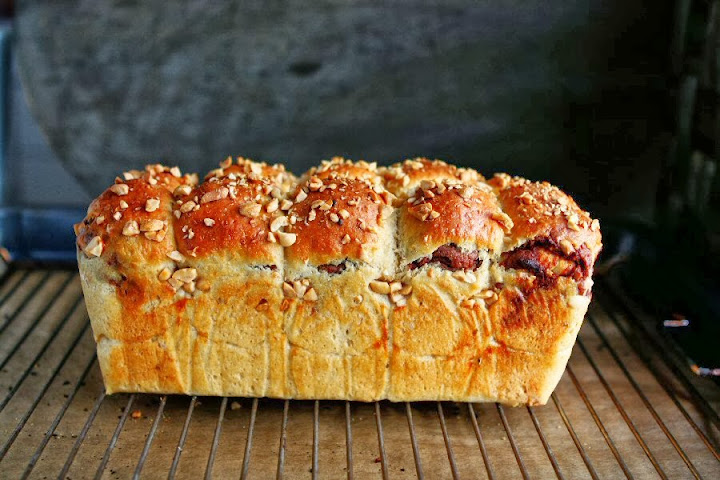
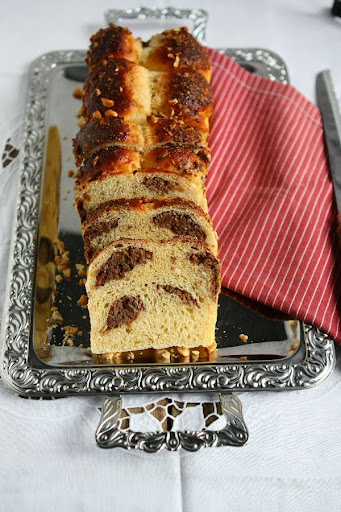
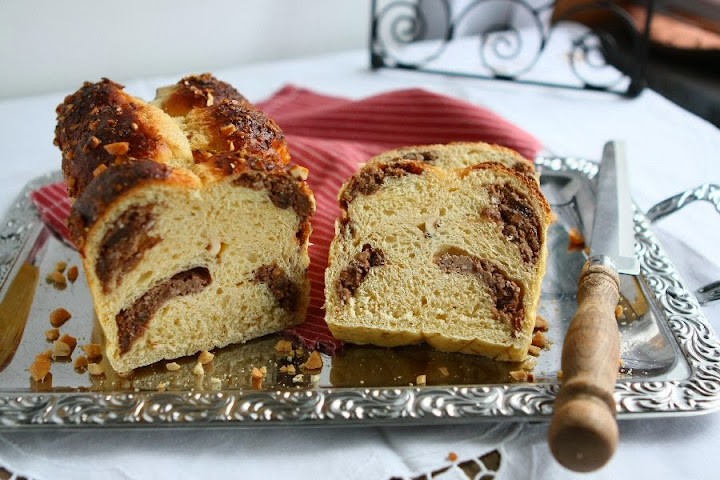
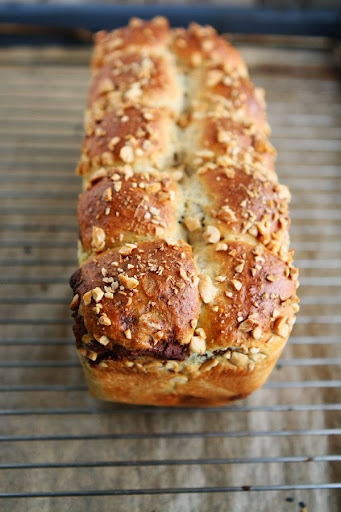
Kamut Spelt Bread
 http://schneiderchen.de | © 2014 | http://angiesrecipes.blogspot.com
 |
 |
 http://schneiderchen.de | © 2014 | http://angiesrecipes.blogspot.com
Spelt (dinkel wheat ) and kamut (khorasan wheat) are heirloom wheat varieties that contain gluten. So they are NOT for celiacs. If you are not diagnosed with gluten sensitivity and can enjoy these two 'ancient grains' with no side effects, then you’ll find that both have a rich buttery, nutty flavour and excellent nutritional profile.
This easy bread recipe comes from 'Brot selbst gebacken' by Kristiane Müller-Urban. You can make this bread using emmer, einkorn or modern common wheat.
|
- Crumble the fresh yeast into the bowl of your stand mixer. Add in sugar, 3 tablespoons of spelt flour, and 50 ml water. Stir until combined. Cover and set aside for 10 minutes.
- In another bowl mix together lukewarm buttermilk, olive oil, egg, honey and salt.
- Add the ground kamut, the rest of white spelt into the yeast mixture. Roughly stir together. Add in buttermilk-honey mixture. Stir at low speed until a soft dough forms. Increase the speed and knead until the dough cleans the sides of the bowl.
- Cover the bowl with a plastic film and set aside at a warm place for an hour until doubled in volume. Punch down the dough and divide into two portions, one is 480 grams, the other 360 grams (or 600-gram and 240 -gram). Divide the 480-gram-dough into 16 pieces (600-gram-dough into 20 pieces), each 30 grams and 360-gram-dough into 6 pieces (or 240 -gram into 4 pieces), each 60 grams.
- Wrap each 30-gram-dough with 15 grams of red bean filling. Shape into balls and place 8 dough balls into the base of a loaf pan and top with another 8 dough balls. Shape each 60-gram-dough into a ball. Place them on a parchment-lined baking tray.
- Cover with a kitchen towel and let rise in a warm place for about 1 hour, or just until doubled in volume. Meanwhile, preheat the oven to 190C/375F. Gently brush the egg wash mixture over the loaf and buns. Sprinkle the top of loaf with chopped peanuts.
- Bake the loaf for about 35 minutes and dinner buns for 20 minutes until the tops are golden brown. Remove them to a cooling rack or serve immediately.
http://schneiderchen.de | © 2014 | http://angiesrecipes.blogspot.com
 |
 |

http://schneiderchen.de | © 2014 | http://angiesrecipes.blogspot.com
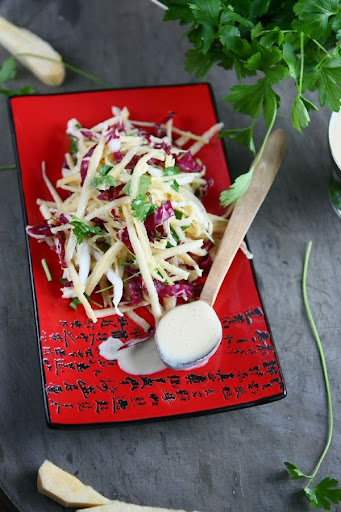
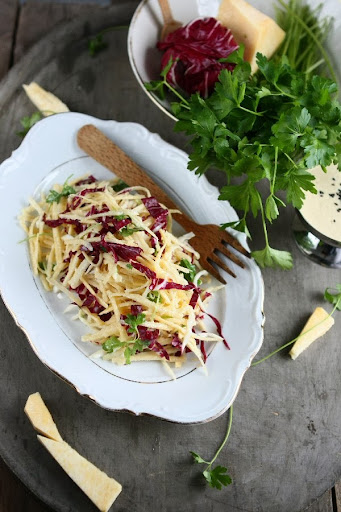
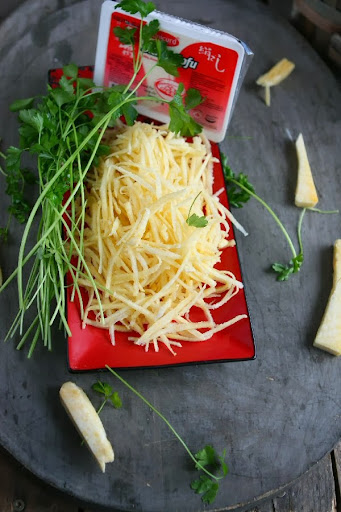
Rutabaga Radicchio Salad with Silken Tofu Dressing
 http://schneiderchen.de | © 2014 | http://angiesrecipes.blogspot.com
 |
 |
 |
 |
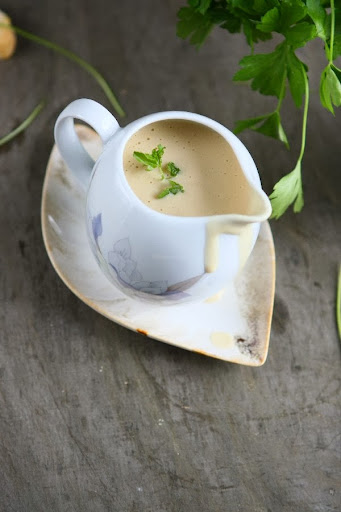
Grated rutabagas and shredded radicchio are dressed with a creamy silken tofu dressing. Apple juice reduction and apple cider vinegar add a perfectly sweet and tangy element to the dressing. Freshly chopped parsley is used in the salad to highlighten the flavours and to give it some extra colour.
Rutabaga, also know as Swede, is a nutritious root vegetable derived from turnips and cabbage, and has a sweet earthiness and is not peppery as turnips. It can be eaten raw or cooked.
| Tofu Dressing | Salad |
|---|---|
|
|
- Place apple juice in a saucepan and boil until reduced by half. Add in apple cider vinegar and soya sauce. Mix well and pour into the blender. Drain the tofu and add into the apple juice mixture. Blend until smooth. Add in sesame seed oil and sunflower oil. Blend for a minute on high.
- Use a sharp knife or vegetable peeler to peel the rutabaga. Peel enough of the skin so that the flesh exposed is yellow. Shred the rutabaga with a grater, mandolin or a food processor. Thinly shred the radicchio. Roughly chop the parsley.
- Put the grated rutabaga strips, shredded radicchio and chopped parsley in a large salad bowl. Add in 1 cup of dressing and toss all together until well combined. Cover with a plastic film and store in the fridge for a couple of hours to allow the flavours to mingle.
 |
 |

http://schneiderchen.de | © 2014 | http://angiesrecipes.blogspot.com
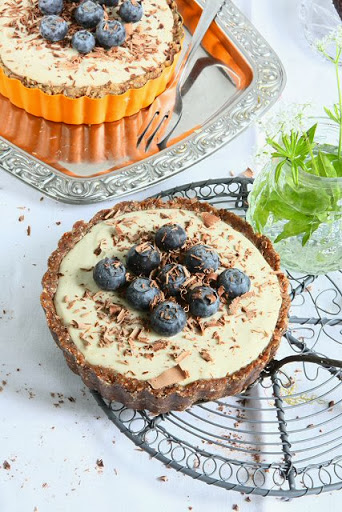
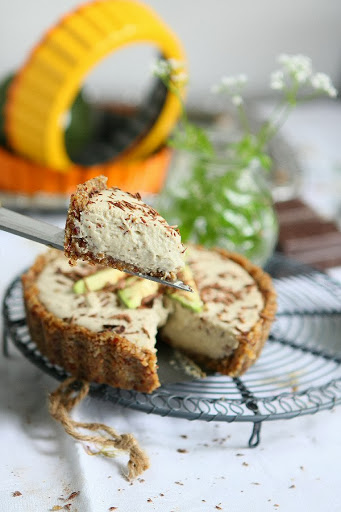
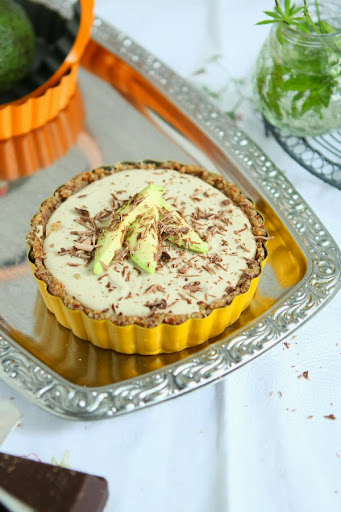
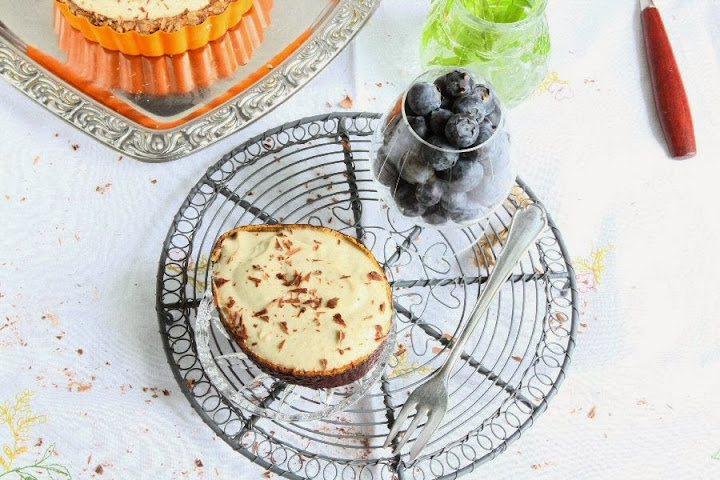
Avocado Milk Chocolate Mousse Tartlets
 http://schneiderchen.de | © 2014 | http://angiesrecipes.blogspot.com
 |
 |
 http://schneiderchen.de | © 2014 | http://angiesrecipes.blogspot.com
A decadently rich and irresistibly creamy avocado chocolate mousse on a oat-nut-date base that is not only delicious, also very healthy. The secret ingredient for the mousse is the heart-healthy avocado which has a creamy nutty flavour that works well with chocolate. If you have a milk allergy, substitute milk chocolate with dark one.
| Crust | Filling |
|---|---|
|
|
- Mix 2 tablespoons of orange juice with oats. Quarter the dried dates. Pulse dates and almonds in a food processor until they turn into crumbs. Add in 1 tablespoon of orange juice. Mix the almond-date-mixture with oats and cocoa powder. Press into three 12-cm tartlet moulds and put in the fridge.
- Place the chopped chocolate in a small bowl. Place over a small saucepan of barely simmering water. Stir until the chocolate is melted and smooth, about 3 minutes. Set aside to cool slightly.
- Using a food processor, blend the melted milk chocolate, melted coconut oil, avocados, lime juice, maple syrup, vanilla, and salt until smooth and creamy, scraping the sides of the bowl as needed.
- Divide the mousse into tartlet cases and refrigerate for at least 4 hours or overnight. Grate some milk chocolate over and arrange some avocado slices or fresh berries atop.

http://schneiderchen.de | © 2014 | http://angiesrecipes.blogspot.com
 |
 |
http://schneiderchen.de | © 2014 | http://angiesrecipes.blogspot.com
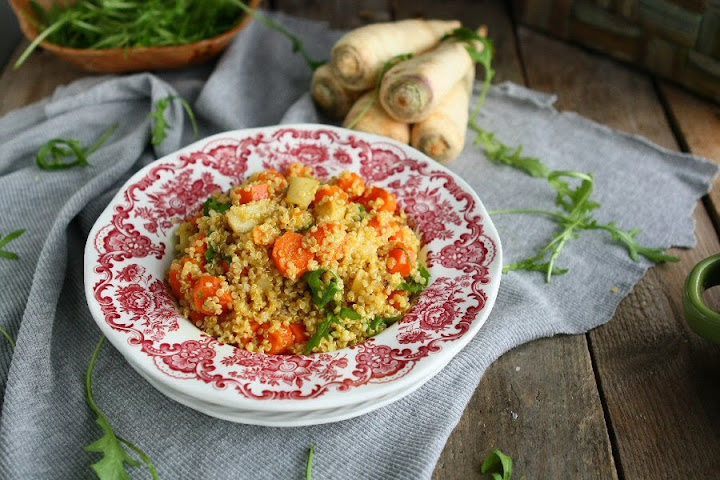
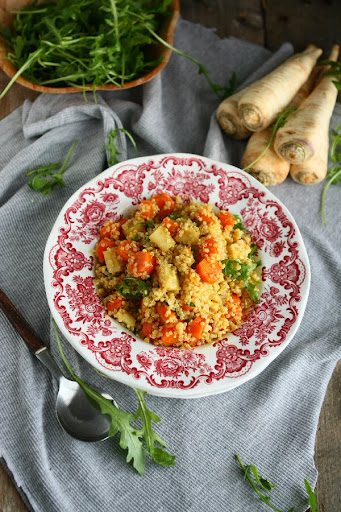
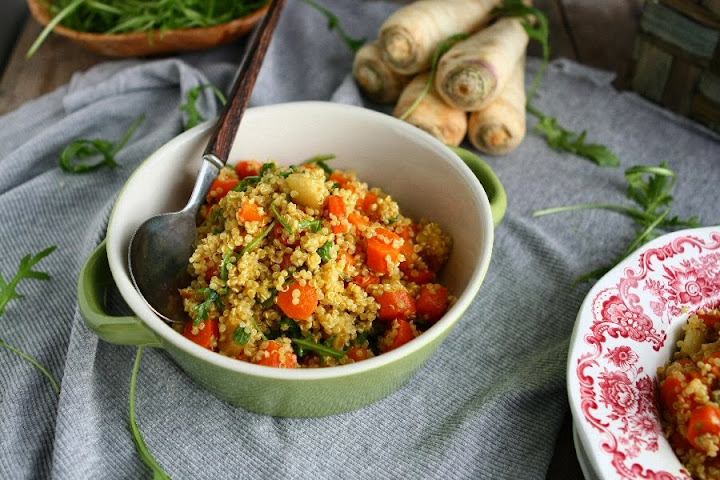
Quinoa Root Vegetables Salad with Curry Vinaigrette
 http://schneiderchen.de | © 2014 | http://angiesrecipes.blogspot.com
 |
 |
This simple, yet rewarding protein-rich quinoa recipe with ginger-curry vinaigrette, which tastes even better the next day, is a great way to use up any winter vegetables you have in the fridge. It's wonderful as a salad and a side dish with some oven roasted chicken, or as a vegetarian main.
Parsley root, aka Hamburg parsley, rooted parsley, looks deceptively similar to a parsnip, but is less pungent than parsnip and has a faint parsley taste. It has a sweet taste, and is often used in soups, stews, and side dishes in Germany.
| Salad | Ginger Curry Vinaigrette |
|---|---|
|
|
- In a bowl, whisk together the lemon juice, vinegar, honey, curry powder, ginger, garlic, salt and pepper. Whisking constantly, add the oil in a slow, steady stream, until the mixture is emulsified and well combined. Taste and adjust the seasoning.
- Preheat oven to 200C/400F. Place root parsley, carrots, oil and spices in a bowl. Toss to coat. Transfer to a baking tray lined with baking paper. Roast for about 25 minutes until tender.
- Meanwhile, place quinoa and water in a saucepan over high heat. Cover and bring to the boil. Reduce heat to low. Simmer for 10 to 12 minutes or until liquid is absorbed.
- Place quinoa in a salad bowl. Add root vegetables, arugula and the dressing. Toss gently to combine.
http://schneiderchen.de | © 2014 | http://angiesrecipes.blogspot.com

http://schneiderchen.de | © 2014 | http://angiesrecipes.blogspot.com
Chocolate Spelt Cookies
 http://schneiderchen.de | © 2013 | http://angiesrecipes.blogspot.com
 |
 |
Change the grains in your favourite chocolate chip cookies by using a mix of white spelt flour and oat flour instead of the traditional all-purpose flour. These cookies are slightly chewy with a nice firmness. To jazz up those plain cookies and to use up all the holiday leftovers, I have used some melted white chocolate and sprinkles for the topping. Enjoy them with a glass of milk.
|
- Preheat oven to 180C/350C/. Line two oven trays with baking paper.
- Use an electric mixer to beat the butter, sugar and vanilla in a medium bowl until creamy and pale in colour. Add the spelt flour, oat flour, cocoa powder, baking powder and baking soda and stir to combine.
- Roll tablespoonsful of mixture into balls and place on the prepared trays, leaving 3-cm between each cookie. Use the palm of your hand to gently flatten.
- Bake for 15 minutes or until firm to the touch, swapping trays halfway through cooking. Remove from oven and set aside on trays to cool completely. Cool cookies on a wire rack.
- Cut the white chocolate couverture into smaller pieces and place in a bowl set over a saucepan of simmering water. Stir frequently with rubber spatula until fully melted.
- Spread white chocolate icing over each cookie and sprinkle with sprinkles. Set aside for 30 minutes to set.

http://schneiderchen.de | © 2013 | http://angiesrecipes.blogspot.com
 |
 |

http://schneiderchen.de | © 2013 | http://angiesrecipes.blogspot.com
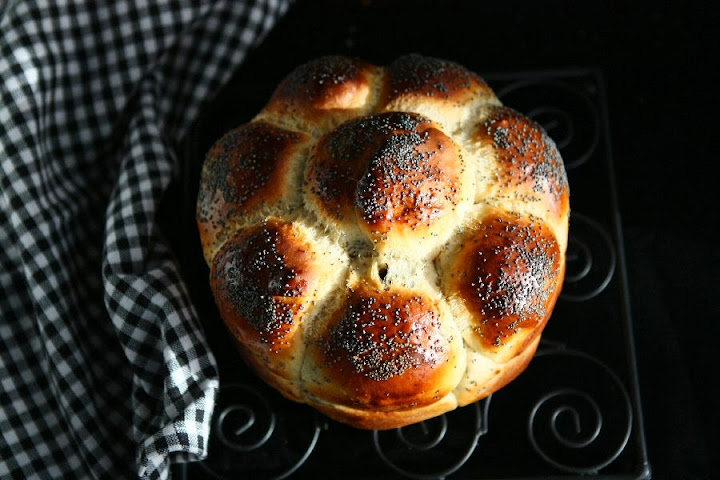
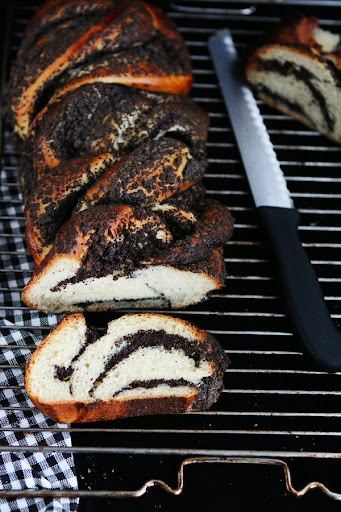
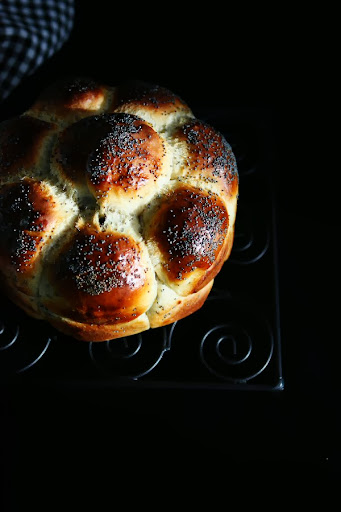
Buttermilk Spelt Bread with Poppy
 http://schneiderchen.de | © 2013 | http://angiesrecipes.blogspot.com
 |
 |
This sweet bread is so soft and light that it tastes almost like a sponge cake. Excellent served at an afternoon tea or any occasion! I really love the earthy flavour and golden color the saffron imparts to the bread. And it took all my willpower to not eat the whole loaf after it's right out of the oven. The stevioside powder I used to make the poppy filling is a pure extract from the leaves of the stevia plant, about 300 times sweeter than white sugar. Replace it with 150 grams of sugar if you are not fond of stevia.
Buttermilk Spelt Bread with Poppy
adapted from-Backen mit Stevia by Christiane Schäfer & Sandra Stehle (p.28)
-Brot selbst gebacken by Kristiane Müller-Urban (p.27)
| Starter | Dough | Filling |
|---|---|---|
|
|
|
- Crumble the fresh yeast in a mixing bowl. Add in honey, white spelt flour and water. Stir until smooth and well blended. Cover with a clean kitchen towel and leave it at a warm place for an hour.
- Whisk together the white spelt flour and salt in a mixing bowl. In another bowl, stir buttermilk, honey and saffron until combined.
- Add the starter to the flour mixture, roughly stirring together, then add in buttermilk mixture, eggs and butter. Now stir all the ingredients in the mixing bowl fitted with dough hook until the dough has become smooth and elastic.
- Turn out the dough onto a lightly floured work surface and shape the dough into a ball. Place the dough back to the mixing bowl. Cover with a kitchen towel and allow it to rise for an hour in a warm place until it has doubled in volume.
- Meanwhile prepare the filling. Dry roast the ground poppy seeds in a heavy-based pan until aromatic, stirring frequently to prevent burning. Stir in pure stevia extract powder, grated lemon peel and a pinch of salt. Pour in milk and bring the mixture to a simmer. Remove from the heat and leave at side to cool to room temperature.
- Place the dough on a lightly floured work surface and knead briefly. Divide the dough into 2 portions, one 720 grams and the other 600 grams. Divide the 480-gram-dough into 16 portions, each 45 grams. Wrap each 45-gram-dough with 15 grams of poppy filling. Shape into balls and place 8 dough balls into the base of a 24-cm springform pan and top with another 8 dough balls.
- Cover with a kitchen towel and leave it at a warm spot until doubled in volume, about 30 minutes. Brush the top with egg wash and sprinkle with some poppy seeds if desired.
- Roll out the 600-gram-dough into a 35x60-cm rectangle. Spread the rest of poppy filling over the dough, leaving a narrow margin around the edges uncovered. Starting with a long edge, gently roll the dough into a log. Seal edges well by pinching close and slice it in half lengthwise, leaving 5cm intact. Turn each half cut-side up and carefully plait the halves together, keep the cut-side up to expose the filling. Place it in a parchment-lined baking tray. Cover and set aside for 20 minutes.
- Preheat the oven to 190C/375F. Bake for about 35-45 minutes until nicely golden brown.
 |
 |

http://schneiderchen.de | © 2013 | http://angiesrecipes.blogspot.com
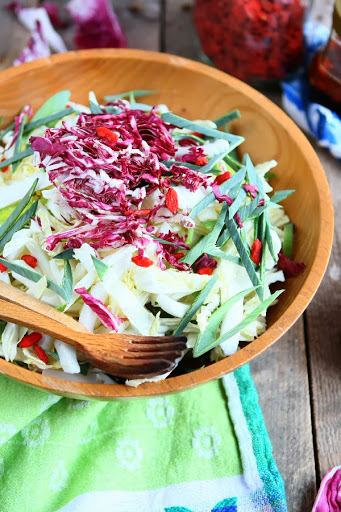
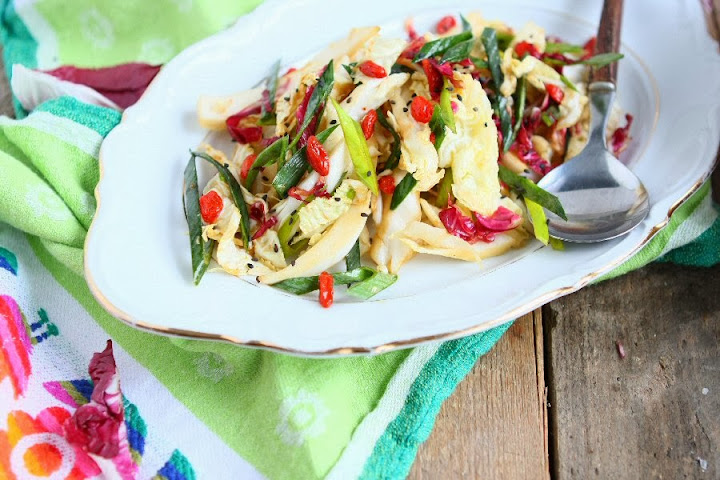
Chinese Cabbage and Leek Salad with Goji Vinaigrette
 http://schneiderchen.de | © 2013 | http://angiesrecipes.blogspot.com
 |
 |
This Asian-inspired cabbage salad, packed with vitamins A and C, and full of antioxidants and fiber, combines a half head of thinly sliced Chinese cabbage and leek with a quick vinaigrette prepared with peanut oil and goji berries. You can add some roasted sesame seeds or peanuts for extra crunchiness.
|
- Finely shred the Chinese cabbage and radicchio. Cut the leek in half lengthwise and wash in water, being careful to check all the layers for hidden dirt. Drain and thinly sliced the leeks. Place the cabbage, radicchio, and leek in a large bowl, cover and refrigerate until ready to use.
- Meanwhile, make the dressing. In a glass jar, add in peanut oil, sunflower oil, rice vinegar, soya sauce, honey, goji berries, salt and pepper. Put the lid on the jar and shake until well blended. Refrigerate for about an hour. Shake well before using. Pour the dressing over the salad and toss gently to coat. Sprinkle some roasted sesame seeds over if using.
 |
 |
http://schneiderchen.de | © 2013 | http://angiesrecipes.blogspot.com

http://schneiderchen.de | © 2013 | http://angiesrecipes.blogspot.com
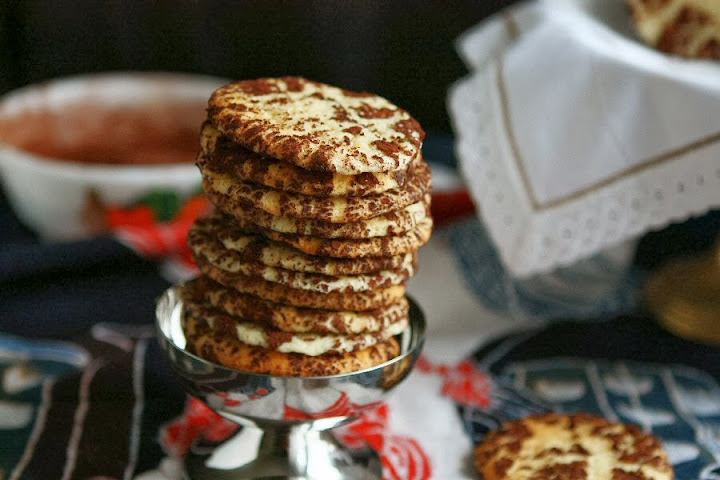
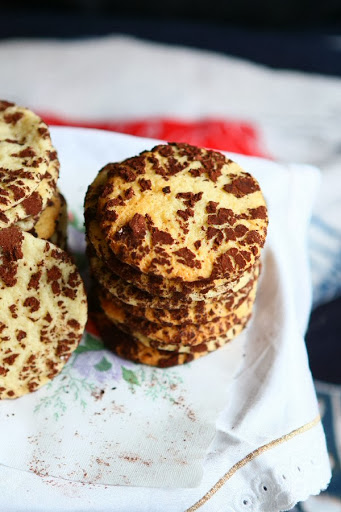
White Chocolate Spelt Cookies
 http://schneiderchen.de | © 2013 | http://angiesrecipes.blogspot.com
 |
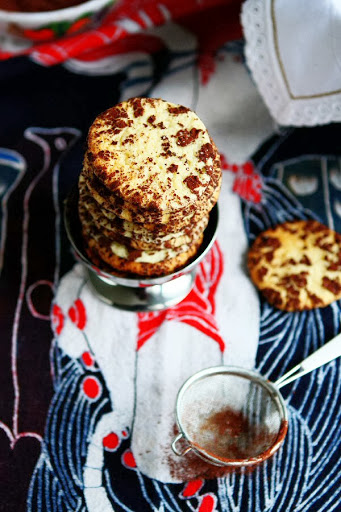 |
These white chocolate cookies are easy and fun to make. It is basically a white chocolate vanilla bean cookie dough, shaped into balls and rolled it in a mixture of Dutch-process cocoa and powdered sugar. I shaped the cookie balls a little too small, so the final result doesn't look as thick as the original recipe I found on Eat the Love. Still, they are very delicious!
Would like to wish everyone a Merry Christmas and a Very Happy New Year. Hope you all enjoy your Holidays!
| Cookie Dough | Coating |
|---|---|
|
|
- Preheat the oven to 180C/350F and line a baking sheet with a piece of parchment paper. Melt the chopped white chocolate in a metal bowl placed over a pot of simmering water (making sure the metal bowl doesn’t actually touch the hot water). Measure the buttermilk in a glass measuring cup and add the honey, vanilla extract and rum. Stir to dissolve the honey into the buttermilk.
- Place the white spelt flour, milk powder, baking powder and salt in a medium bowl and stir vigorously with a balloon whisk.
- Place the butter and sugar in the bowl of a stand mixer fitted with the paddle attachment. Split the vanilla bean lengthwise and scrape the seeds out of the pod into the butter and sugar. Cream the butter together with the sugar and vanilla seeds on medium speed until fluffy. Beat in egg until well combined. Add the melted white chocolate and beat to incorporate.
- Add a third of the dry ingredients to the butter and beat to incorporate. Add half the buttermilk to the batter and beat to incorporate. Repeat with another third of the dry ingredients, the remaining buttermilk mixture and ending with the dry ingredients.
- Mix the cocoa powder and confectioners’ sugar together in a small bowl until uniform in color. Place the granulated sugar in another small bowl. Scoop a tablespoon of the dough out of the bowl and roll it into a ball, then roll it in the granulated sugar first then the cocoa powder mixture. Set on the lined baking sheet and repeat with the remaining dough, placing the cookies about two inches apart from each other.
- Bake in the oven for about 10 to 12 minutes or until the bottom edges of the cookie start to look golden brown. Let cool on the baking sheet for five minutes before moving the cookies to a wire cooling rack.
 |
 |

http://schneiderchen.de | © 2013 | http://angiesrecipes.blogspot.com


