
Crunchy Vegetable Wraps with Green Pea Dip
 © 2021 | http://angiesrecipes.blogspot.com
 |
 |
 © 2021 | http://angiesrecipes.blogspot.com
 © 2021 | http://angiesrecipes.blogspot.com
Veggie wraps are fun and easy to make, ideal as a snack and a perfect alternative to bread when you're trying to lower your carb intake. They are grain-free, gluten-free, fiber-packed and totally customizable! Besides lettuce, you can use chard, kale, and collard greens to make these wraps too. I am using mint and green pea dip, but you could try any spreads and sauces you enjoy--try traditional hummus, guacamole, peanut sauce or ranch.
| Wraps | Mint and Green Pea Dip |
|---|---|
|
|
- Place the frozen peas in a small saucepan and cover with water. Place the saucepan over medium-high heat and bring to a boil. Once boiling, turn the heat off and drain the peas.
- Transfer the drained peas to a food processor and pulse a few times until the peas becomes a chunky puree. Add in tahini, lemon juice, olive oil, garlic, chopped chilli pepper, mint leaves, chopped spring onions, salt and pepper. Process until you have a smooth and thick puree.
- Taste and season with more salt and pepper. Transfer the dip to a serving bowl and garnish with a drizzle of olive oil, freshly milled black pepper and a few pieces of peas if desired.
- Place the two lettuce leaves, overlapping by about one-third. Crumble some feta over and arrange the vegetable and kiwi sticks on top. Season with salt and pepper. Gently roll it up, tuck in the end and secure the bundle with a kitchen twine. Place the bundles in a large serving bowl or platter with the dip. Sprinkle some dill fronds over.

© 2021 | http://angiesrecipes.blogspot.com

© 2021 | http://angiesrecipes.blogspot.com
 |
 |

© 2021 | http://angiesrecipes.blogspot.com
Beetroot Spelt Crepes with Horseradish Labneh
 © 2021 | http://angiesrecipes.blogspot.com
 |
 |
 © 2021 | http://angiesrecipes.blogspot.com
This beautiful vegetarian pancake recipe is easy but indulgent and very delicious made with beet juice and spelt, then filled with a horseradish labneh, rolled and served with some leafy greens and pomegranate seeds. They make a perfectly light and yummy lunch. You won't be disappointed. If you're not sure if horseradish is your thing, start with just a tablespoon. Add in some chopped fresh herbs if desired.
|
- Mix labneh, horseradish cream, and lemon juice in a medium bowl. Season with salt and lots of pepper. It can be made a couple of days ahead. Cover and chill.
- Sift the spelt flour into a mixing bowl. Whisk together the beet juice, milk and egg in a jug until combined. Gradually add egg mixture to the flour in the bowl, whisking until smooth and combined. Cover. Set aside for 30 minutes.
- Spray a 22-cm non-stick frying pan with coconut oil. Pour 1/5 of the batter into pan. Swirl to cover base. Cook for 2 minutes or until light golden. Turn. Cook for 30 seconds. Transfer to a plate. Cover to keep warm. Repeat with remaining mixture to make 5 crepes.
- Spread 2 tablespoons of horseradish labneh evenly onto the crepe. Roll up firmly to enclose the filling. Serve immediately with leafy greens and pomegranate seeds.

© 2021 | http://angiesrecipes.blogspot.com

© 2021 | http://angiesrecipes.blogspot.com

Toasted Buckwheat, Blistered Grape and Herb Salad
 © 2021 | http://angiesrecipes.blogspot.com
 |
 |
 © 2021 | http://angiesrecipes.blogspot.com
 © 2021 | http://angiesrecipes.blogspot.com
Fancy a salad for your next meal? Try this superfood buckwheat salad. It's nutritious, tasty and incredibly satisfying. Combined with different sorts of fresh herbs, blistered red grapes, pomegranate seeds and a lemony smoky cumin dressing, this salad really brings this pseudo grain to life!
Buckwheat, like quinoa, amaranth, teff, and Kañiwa, belongs to pseudocereals. Pseudocereals are plants that produce fruits or seeds which are used and consumed as grains, though botanically pseudocereals are neither grasses nor true cereal grains.
Buckwheat, despite its name, is not related to wheat and is thus gluten-free. It mainly composed of carbs and a decent amount of fiber. Buckwheat also contains small amount of protein.
| Salad | Dressing |
|---|---|
|
|
 |
 |
 |
 |
- Place the buckwheat in a frying pan and toast over medium heat until lightly browned and the buckwheat is taking on a nutty aroma. Remove and allow to cool.
- Rinse buckwheat well under cold running water, drain and cook in boiling salted water until just tender, about 10 minutes. Drain, refresh under cold running water and transfer to a large tray to cool to room temperature.
- Meanwhile, add the avocado oil to a pan over medium-high heat. Once sizzling, add the grapes and cook, shaking the pan regularly until you see the grapes start to blister. At this point add the pomegranate molasses and cook until they look coated and shiny, about 30-45 seconds. You don't want the sugar in the grapes or the pomegranate molasses to burn.
- Once the buckwheat cooled, place them in a large bowl, and season generously with salt and pepper. Add the blistered grapes, pomegranate seeds, chopped Brazil nuts, and herbs. Toss gently to combine.
- To make the dressing, combine all ingredients in a small bowl and whisk thoroughly.
- Pour dressing over the salad and toss again. The buckwheat can really absorb the dressing, so let it rest for a minute or so and, if necessary, drizzle over a little extra olive oil. Season generously and serve.

© 2021 | http://angiesrecipes.blogspot.com
 |
 |

© 2021 | http://angiesrecipes.blogspot.com
Greek Wings With Feta, Lemon and Dill
 © 2021 | http://angiesrecipes.blogspot.com
 |
 |
 © 2021 | http://angiesrecipes.blogspot.com
This flavour-packed Greek wing recipe is not only easy to make, also fingerlickingly delicious. A favourite of both adults and kids, you can't go wrong serving up this budget-friendly cut. Great as an appetizer for parties or with some noodle salad as a nutritious family meal. Either way, just watch them disappear like magic.
| Wings | Dressing and Topping |
|---|---|
|
|
- Pat dry the chicken wings with a paper towel. Use a pair of kitchen shears or a sharp knife to cut through the joint of the wings. You will have 20-24 wingettes (flats) and drumettes.
- Whisk lemon zest and juice, garlic, olive oil, black pepper, salt, and oregano in a large bowl to combine. Add wings and toss to coat. Cover and chill at least 2 hours and overnight.
- Preheat oven to 190C/375F. Line 1 large tray with foil and set a wire rack in it if you have one. Arrange the chicken wings on the wire rack in the baking tray. Bake wings at the top of hot oven, rotating baking tray halfway through, until deeply browned and crisp, about 1 hour.
- Whisk olive oil, lemon juice, garlic, cayenne, and black pepper in a small bowl. Season the dressing with salt.
- To serve, stir chopped dill into dressing. Arrange wings on a platter, drizzle dressing over, and scatter feta on top.

© 2021 | http://angiesrecipes.blogspot.com
 |
 |

© 2021 | http://angiesrecipes.blogspot.com
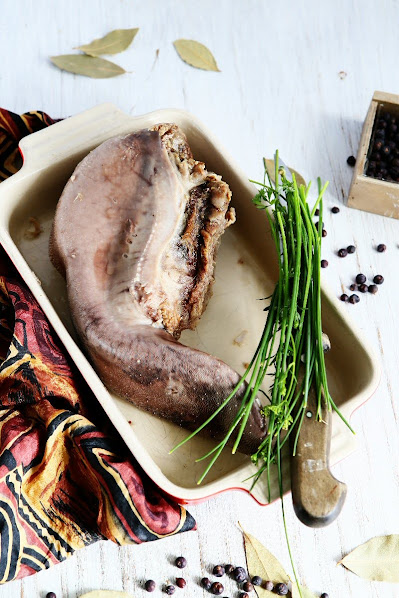
Fleischsalat aus Rinderzunge Beef Tongue Salad
 © 2021 | http://angiesrecipes.blogspot.com
 |
 |
 © 2021 | http://angiesrecipes.blogspot.com
Fleischsalat is a classic German meat salad made with sausage, pickles and tossed with a mayonnaise dressing. They are often eaten with some German bread or Brötchen / buns. I am using the beef tongue instead as I enjoy organ meat and like to experiment with eating offal. Use mortadella or other ham instead if you don't eat organ meat. This special cut of beef is wonderfully flavourful and tender, and it's also surprisingly easy to make, esp. if you have a pressure cooker. You can't typically find many internal organs in supermarkets. I usually order the whole set of organs or 1/4 cow from the farmer or ask the butcher from the store to special order for me. I like organ meat because they are nutrient-dense and tasty. Plus, nose-to-tail eating is a responsible way for carnivores to consume meat. Eating just the steaks or other muscle meat of the animal is simply wasteful and irresponsible.
Garam Masala Minced Beef and Pea Quiche
 © 2021 | http://angiesrecipes.blogspot.com
 |
 |
 © 2021 | http://angiesrecipes.blogspot.com
 © 2021 | http://angiesrecipes.blogspot.com
This simple, hearty savoury tart is perfect for simple weeknight dinners or an easy meal that wows guests. The true Parmigiano-Reggiano cheese speaks for itself, and mixed with eggs and heavy cream makes the perfect base for the minced beef and green pea filling. You can stick to the basic quiche crust, or flavour it with a bit of turmeric and black pepper for the colour, health and fun. Serve the quiche with a simple salad and a glass of medium-body red wine, such as Cotes du Rhon. Adding garam masala to the ground beef has brought out the best flavour of the meat and add a little sweet hint to it. If you don't have the spice blend, use curry powder instead.
| Turmeric Crust | Filling |
|---|---|
|
|
 |
 |
 |
- To make shortcrust pastry, place flour, turmeric powder, black pepper and butter in a food processor. Process until fine crumbs form. Add egg yolks and water. Process until dough just comes together. Turn onto a lightly floured surface and gently knead until smooth. Shape into a disc. Wrap in plastic wrap. Place in fridge for an hour to rest.
- Preheat oven to 200C/400F. Roll out the pastry on a lightly floured surface to a 3mm-thick disc. Line a 23cm fluted tart tin with the pastry, trimming any excess. Prick the base all over with a fork, then chill for 15 minutes.
- Line with baking paper, fill with pastry weights or beans or rice, then blind bake for 12 minutes. Remove the baking paper and weights (or beans/rice), then return to the oven for 5-6 minutes until golden.
- Meanwhile brown the ground beef and minced garlic in a skillet over medium heat, stirring to break up the meat. This should take about 5-8 minutes. Remove from the heat. Drain off any excess fat. Stir in garam masala and green peas.
- In a medium bowl, stir together the eggs, cream, and mustard. Season. Stir in grated Parmigiano-Reggiano, and chopped parsley.
- Scatter the browned ground beef and peas over the base of the tart, then pour over the egg mixture. Bake for 25-30 minutes until just set.

© 2021 | http://angiesrecipes.blogspot.com

© 2021 | http://angiesrecipes.blogspot.com

© 2021 | http://angiesrecipes.blogspot.com


