Featured Recipe
Vegan Gluten Free Seeded Oat Bread
Saturday, May 31, 2014  |
 |
This bread tastes AMAZING and uses only wholegrain oats, lots of seeds (sunflower, hemp, pepita, chia, psyllium, and flax seeds) and almonds. It is high in protein and fiber. It is gluten-free and vegan. If you are interested in fat-free baking, here is the similar one I baked last year using homemade pearsauce in place of oil and the result was great too.
The psyllium husks provides a binder for the bread, in place of the gluten found in traditional flour. You can find them from health food stores or online.
Vegan Gluten Free Seeded Oat Bread
adapted from David Lebovitz| Dry Ingredients | Liquid Ingredients |
|---|---|
|
|
- Toast the seeds. Preheat your oven to 180C/350F. Spread the sunflower, hemp and pumpkin seeds on a baking sheet and toast until they start to brown, about 15 minutes, stirring halfway during baking.
- Grease or line a standard loaf pan with parchment paper. Place all the dry ingredients into a big bowl. Then pour in the liquid ingredients. Mix it all up with your hands or a wooden spoon.
- Once it’s well-mixed, scoop it into your prepared loaf pan and smooth out the top so it looks nice. Cover it with plastic film and leave it in the fridge for at least a few hours, up to a whole day.
- Put a rack in the middle of the oven and preheat to 180C/350F. Remove the bread from the refrigerator and let it come to room temperature. Bake the bread for about an hour or so, then take it out and gently remove the loaf from the pan. Let cool completely on a cooling rack for at least 2 hours before slicing.
 |
 |
Sprouted Quinoa Salad with Apricots
Monday, May 26, 2014  |
 |
Quinoa is a rich source of dietary fiber, potassium, magnesium, iron, zinc, calcium, vitamin E and phosphorus. Quinoa is also gluten-free, making it a good grain substitute for people with wheat sensitivities. Sprouting produces enzymes which aid digestion and also helps the absorption of minerals. For easy directions on sprouting quinoa, check out these instructions from Healy eats real. If you’re searching for a light summer salad, look no further! This light and delicious salad features sprouted quinoa along with fresh apricots, oakleaf lettuce, onion and a basic white balsamic vinaigrette. It's perfect for the lunch or a picnic.
| Salad | White Balsamic Vinaigrette |
|---|---|
|
|
- Combine all the ingredients into your jar or shaker and seal well. Shake vigorously to thoroughly mix together all ingredients and emulsify the oils and mustard. Shake vigorously before use.
- Rinse quinoa thoroughly and place in a jar or bowl and cover generously with cold water. Let quinoa soak for about 8 hours or overnight.
- Drain and rinse the quinoa. Place a piece of cloth over the neck of the jar and secure with a rubber band.Place jar in a bowl with the cloth covered side down so the excess water will drain out. You can drain the quinoa in a colander lined with a kitchen towel. Repeat this rinsing step twice a day for two days. You will see little thread-like sprouts coming from the quinoa.
- The sprouted quinoa can be eaten raw or if preferred, just cook them with equal parts of water for about 20 minutes.
- Place sprouted quinoa, oakleaf lettuce, sliced red onions and quartered apricots in a mixing bowl. Dress with vinaigrette and toss until well combined.
 |
 |
Gluten Free Sprouted Black Quinoa Bread
Tuesday, May 20, 2014  |
 |
This is a nutrient rich, dense and moist quinoa bread that I found here. It has a nutty texture that comes from the sprouted black quinoa and makes the perfect sandwiches.
I can’t tell you how good it tastes and how easy this recipe is. The most important steps would be to soak your quinoa overnight until sprouty before starting the recipe and puree it with other ingredients in your food processor. Don't expect it would resemble the traditional bread because it's naturally gluten-free, it wouldn't rise high. Use white or red quinoa if you don't have the black variety and tapioca starch can be substituted with cornstarch.
|
- Rinse quinoa thoroughly and place them in a pot or plastic container. Cover the quinoa with water and let soak overnight. Drain.
- Preheat the oven to 190C/375F. Grease or line a small loaf pan with parchment paper.
- Place the drained quinoa in a blender along with egg whites, almond milk, maple syrup, tapioca starch, and a good pinch of sea salt. Process until everything is well blended and pureed. You don't want any whole quinoa seeds left.
- In another bowl, whisk together the almond meal, baking soda, and baking powder. Pour the pureed quinoa mixture into the dry one. Mix until just incorporated. The mixture will as runny as pancake batter.
- Pour the batter into the prepared pan and bake for about 50 minutes. Remove the bread from the pan and cool on a wire rack for 10 minutes before slicing.
 |
 |
Coeur de Boeuf Salad with Balsamico Cream and Argan Oil
Thursday, May 15, 2014  |
 |
Coeur de Boeuf, originated from Italy, commonly known as ‘ox-hearts’, is known for its meaty, fleshy texture and fruity taste, and, of course, for its beautiful unusual shape. These 'old-fashioned' tomatoes are beautifully ribbed and ripen from the inside out, turning from green to orange into a deep red. Perfect for pastas and sauces and just superb in salads with fresh herbs and cheese.
|
- Arrange the tomato slices on a platter.
- Scatter black olive rings and cilantro leaves over tomato slices.
- Sprinkle with cracked green pepper and salt. Drizzle the salad with balsamico cream and argan oil.
 |
 |
Beetroot Hummus with Asparagus
Saturday, May 10, 2014  |
 |
This hummus recipe is a little different from the classic one. It's coloured with nutritious beetroot and tastes heavenly. This is a versatile recipe that simple to prepare and bursting with flavour. Perfect as a dip with your favourite veggies or as a spread on some homemade gluten-free bread.
|
- Place the beetroot, chickpeas, garlic, tahini and lemon juice in the bowl of a food processor and whiz to a coarse paste.
- With the motor running, slowly add the oil through the feed tube until mixture is thick and smooth. If it is too thick, gently drizzle a little water into the mixture until just right. Season to taste. Drizzle a little extra olive oil over the top and serve with fresh asparagus.
 |
 |
Asparagus with Crunchy Gremolata Crumbs
Tuesday, May 06, 2014  |
 |
A delicious and fresh-as-spring side or starter, this classic Italian garnish together with a toasted crumb topping and truffle oil gives those blanched green asparagus a burst of flavours and lifts this spring veggie to a whole new level.
Gremolata is a chopped herb condiment classically made of parsley, garlic and lemon zest. It is a traditional accompaniment for veal, fish and also excellent sprinkled over pasta.
|
- Cook asparagus in shallow, simmering salted water 5 minutes. Drain, arrange on a platter and drizzle with one tablespoon of the truffle oil, then toss well to coat.
- While asparagus cooks, make the gremolata crumbs. Whiz the bread in a food processor to coarse crumbs. Dry toast the breadcrumbs in a small frying pan over a medium heat until golden and crisp.
- Place in a bowl and stir in the garlic, lemon zest, parsley, some sea salt, and freshly ground black pepper. Set the mixture aside.
- Sprinkle the gremolata crumbs liberally over the asparagus with the remaining truffle oil. Scatter over the strips of lemon zest and lemon wedges at side. Serve immediately.
Meet fellow foodies face-to-face and share your cooking secrets and favorite recipes
Saturday, May 03, 2014
As a real foodie, I’m always looking for new recipes and new inspiration and I’m sure you guys are too. I also really love cooking just by myself, since no-one can get in my way when I’m at my private Kingdom (read: kitchen). But.. of course, I get my new recipes and inspiration from fellow foodies and besides that, I also really love to exchange food experiences and recipes with others. This is why I really got excited when I bumped into the new peer-to-peer marketplace Withlocals.com.

They connect food lovers/travelers from all over the world with local foodies from Southeast Asia. So, if you love traveling and like to taste the real local food, you should try a Withlocals Eat experience. You can easily book a home-dinner with a local from one of the country’s Withlocals has launched in (Malaysia, Singapore, Thailand, Indonesia, Vietnam, Sri Lanka and Nepal).
Imagine.. you’re traveling to Singapore and you really love to try the real Singaporean food and maybe, also get some insights in those recipes. You can go on a home-dinner with a local, who will tell you all the ins and outs about his or her knowledge of Singaporean recipes. Of course, in exchange for some of your secrets.

To the foodies who live in one of the Withlocals countries: you guys can host home-dinners yourself! This way, you can show off your cooking skills and share your love for cooking with fellow foodies and .. earn some extra money by doing so! Besides an Eat experience, you can also offer a Tour or an Activity.
Got excited? Just easily register here, describe your signature dish and everything else the travelers can expect from your home-dinner, and you’re good to go! Enjoy exchanging recipes and talk ‘foodie-talk’ with your new friend!

I couldn’t help myself from nosing around in all those great home-dinners. When I would visit Malaysia in the near future, I would consider those two possibilities: the healthy diner in Petaling Jaya or the cooking class in Kuala Lumpur.
What would you choose? Please let me know!

Radish Salad with Avocado Buttermilk Dressing
Thursday, May 01, 2014  |
 |
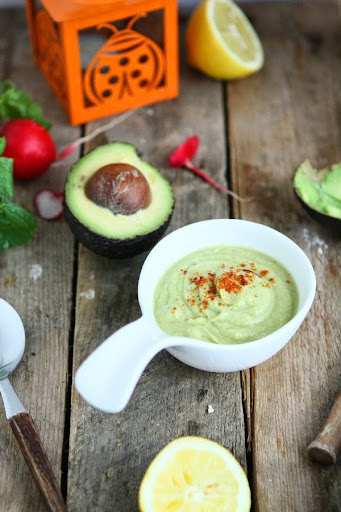
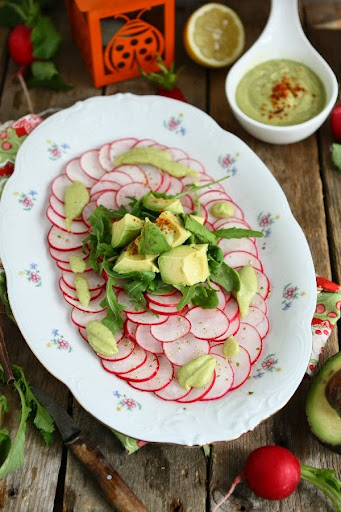
A simple spring salad of juicy, crunchy cherry radish, peppery arugula and rich, buttery avocado flavoured with an easy salad dressing, which is a creamy mixture of avocado and buttermilk.
| Dressing | Salad |
|---|---|
|
|
- Combine all the dressing ingredients in a blender and blend on high speed until smooth, scraping down the sides as needed. Adjust the seasoning, to taste. Transfer to a bowl, cover, and refrigerate until ready to use.
- With a mandoline or a sharp knife, slice the radishes as thin as possible. Cut the avocado in half lengthways and remove the stone and skin. Cut into thick slices then into pieces. Toss with the lemon juice.
- Arrange the thinly sliced radishes in a serving bowl, and top with arugula leaves and avocado. Drizzle the dressing over and serve immediately.
 |
 |


