
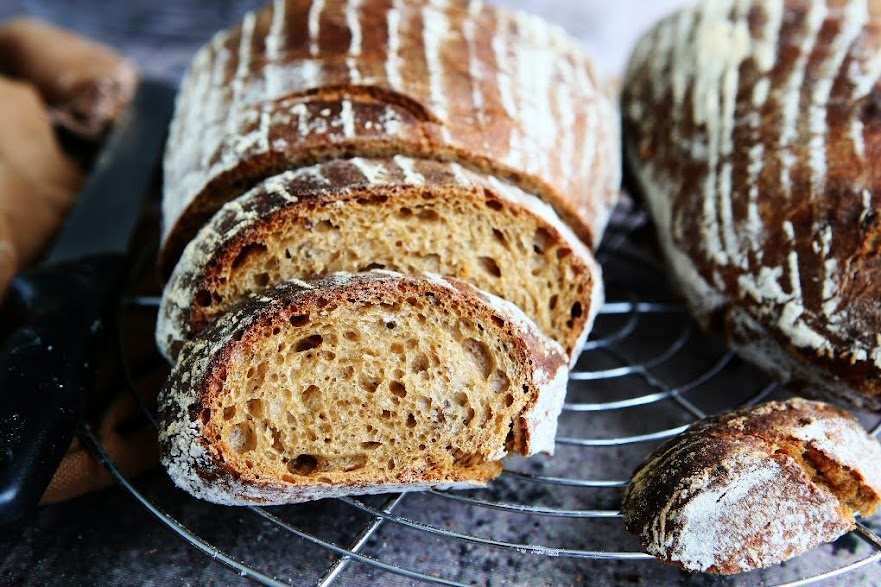
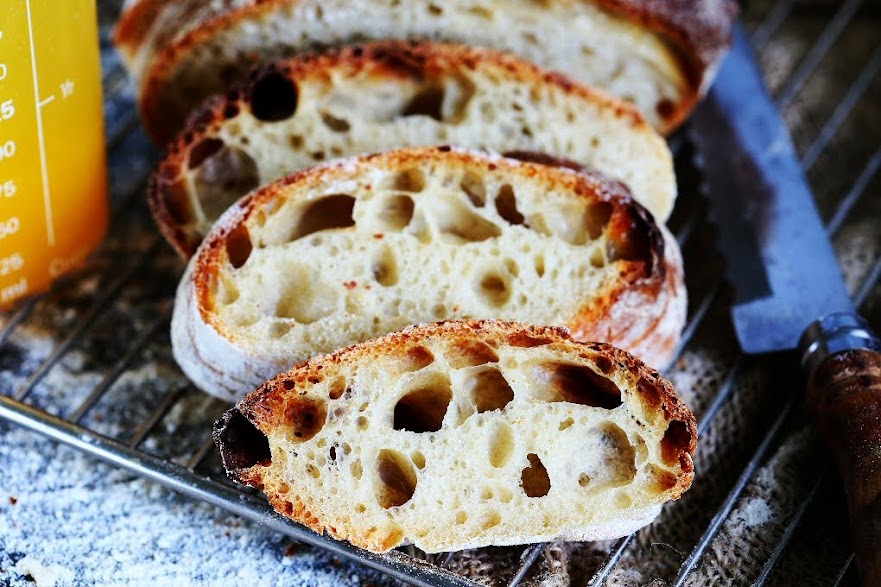
Rye Mixed Bread with Wild Yeast Starter
 © 2022 | http://angiesrecipes.blogspot.com
 |
 |
 © 2022 | http://angiesrecipes.blogspot.com
 © 2022 | http://angiesrecipes.blogspot.com
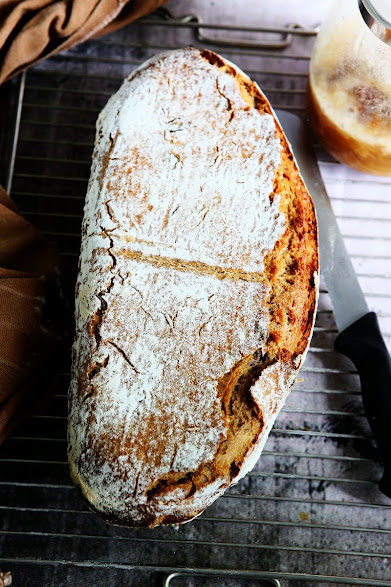
A fun bread recipe for a hearty, healthy and sensationally aromatic, crispy and rustic rye mixed bread made from wholemeal rye and wheat flour. A cultivated wild yeast starter is used as a leavening agent, which ensures a fine flavour, aroma, long freshness and at the same time a good oven spring. Barley malt extract not only contributes to the flavour but also encourages a browner crust and a glossy sheen. If you don't have barley malt extract, then a good substitute will be sugar beet syrup, honey or molasses. All in all, a very tasty, wholesome bread that goes well with hearty dishes or toppings. Or simply enjoy it with a generous smear of butter - you absolutely have to try it.
Rye Mixed Bread with Wild Yeast Starter
inspired and adapted from here and here| Wild Yeast Starter | Dough |
|---|---|
|
|
 |
 |
 |
 |
- Puree the fruit with the yeast water. Mix in the flour and leave to rise at room temperature for 12-14 hours.
- Add the wild yeast starter, buttermilk and all the flour to the bowl of your mixer and knead on the lowest speed for 3 minutes. Add the yeast water a little at a time as the dough absorbs the liquid. Increase the speed to medium and knead for a further 8-10 minutes. After 5 minutes, knead in the salt.
- Grease a large bowl with some olive oil and place in the dough. Stretch and fold once on all sides. Leave to ferment at room temperature for 5-6 hours, folding again after 1 and 2 hours if possible.
- Shape the dough into a baton and place in an oblong floured proofing basket with the end facing upwards. Cover and leave to rise for another 3-4 hours at room temperature.
how to shape a baton
- Preheat the oven to 250C/480F. Place a baking stone in the lower half of the oven. If you don't have a baking stone, a baking tray works too. At the bottom of your oven, place a baking tray for water to create the steam.
- Dust a parchment paper with flour. Turn the dough out onto the floured parchment paper. Transfer to the hot baking stone. Pour 1 cup of water into the baking tray at the bottom of your oven. Close the oven door immediately.
- After 10 minutes, turn the heat down to 200C/400F and open the oven briefly so that the steam can escape. Bake for another 30-35 minutes until bread is golden brown and crisp. Remove and cool the bread on a wire rack for at least 2 hours before slicing.

© 2022 | http://angiesrecipes.blogspot.com

© 2022 | http://angiesrecipes.blogspot.com

© 2022 | http://angiesrecipes.blogspot.com
Heirloom Tomato Salad with Black Olives and Pine Nuts
 © 2022 | http://angiesrecipes.blogspot.com
 |
 |
 © 2022 | http://angiesrecipes.blogspot.com
This is a really simple salad that calls for just a few everyday ingredients: sweet beefsteak tomatoes, salty black olives, rich buttery pine nuts, chives and blossoms. They combines together to make a lovely summer salad with a healthy drizzle of olive oil and red wine vinegar. Plus, the recipe comes together in 5 minutes. Serve it as a side or add grilled fish, roasted chicken, or boiled chickpea to make it a meal.
Hazelnut Bread with Rye and Spelt
 © 2022 | http://angiesrecipes.blogspot.com
 |
 |
 © 2022 | http://angiesrecipes.blogspot.com
 © 2022 | http://angiesrecipes.blogspot.com
If you are trying to avoid empty-calorie bread made with plain flour and looking for a healthy alternative that's easy to make and doesn't taste like cardboard, this bread will fit the bill perfectly. Enriched with the eathy, nutty taste of roasted hazelnuts, this easy, perfectly dense mixed loaf bread packs with nutrients and offers so much flavour well beyond what a basic wheat bread can achieve. The combination of spelt and rye gives the bread a pleasant tang with earthy flavour and hearty taste. The milk and butter add just the right amount of fat to make this wholesome, no-nonsense bread pairs exceptionally well with all sorts of cheeses, cured meats, and preserves.
Hazelnut Bread with Rye and Spelt
adapted from essen und trinken
|
- Combine the milk and water in the bowl of your mixer. Add in coconut sugar and crumble the fresh yeast into the mixture. Set aside for 5-10 minutes. Once the yeast is foamy and activated, stir it with a spoon until the yeast and sugar are completely dissolved.
- Heat the oven to 180C/350F. Place hazelnuts in a single layer on a baking sheet. Toast in preheated oven for 10-12 minutes. Wrap roasted hazelnuts in a kitchen towel and let steam for a minute. Rub nuts in towel to remove the brown skins. Roughly chop the hazelnuts.
- Add the flours, hazelnuts, salt, butter and egg to the yeast milk mixture in the mixing bowl. Knead all the ingredients until you have a smooth dough.
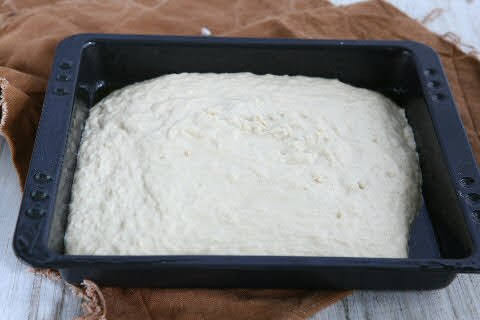
- Cover the dough with a clean kitchen towel and leave it in a warm place for about 1 hour until double in size.
- Line a 28-30 cm x 10 cm loaf pan with a parchment paper.
- Gently flatten the dough and roll out to a 28x25 cm rectangle. Starting from the long side roll the dough into a log and place, with the seam side down, into the prepared loaf pan. Lightly dust the surface with flour and proof for 45-60 minutes.
- Preheat the oven to 180C/350F. Bake the bread in the middle of hot oven for 50-60 minutes. Remove the bread and turn out onto a wire rack to cool complately. Slice and serve.

© 2022 | http://angiesrecipes.blogspot.com
 |
 |

© 2022 | http://angiesrecipes.blogspot.com

© 2022 | http://angiesrecipes.blogspot.com
Creme Fraîche Pound Cake with Blackberries and Raspberries
 © 2022 | http://angiesrecipes.blogspot.com
 |
 |
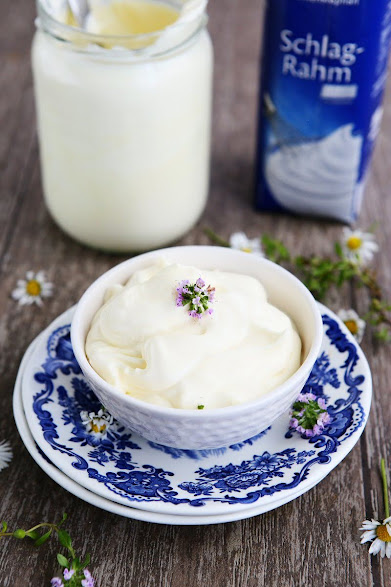
Homemade Creme Fraîche
 © 2022 | http://angiesrecipes.blogspot.com
 © 2022 | http://angiesrecipes.blogspot.com
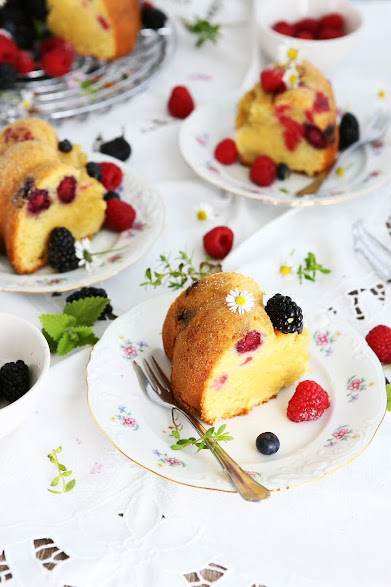
The silky creme fraîche, a richer, thicker and sweeter French version of sour cream, not only adds a right amount of delicate tang but the added moisture, richness, and acidity gives you an ultra-flavourful, moist and tender cake that’s just irresistible. We enjoy the cake simply dusted with powdered sugar and some extra berries, but it’s as equally as delicious topped with a yummy glaze.
| Creme Fraîche made with Buttermilk | Cake Batter, adapted from here |
|---|---|
|
|
- Mix the cream with the buttermilk in a bowl and cover with a cheesecloth or kitchen paper with a piece of string or rubber band. Leave at room temperature for approx. 12-24 hours until the mixture has reached a thick consistency. Then chill for 6 hours before using for the recipe.
- Preheat the oven to 180C/350F. Thoroughly butter and flour a 10-inch / 28cm bundt cake pan. Combine the flour, salt, and baking soda in a large bowl, whisk together and set aside. Use 1 tablespoon of flour mixture to coat the berries.
- In a large bowl, cream butter and sugar until light and fluffy, about 5 minutes. Add egg yolks, one at a time, beating well between additions. Beat in the vanilla extract.
- With the mixer set on low speed, beat in half the flour mixture. Beat in the crème fraîche, then the remaining flour mixture, scraping down the sides of the bowl with a rubber spatula.
- In another bowl and with a clean beater, beat egg whites on high speed until stiff peaks form. Fold into batter. Fold in flour-coated berries.
- Scrape the mixture into the prepared pan and smooth the top. Bake until the cake is browned on top and a cake tester inserted into the center comes out clean, 55 to 65 minutes. Let cool in the pan for 10 minutes, then turn out onto a wire rack and cool completely.

© 2022 | http://angiesrecipes.blogspot.com
 |
 |

© 2022 | http://angiesrecipes.blogspot.com

© 2022 | http://angiesrecipes.blogspot.com
Wild Yeast Ciabatta using Yeast Water and Bassinage Method
 © 2022 | http://angiesrecipes.blogspot.com
 © 2022 | http://angiesrecipes.blogspot.com
 |
 |

 © 2022 | http://angiesrecipes.blogspot.com
Yeast is a living microorganism that feeds on carbohydrates / sugar and releases carbon dioxide and alcohol that helps to leaven bread and enable fermentation. Wild yeast is found everywhere in the nature and can be easily captured from plants and animals. Your skin is even home to different types of yeast.
Fresh fruits, vegetables, or herbs can be used to capture wild yeast, but the easiest way to capture wild yeast is to use dried fruit, making sure that the fruit ain't treated with sulfur dioxide.
Fill a glass bottle with lukewarm water, add in dried fruit (and honey / sugar to speed up the fermentation process ). Seal the bottle with a ballon or a latex glove (as the yeast feeds on the sugar, it produces carbon dioxide and tremendous pressure can develop in the bottle ) and leave it at room temperature in a place away from direct sunlight or heat. The yeast is ready when bubbles appear and the liquid is frothy on top, which will take about 4-5 days. Strain out the liquid and use the wild yeast water for baking in place of both the liquid and baker’s yeast in recipes. You can also use the wild yeast water to make sourdough starter.You can discard the fruit or use it for baking.
Bassinage is a French term for pouring or bathing in water. In bread, the bassinage method makes the initial dough stiffer by holding back some of the water. After the gluten has developed, the second water is added to the dough. This method increases the amount of water that the dough can retain and produces a more open crumb.
Ciabatta is a rustic Italian bread that is usually made from wheat bread flour, water, olive oil, salt, and yeast. The name means “slipper” in Italian and refers to its elongated, broad, and flat shape, but you can form ciabatta into small squares or rolls.
Ciabatta dough is wet and sticky with hydration levels often 80% or higher up to 95%. So it can be tricky to handle the dough and obtain those signature air bubbles within the dough. The taste will be same regardless of the crumb of your bread. Here are some very helpful tips on how to handle high hydration dough.
The soft, chewy texture and big, distinctively airy holes make ciabatta perfect for dunking into soups, sopping up sauce or absorbing seasoned oil. From breeding yeast water to the loaf of bread, it takes about 7 days. A slow and long process, but the result is definitely worth your time and patience.
Wild Yeast Ciabatta using Yeast Water and Bassinage Method
adapted from Marcel Paa| Cultivating Yeast Water | Refreshing Yeast Water | Dough |
|---|---|---|
|
|
|
| Cultivating Yeast Water | |||
|---|---|---|---|
 |
 |
 |
 |
| Refreshing Yeast Water | ||
|---|---|---|
 |
 |
 |
| For the Dough | ||||
|---|---|---|---|---|
 |
 |
 |
 |
 |
- To cultivate wild yeast water : Use hot water to rinse the bottle and pour in the 250 ml warm water. Then add the honey and finally the dried fruit. Depending on the type of dried fruit, cut it into small pieces so that it comes out of the bottle after swelling. Shake the bottle until the honey has dissolved and close the bottle with a balloon or a latex glove. Leave the bottle at room temperature for 4-5 days. During these days, shake the bottle a little every now and then so that new oxygen gets in.
- To refresh the yeast water : To do this, put the wild yeast water, warm water, honey and sultanas in a glass bottle and close it tightly. Shake the bottle to mix all the ingredients. Replace the bottle cap with a balloon. Leave it to ferment at room temperature for 12-24 hours.
- To prepare the dough : After 12-24 hours, the sultanas float on the yeast water and this means that it's strong enough to ferment the dough.
- Carefully remove the balloon from the bottle and pour the yeast water through a sieve into the mixing bowl of your mixer. Add in the remaining ingredients and knead for 2-3 minutes on slow speed.
- Increase the mixer speed and knead the dough for about 8-10 minutes at medium speed until it passes the "window test". Gradually fold the second part of water into the dough until the dough has completely absorbed the liquid.
- In a lightly greased rectangular container, place the dough and cover with a plastic film. Leave it to rest for 12-16 hours at room temperature.
- During that time, stretch and fold the dough 2-3 times. To do this, dip your hands in a little water beforehand, then pull the dough up slightly on one side and place it on the opposite side of the container. Repeat this process from all four sides. Then cover the dough again and let it rest.
- After the proofing time, turn the dough out onto a generously floured work surface and divide into two equal portions. Pull the dough towards the conter from each side to form a "slipper". Place it on a generously floured tea towel on a baking tray with the seal facing upwards. Cover the dough with the towel and leave to rise for 40 minutes at room temperature.
- Preheat the oven to 230C/450F with a baking stone in the middle of oven and a baking tray at the bottom.
- Place the dough, with the seal side down, on a floured bread shovel and push them directly onto the baking stone in the oven. I simply turned the dough onto a well floured parchment paper and place it directly onto the baking stone. Pour a glass of water into the baking tray at the bottome of the oven and close the oven door immediately.
- Now reduce the oven temperature to 220C/430F and bake the loaves for 15 minutes. Now open the oven door to let the steam escape and then bake the loaves for another 25 minutes until crispy. Cool the loaves on a wire rack.

© 2022 | http://angiesrecipes.blogspot.com

© 2022 | http://angiesrecipes.blogspot.com
 © 2022 | http://angiesrecipes.blogspot.com


