
Sweet and Salty Browned Butter Pecan Cookies
 © 2021 | http://angiesrecipes.blogspot.com
 |
 |
 © 2021 | http://angiesrecipes.blogspot.com

© 2021 | http://angiesrecipes.blogspot.com
These insanely delicious browned butter cookies are heavily loaded with buttered pecans and have a rich flavour and chewy texture. Love the combo of salty and sweet? They're rolled in a mixture of sugar and salt before baking, which gives them over-the-top flavour. If you don't have pecans you can substitute equal amounts of walnuts or hazelnuts or even pistachios. You can also add a mix of butterscotch and chocolate chips for an even more indulgent treat.
| Cookie | Coating |
|---|---|
|
|
 |
 |
 |
 |
 |
 |
 |
 |
- Toast the chopped pecans and 1 tablespoon of the butter in a skillet over medium heat until fragrant and browned, about 5 minutes.
- Cook the remaining butter in a light-coloured pan over medium-high heat. Once melted, the butter will begin to foam and sizzle around the edges. Keep stirring. In about 6-8 minutes, the butter will turn toasty brown and smell nutty and buttery. Pour into a bowl or pan to stop the butter from cooking further. Set aside to cool slightly, about 10 minutes.
- Meanwhile, whisk together the flour, baking soda, and salt in a bowl. Set aside.
- Add coconut sugar and vanilla sugar to the cooled browned butter. Using an electric mixer on medium speed, beat until incorporated, about 2 minutes. Add eggs, vanilla, and apple cider vinegar, increase mixer speed to medium-high, and beat until mixture lightens and begins to thicken, about 2 minutes.
- Reduce the mixer speed to low and add flour mixture and beat just to combine. Mix in buttered pecans with a wooden spoon or rubber spatula.
- Cover the bowl, and chill for about 4 hours or overnight. Preheat the oven to 180C/350F. Line two baking trays with parchment paper or silicone baking mat.
- Mix 70 grams sugar and 1 teaspoon sea salt in a bowl. Use a spoon to scoop 2" balls (about 55 g each) of dough into the sugar/salt mixture, rolling to coat. Place them on the prepared baking sheets, leaving 2" between them on all sides.
- Bake the cookies in the middle of the hot oven for 10-12 minutes until the edges are golden brown and firm but centers are still soft. Let cool on baking sheets 10 minutes, then transfer to a wire rack and let cool completely. Repeat with the remaining dough. Store cookies, well wrapped in an airtight container, at room temperature for up to a week.

© 2021 | http://angiesrecipes.blogspot.com
 |
 |

© 2021 | http://angiesrecipes.blogspot.com

© 2021 | http://angiesrecipes.blogspot.com
Pumpkin and Fried Onion Scones
 © 2021 | http://angiesrecipes.blogspot.com
 |
 |
Made with plain wheat flour, fresh homeamde butternut squash puree, and crisp fried onion, these simple tasty pumpkin scones are best served with butter, sour cream or chutney over a pot of tea. They are the perfect addition to every fall and holiday table and might be the best way to celebrate pumpkin season.
|
- Preheat oven to 220C/430F. Line two oven trays with parchment paper. Sift flour, baking powder, baking soda and salt into a large bowl. Rub in butter lightly using fingertips, until mixture resembles breadcrumbs.
- Make a well in centre. Add pumpkin puree, buttermilk, maple syrup, egg, dried thyme and fried onions.
- Using a bread and butter knife, mix quickly to a soft, sticky dough. Do not over-mix. Turn onto a floured surface. Knead lightly. Press out to form a round about 2cm thick and cut into 10-12 rounds or your desired size and shape.
- Place them on the prepared trays. Brush with extra buttermilk. Bake 20-22 minutes or until scones sound hollow when tapped. Cool on a wire rack. Serve with herb sour cream or your favourite chutney.

© 2021 | http://angiesrecipes.blogspot.com
 |
 |

© 2021 | http://angiesrecipes.blogspot.com
Blooming Onion
 © 2021 | http://angiesrecipes.blogspot.com
 |
 |
 © 2021 | http://angiesrecipes.blogspot.com
If you like onion rings, you're going to love this blooming onion. The name "blooming onion" stems from the fact that the finished dish resembles a flower.
The onion is first cut to 16 strips that resemble the petals of a flower when fanned out, then coated with well seasoned flour mixture and deep-fried to a beautifully golden brown and satisfying crisp goodness. Not only it is delicious, but it also has a unique appearance that looks great and is fun to eat. With only a handful of ingredients, you can create this unique appetizer in your own kitchen. Serve it with your favourite dipping sauce (chipotle sauce, spicy mayonnaise, or garlic yoghurt).
|
 |
 |
 |
 |
 |
 |
 |
 |
- Combine the plain flour, paprika powders, cayenne pepper, garlic powder, dried thyme and ground cumin in a bowl. Season with salt and pepper. In a separate bowl, beat eggs and milk until combined.
- Cut a tiny slice off the tip of yellow onion, then peel off the brown outer layer of skin. Flip the onion cut side down, then begin slicing about 1/2 inch away from the root. I find it easiest to do 4 quarter slices, then cut each quarter into 4 sections, that's 16 sections total. Turn the onion over and carefully fan out.
- Holding onion from base, dip in spiced flour mixture, coating petals thoroughly. Shake off excess. Dip in egg wash, letting any excess egg wash drip off, and again in flour mixture, so each petal is thoroughly coated. Pat off any excess flour.
- Heat lard or vegetable oil in a deep saucepan to 175C/350F. Immerse onions, cut-side down into the lard for 3-4 minutes. Turn over and fry for 2-3 minutes or until nicely golden brown and crisp. Drain on paper towel. Serve immediately with your favourite dipping sauce.

© 2021 | http://angiesrecipes.blogspot.com

© 2021 | http://angiesrecipes.blogspot.com

© 2021 | http://angiesrecipes.blogspot.com
Tuna Salad with Green Peas and Tomatoes
 © 2021 | http://angiesrecipes.blogspot.com
 |
 |
 © 2021 | http://angiesrecipes.blogspot.com
Simple, budget-friendly, quick to make, tasty and wholesome - this tuna and green pea salad ticks all the boxes. Green peas, baby tomatoes and red bell pepper are packed with vitamins, low in calories and add beautiful colours! So, what's not to love? Serve it as a light lunch or side salad.
| Salad | Dressing |
|---|---|
|
|
- Drain the tuna and set aside. Place the frozen peas in a bowl. Pour in boiling water and set aside for 5 minutes.
- Wash and dry the cucumber and bell pepper. Finely chop them. Peel the red onion and finely chop too. Slice the baby tomatoes in half. Finely chop the flat parsley and dill.
- Place all the ingredients for the dressing a bowl. Whisk until well combined and emulsified. Season.
- Drain the peas. Use a fork to break the tuna into smaller pieces. Place all the prepared ingredients in a large bowl. Toss with the dressing. Taste and season.

© 2021 | http://angiesrecipes.blogspot.com

© 2021 | http://angiesrecipes.blogspot.com
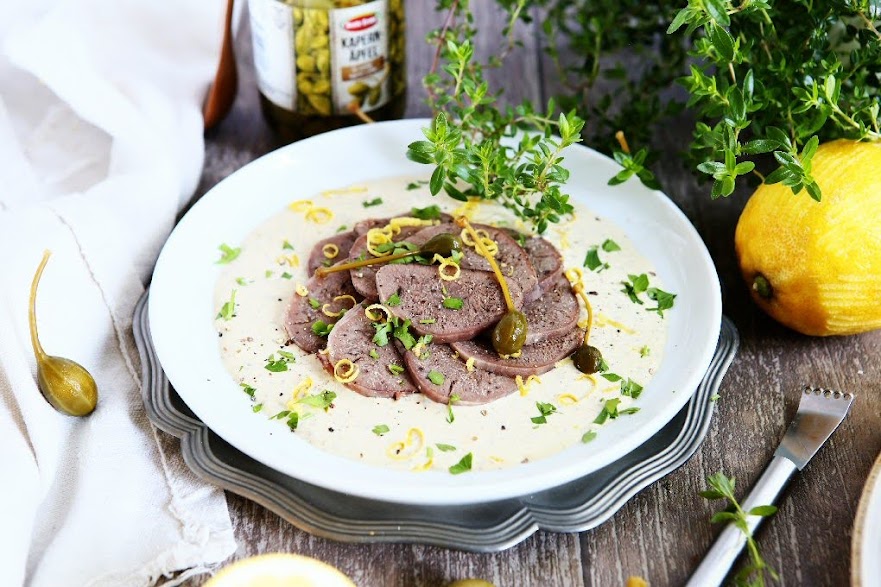
Vitello Tonnato
 © 2021 | http://angiesrecipes.blogspot.com
 |
 |
 © 2021 | http://angiesrecipes.blogspot.com
Vitello tonnato is a classic Italian entrée of cold, sliced veal served with a creamy, mayonnaise-like sauce that has been flavoured with tuna and garnished with capers. As unusual, or even weird, as this combination might sound at first, they go surprisingly well together and taste really good ... defintiely a new ultimate surf & turf for me. Traditionally it's made with veal top round, but I find that the rich veal tongue pairs perfectly with this creamy, tangy, salty and slightly spicy tuna sauce. The old fashioned way of preparing a tonnato doesn't include mayonnaise, but hard-boiled eggs. Tonnato is not only great with meat, also fantastic with grilled veggies, pasta or salad. So make an extra batch and enjoy it!
| Tonnato Tuna Dressing | |
|---|---|
|
|
- Rinse the veal tongue thoroughly. Place the tongue, chopped vegetables, spices, salt and pepper in the instant pot. Add in white wine and water to cover the tongue. Close and seal the lid. Select 'pressure cook' and set time for 40 minutes. Allow the pressure to release naturally. This will take about 15 minutes.
- Unlock and remove the lid. Using tongs, remove the tongue. Peel the tough skin off while still hot. Wrap tightly in plastic wrap and refrigerate until chilled, at least 45 minutes.
To make tuna dressing. Blend tuna, anchovies, capers, lemon juice, jalapeno pepper, mayonnaise and olive oil until smooth. Taste and season tonnato with salt. Transfer the tuna sauce into a jar and refrigerate until chilled, about 20 minutes. - Cut the tongue crosswise into 1/4-inch thick slices and arrange them on plates. Spoon some of the sauce over the tongue medallions and garnish with the lemon zest, chopped flat parsley and capers. You can also pour 1/4 cup of tuna sauce on a plate, then arrange the sliced veal tongue over, and garnish as desired.

© 2021 | http://angiesrecipes.blogspot.com
 |
 |

© 2021 | http://angiesrecipes.blogspot.com


