Tuna Salad with Green Peas and Tomatoes
 © 2021 | http://angiesrecipes.blogspot.com
 |
 |
 © 2021 | http://angiesrecipes.blogspot.com
Simple, budget-friendly, quick to make, tasty and wholesome - this tuna and green pea salad ticks all the boxes. Green peas, baby tomatoes and red bell pepper are packed with vitamins, low in calories and add beautiful colours! So, what's not to love? Serve it as a light lunch or side salad.
| Salad | Dressing |
|---|---|
|
|
- Drain the tuna and set aside. Place the frozen peas in a bowl. Pour in boiling water and set aside for 5 minutes.
- Wash and dry the cucumber and bell pepper. Finely chop them. Peel the red onion and finely chop too. Slice the baby tomatoes in half. Finely chop the flat parsley and dill.
- Place all the ingredients for the dressing a bowl. Whisk until well combined and emulsified. Season.
- Drain the peas. Use a fork to break the tuna into smaller pieces. Place all the prepared ingredients in a large bowl. Toss with the dressing. Taste and season.

© 2021 | http://angiesrecipes.blogspot.com

© 2021 | http://angiesrecipes.blogspot.com
Vitello Tonnato
 © 2021 | http://angiesrecipes.blogspot.com
 |
 |
 © 2021 | http://angiesrecipes.blogspot.com
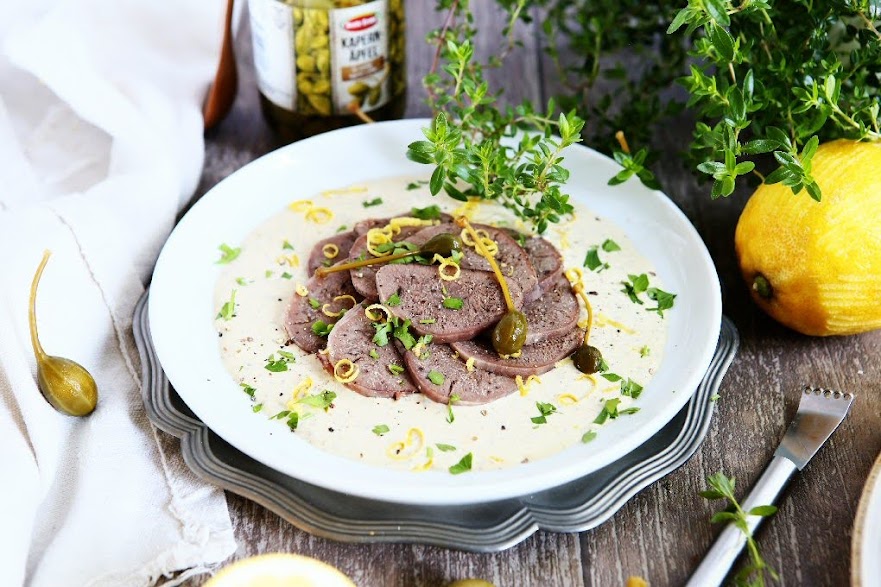
Vitello tonnato is a classic Italian entrée of cold, sliced veal served with a creamy, mayonnaise-like sauce that has been flavoured with tuna and garnished with capers. As unusual, or even weird, as this combination might sound at first, they go surprisingly well together and taste really good ... defintiely a new ultimate surf & turf for me. Traditionally it's made with veal top round, but I find that the rich veal tongue pairs perfectly with this creamy, tangy, salty and slightly spicy tuna sauce. The old fashioned way of preparing a tonnato doesn't include mayonnaise, but hard-boiled eggs. Tonnato is not only great with meat, also fantastic with grilled veggies, pasta or salad. So make an extra batch and enjoy it!
| Tonnato Tuna Dressing | |
|---|---|
|
|
- Rinse the veal tongue thoroughly. Place the tongue, chopped vegetables, spices, salt and pepper in the instant pot. Add in white wine and water to cover the tongue. Close and seal the lid. Select 'pressure cook' and set time for 40 minutes. Allow the pressure to release naturally. This will take about 15 minutes.
- Unlock and remove the lid. Using tongs, remove the tongue. Peel the tough skin off while still hot. Wrap tightly in plastic wrap and refrigerate until chilled, at least 45 minutes.
To make tuna dressing. Blend tuna, anchovies, capers, lemon juice, jalapeno pepper, mayonnaise and olive oil until smooth. Taste and season tonnato with salt. Transfer the tuna sauce into a jar and refrigerate until chilled, about 20 minutes. - Cut the tongue crosswise into 1/4-inch thick slices and arrange them on plates. Spoon some of the sauce over the tongue medallions and garnish with the lemon zest, chopped flat parsley and capers. You can also pour 1/4 cup of tuna sauce on a plate, then arrange the sliced veal tongue over, and garnish as desired.

© 2021 | http://angiesrecipes.blogspot.com
 |
 |

© 2021 | http://angiesrecipes.blogspot.com
Roast Pumpkin and Pistachio Gremolata
 © 2021 | http://angiesrecipes.blogspot.com
 |
 |
 © 2021 | http://angiesrecipes.blogspot.com
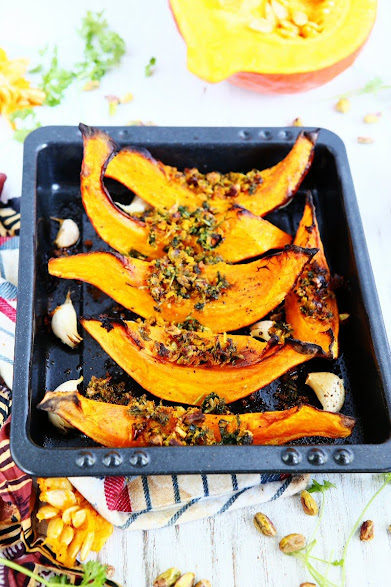
Pistachio gremolata, lightly sweetened with clear honey, is baked with the Hokkaido pumpkin wedges for extra crispness, and this recipe works with almost any kinds of pumpkins (acorn, kent or butternut) or root vegetables. Instead of pistachios, you can use other nuts like toasted coconut chips, pine nuts, pepitas or hazelnuts.
| Pistachio Gremolata | |
|---|---|
|
|
- Preheat the oven to 190C/375F. Put the pumpkin wedges into a large baking tray, add the garlic cloves, olive oil, vinegar and salt and pepper, then toss until evenly coated. Roast for 35-40 minutes, until the pumpkin is soft and golden around the edges.
- For the gremolata, roughly chop the parsley, chilli and pistachios, and put in a bowl with the remaining gremolata ingredients. Mix until everything is coated in the olive oil and honey.
- Remove the tray from the oven and sprinkle the gremolata evenly over the pumpkin. Return the tray to the oven and roast for a further 10 minutes, until the pumpkin is soft and the breadcrumbs are golden.
- When cool enough to handle, squeeze out the soft garlic flesh from the bulb and mix into the Greek-style yoghurt.
- Spread the garlic flavoured Greek yoghurt on serving plates and top with a final drizzle of extra-virgin olive oil. Arrange the roasted pumpkin wedges over and enjoy!

© 2021 | http://angiesrecipes.blogspot.com

© 2021 | http://angiesrecipes.blogspot.com
Pumpkin Falafels
 © 2021 | http://angiesrecipes.blogspot.com
 |
 |
 © 2021 | http://angiesrecipes.blogspot.com
 © 2021 | http://angiesrecipes.blogspot.com
These falafels are full of pumpkin flavour, soft in the center and crisp on the outside. Enjoy them in a salad, serving them in a warmed split pita pocket or just on their own. I like serving these on a bed of salad with a lemony Greek yoghurt dressing, but a green tahini sauce (a mixture of cilantro, lemon juice, garlic and sesame paste) would be just amazing if you want to go dairy-free.
| Falafels | Yoghurt Dressing |
|---|---|
|
|
 |
 |
- Preheat oven to 200C/400F. In your food processor, pulse the chickpeas until chunky puree forms. You can use a fork to mash them too.
- Mash the roasted pumpkin in a large bowl. Add in chickpeas, chickpea flour, red onion, minced garlic, garam masala, cumin, chilli pepper, parsley and salt. Mix well and refrigerate for 30 minutes.
- Shape the mixture into 16 balls and place on a greased baking tray or lined with baking paper. Spray the falafel with olive oil and bake for 25-30 minutes or until golden brown. The edges should be crispy and the center is still soft.
- Meanwhile, combine yoghurt, lemon juice and minced garlic in a small bowl. Season to taste. Serve falafels with yoghurt dressing.

© 2021 | http://angiesrecipes.blogspot.com
 |
 |

© 2021 | http://angiesrecipes.blogspot.com
Bacon-wrapped Frikadellen
 © 2021 | http://angiesrecipes.blogspot.com
 |
 |
 © 2021 | http://angiesrecipes.blogspot.com
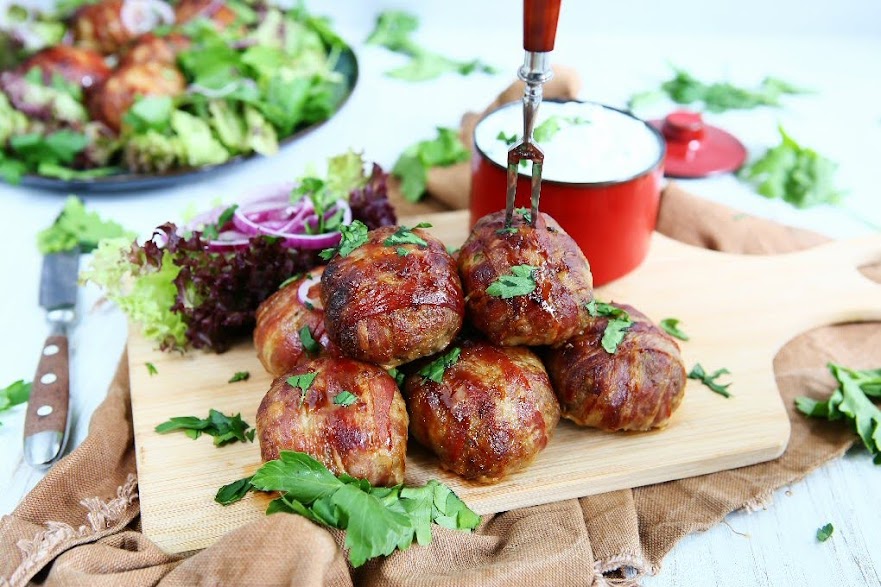
Frikadellen, aka “Fleischklops”, “Fleischpflanzerl” or “Buletten” – it depends on the region, are German meat patties, typically made with ground beef, pork, or a mixture of two, and shaped into slightly flattened ovals. Traditionally Frikadellen are fried in lard or tallow, but today they are commonly fried in ghee (Butterschmalz) or oil. In Germany Frikadellen are typically served with a potato salad, potato dumplings (Kartoffelknödel) or pommes frites. They are delicious warm or cold, can be made in advance and freeze well. Bacon gives the meat patties an extra burst of smoky flavour and adds juiciness, but not overly greasy.
|
- Preheat oven to 180C/350F. Line a rimmed baking pan with aluminum foil or parchment paper so that cleanup is easier.
- Peel and finely mince the onion and garlic. Finely chop the flat parsley. Grate the cheese.
- In a bowl, add minced beef, egg, keto breadcrumbs, chopped onion, garlic, parsley, grated cheese, dried herbs, salt and pepper. Mix everything together until combined. Form the mixture into 12-14 Frikadellen, each about 5-6cm in diameter.
- Wrap half a bacon slice around a frikadelle, turn around 45 degrees and wrap a second half-slice of bacon around the frikadelle, so the meat is enclosed by bacon. Repeat with the remaining. Place them onto the prepared baking pan with seam sides down.
- Bake in the preheated oven until meatballs are no longer pink inside and bacon is crisp, 40- 45 minutes. Serve with your favourite dipping sauce and a side salad.

© 2021 | http://angiesrecipes.blogspot.com
 |
 |

© 2021 | http://angiesrecipes.blogspot.com
Roasted Peanut, Rosemary and Tomato Cookies
 © 2021 | http://angiesrecipes.blogspot.com
 |
 |
 © 2021 | http://angiesrecipes.blogspot.com
 © 2021 | http://angiesrecipes.blogspot.com
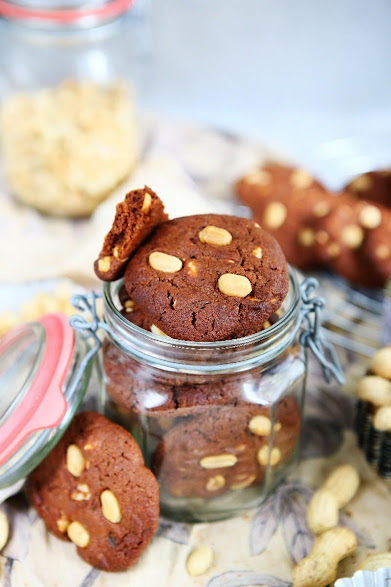
These peanut cookies have a crazy secret ingredien that helps intensify the flavour --you’ll never guess the ingredient. No, it's not mashed banana. No, it's not quinoa. It's tomato paste. It might sound gross, but these cookies are chunky, nutty, chewy and taste amazing. My husband had 3 at one go and still had no idea that there's tomato paste in it.
I actually found this recipe on GoodFood, but tweaked the original recipe slightly and used a blend of white spelt flour and light rye flour instead of plain flour. A tip from my favourite baker Dan Lepard: If you want to test the flavours before committing to a whole batch, you can halve the recipe – just beat the egg and weigh to divide it.
|
- Combine together the white spelt flour, light rye flour, baking powder and chopped rosemary in a bowl.
- Put the softened butter, peanut butter, tomato paste, cocoa powder and coconut sugar in a mixing bowl and beat until smooth. Beat in the egg.
- Add in the flour mixture and mix evenly to a soft dough. Mix in the roasted salted peanuts then spoon into 40 gram balls onto a tray, spaced five centimetres apart. You will have 21 cookies.
- With a fork dipped in water, press the dough balls out flat to about peanut thickness. Sprinkle a few extra peanuts on top of each to decorate. Bake for 15 minutes then transfer to a wire rack to cool completely.

© 2021 | http://angiesrecipes.blogspot.com
 |
 |

© 2021 | http://angiesrecipes.blogspot.com