Featured Recipe

Belgian Endive, Radicchio, and Blood Orange Salad
 http://schneiderchen.de | © 2011 | http://angiesrecipes.blogspot.com
 http://schneiderchen.de | © 2011 | http://angiesrecipes.blogspot.com
A simple, fresh tossed salad with Belgian endive, radicchio, and blood oranges dressed with avocado oil and Balsamic cream. Gorgonzola can be added to the salad to balance bitter radicchio and give contrast to the sweetness of blood oranges.
|
- Cut the Belgian endives into bite-size pieces, or cut lengthwise into 8 wedges, discarding the hard inner core. Tear the radicchio, butter lettuce if used, into bite-size pieces too. Cut all peel and white pith from oranges. Cut between membranes of oranges to release the segments into a bowl.
- Toss all the prepared vegetables with diced Gorgonzola, if used, in a large serving dish. Arrange orange segments over. Garnish with the chopped parsley leaves. Drizzle the salad with balsamic cream and avocado oil. Season to taste with sea salt and pepper.

http://schneiderchen.de | © 2011 | http://angiesrecipes.blogspot.com

http://schneiderchen.de | © 2011 | http://angiesrecipes.blogspot.com
Green Peas Spelt Cookies
 http://schneiderchen.de | © 2011 | http://angiesrecipes.blogspot.com

http://schneiderchen.de | © 2011 | http://angiesrecipes.blogspot.com

http://schneiderchen.de | © 2011 | http://angiesrecipes.blogspot.com
These crunchy, melt-in-mouth green pea cookies, mainly prepared with spelt flour, ground green peas, peanut oil, and icing sugar, are commonly baked for the Spring Festival celebration, but they are an outright winner any time of year.
Green Peas Spelt Cookies
adapted from No-Frills Recipes
|
- Sift the spelt pastry flour, salt, baking powder, finely ground shelled green peas, and powdered sugar into a large bowl. Set aside.
- Slowly pour in oil and mix until the mixture forms a soft and pliable dough. Cover with a plastic wrap and allow it to rest for 30 minutes.
- Preheat the oven to 180C/350F. Line two baking sheets with parchment paper. Roll the dough into inch balls and arrange them on the prepared baking sheets.
- Stir the egg yolk and water in a small bowl. Brush the top of each cookie with egg glaze and sprinkle some sesame seeds over. Bake for 15 minutes until the tops are golden brown.

http://schneiderchen.de | © 2011 | http://angiesrecipes.blogspot.com

http://schneiderchen.de | © 2011 | http://angiesrecipes.blogspot.com
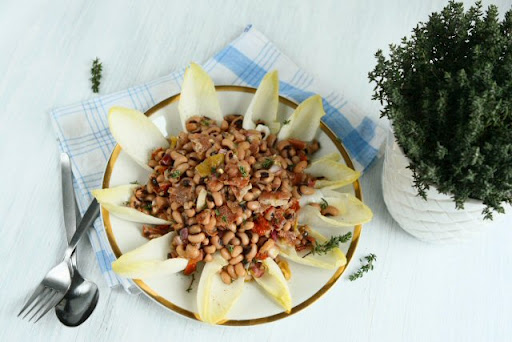
Black-eyed Pea Salad with Prosciutto
 http://schneiderchen.de | © 2011 | http://angiesrecipes.blogspot.com
http://schneiderchen.de | © 2011 | http://angiesrecipes.blogspot.com
A black-eyed pea salad with Prosciutto, sundried tomatoes, pepperrocini, red onion, tossed with a simple fresh herb vinaigrette and served on a bed of Belgian endive leaves. You can serve it either as an appetizer or a side dish.
Black-eyed peas are an excellent source of calcium (an important nutrient for the health of our bones and teeth), folate (support red blood cell production and Allow nerves to function properly), and vitamin A (essential for maintaining healthy skin and vision ), among other nutrients. They are thought to bring you luck and prosperity if eaten on New Years, but they are healthy and delicious any time of the year.
Dried black-eyed peas, also known as the cow peas, are easy to use as they requires no soaking and cook quickly. If you are in a hurry, canned variety can be an option.
|
- Place black-eyed peas in large saucepan of water. Bring it to a boil over medium-high heat. Reduce heat to low and simmer for 40 minutes or until peas are tender but not mushy.
- Meanwhile, in large bowl, whisk together olive oil, red wine vinegar, parsley or thyme, minced garlic, salt, and black pepper.
- Drain black-eyed peas. Add to bowl with dressing along with prosciutto, sundried tomatoes, pepperocini, and red onion. Toss well to combine. Cover and chill for at least 4 hours.
- Remove root end from endive and separate the leaves, rinse and pat dry. Arrange the endive leaves on a serving dish. Spoon the peas onto the leaves and arrange the tomato wedges, if used, on top. Serve at room temperature or chilled with a garnish of fresh thyme or parsley, if desired.

http://schneiderchen.de | © 2011 | http://angiesrecipes.blogspot.com

http://schneiderchen.de | © 2011 | http://angiesrecipes.blogspot.com
Rye Bread with Chinese Red Dates and Sultanas
 http://schneiderchen.de | © 2011 | http://angiesrecipes.blogspot.com

http://schneiderchen.de | © 2011 | http://angiesrecipes.blogspot.com

http://schneiderchen.de | © 2011 | http://angiesrecipes.blogspot.com
This dark, slightly chewy, raisin and Chinese date-studded bread has a subtle earthy flavours of dark rye, and mild sweetness of Chinese red dates and sultanas. It's a great combination with butter and tea in the morning or for the afternoon snack with a glass of milk.
|

- Combine together wholegrain rye flour and 120 ml water in a small pot until the mixture is well blended and lump free. Cook the mixture over the medium heat, frequently stirring, until it has turned into a thick paste and the thermometer reads about 65C/150F. It takes about 2-3 minutes. Cool the mixture to the room temperature and cover with a plastic wrap while you prepare other ingredients.
- In the bowl of your stand mixer fitted with a dough hook, place in the bread flour, wholewheat flour, rye flour, brown sugar, and salt. Make a well in the center, add in water, 20 grams walnut oil and crumbled fresh yeast. Mix on slow speed until combined. Increase the speed to medium and knead until the dough is smooth.
- Turn out the dough onto a lightly floured work surface. Sprinkle with chopped red dates and sultanas and knead with your hands until they are just incorporated. Grease the mixing bowl lightly with the rest of walnut oil. Place the dough in the bowl, cover the bowl, and allow it to rise until doubled in size.
- Dust an 8-inch round proofing basket with rye flour and set aside. Turn the dough out onto work surface, kneading briefly, and shape into a round. Place the dough, seam side up, into the floured basket. Cover with a towel and let dough rise again until it reaches the top of the basket.
- Preheat the oven to 190C/375F. Turn the proofed bread onto a parchment paper lined baking sheet. Use a very sharp knife to cut a decorative pattern on the top of the boule. Bake the bread in the center of hot oven for 35 minutes until nicely golden brown.

http://schneiderchen.de | © 2011 | http://angiesrecipes.blogspot.com

http://schneiderchen.de | © 2011 | http://angiesrecipes.blogspot.com
Vegan Lemon Curd Thumbprints
 http://schneiderchen.de | © 2011 | http://angiesrecipes.blogspot.com

http://schneiderchen.de | © 2011 | http://angiesrecipes.blogspot.com
I have always had a soft spot for the bright, mildly sweet and lemony thumbprint cookies. This thumbprints recipe uses a vegan lemon curd to fill the cookies made with a mix of spelt, buckwheat, walnuts, walnut oil and maple syrup. Traditional lemon curd recipes call for the use of eggs and butter, but this recipe is a bit healthier, while still sweet, tart and satisfying. You can also fill them with your favorite jelly.
Vegan Lemon Curd Thumbprints
adapted from Dairy Free Cooking| Vegan Lemon Curd | Cookie |
|---|---|
|
|

- In a small saucepan over medium heat, combine the lemon juice, sugar, lemon zest and salt, stirring well to dissolve the sugar. Combine together the coconut milk, cornstarch, and cold water in a small bowl, stirring well to combine.
- Add the cornstarch mixture, stirring constantly, cook until the mixture begins to thicken and the first few bubbles appear on the surface, about 8 minutes. Add soya margarine, and cook until the mixture resembles a thick pudding. Transfer the mixture to a heat proof dish, cover with plastic wrap and let cool completely before placing in the refrigerator to chill. Chill lemon curd for 2 hours before using.
- Preheat the oven to 350 F. Line a baking sheet with parchment paper and set aside. In a medium-sized mixing bowl, sift together the spelt pastry flour, finely ground buckwheat, finely ground walnut and salt until well combined, making a well in the center.
- Add in walnut oil and maple syrup to the center, and stir the mixture with a wooden spoon until it forms a dry dough that just holds together.
- Form the dough into 2-inch balls, and place them onto the prepared sheet, pressing a "thumbprint" into the center of each and slightly flattening. (The cookies will not spread, so make them the size that you want!) Add about 1 teaspoonful of lemon curd to each thumbprint and top with a cranberry or some poppy seeds if using. Bake until golden brown, about 15 minutes. Let cookies cool for several minutes on the sheet before transferring to a wire cooling rack to cool completely.

http://schneiderchen.de | © 2011 | http://angiesrecipes.blogspot.com

http://schneiderchen.de | © 2011 | http://angiesrecipes.blogspot.com
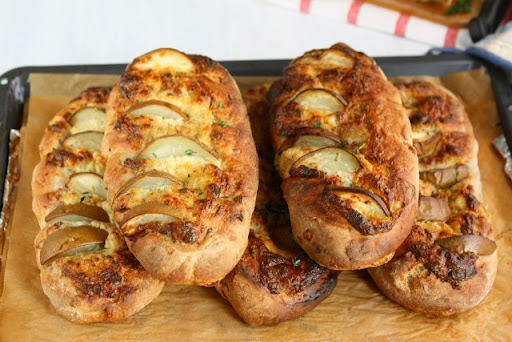
Potato Bread Batons with Cheese and Pear

http://schneiderchen.de | © 2011 | http://angiesrecipes.blogspot.com

http://schneiderchen.de | © 2011 | http://angiesrecipes.blogspot.com
 http://schneiderchen.de | © 2011 | http://angiesrecipes.blogspot.com
What could be better than homemade bread, especially when it's studded with the earthy flavours of cheese, walnuts, potatoes, fresh thyme and pears. I love it served with a steaming soup on ice cold days. It's also great for a school packed lunch.
Potato Bread Batons with Cheese and Pear
adapted from daheim und unterwegs| Bread | Cheese Spread |
|---|---|
|
|

- Peel the potatoes and cut into small pieces. Fill a large pot with the potatoes. Add enough water to cover the potatoes. Once the water boils, reduce the heat to medium and cook for about 15 minutes until potatoes are tender. Drain and cool to room temperature.
- In the bowl of your stand mixer fitted with a dough hook, dissolve the yeast in water. Add in sourdough, flours, salt, walnuts and cooked potatoes. Mix on slow speed for 4 minutes, then increase the speed and mix a further 4 minutes.
- Place the dough on a lightly floured work surface and divide it into 6 even portions. Shape each into a ball and rest, covered, for 15 minutes. Knead the dough balls gently and briefly. Cover, and rest for a further 15 minutes. Shape each dough ball into a baton and allow them to rest, covered, for 15 minutes.
- To prepare the cheese spread by combining all the ingredients in a bowl. Transfer the mixture into a pastry bag. With a sharp serrated knife, slash the top of the bread lengthwise, about 1/4-inch deep. Pipe the cheese mixture onto the cut and press 5-6 pear wedges on top. Allow them to rest for 30 minutes. Preheat the oven to 220C/430F and bake for about 35 minutes until nicely golden brown.

http://schneiderchen.de | © 2011 | http://angiesrecipes.blogspot.com
 http://schneiderchen.de | © 2011 | http://angiesrecipes.blogspot.com
http://schneiderchen.de | © 2011 | http://angiesrecipes.blogspot.com
Homemade Beef Ravioli with Roasted Tomato Sauce
 http://schneiderchen.de | © 2011 | http://angiesrecipes.blogspot.com

http://schneiderchen.de | © 2011 | http://angiesrecipes.blogspot.com
This is an comforting and delicious homemade pasta with browned ground beef filling. It's simply sauced with a roasted tomato sauce. If you're a fan of homemade pasta, take some time and make your dinner special.
Homemade Beef Ravioli with Roasted Tomato Sauce
adapted from Klassische italienische Küche von Julia della Croce| Roasted Tomato Sauce | Beef Ravioli |
|---|---|
|
|

- Preheat an oven to 200C/400F. Slice each tomato in half lengthwise and place on a sheet pan, cut side up. Roughly chop the onion and scatter the pieces around the tomatoes. Scatter the garlic cloves on top of the onion. Drizzle with olive oil, then season with the sugar, salt, pepper, and thyme.
- Roast the vegetables for 30 minutes or until the tomatoes are soft. Remove from the oven and transfer the roasted tomatoes into a large saucepan. With an immersion blender process the tomatoes to the desired consistency. Bring the tomato sauce to a simmer. Add in white wine and balsamic vinegar. Simmer for a further 20 minutes.
- Combine pasta flour and salt on a clean work surface and make a well in the center. Place 3 eggs and olive oil in the well, and incorporate the flour into the liquid ingredients until combined. Knead the dough vigorously until it becomes smooth and elastic.
- Allow the dough to rest, covered with plastic wrap, for at least 1 hour before rolling it out. Flatten a manageable amount of dough (about the size of an orange) on a clean work surface dusted with flour. Cover the rest of the dough. Using a rolling pin, work from the center of the dough to the edges with a back-and-forth motion, rolling and stretching the dough. Continue rolling, turning the dough occasionally and dusting it with flour to prevent sticking and tearing, until the sheet is the desired thickness. Leave the dough sheets to dry for 10-15 minutes before cutting.
- Cook ground meat, minced shallot and garlic in a skillet until meat is browned. Remove and strain off the fat. Stir in one egg, parsley and salt.
- Cut the dough sheet into 8-cm wide strips and place spoonfuls of filling about 4cm apart on one strip. Brush the area between fillings with egg white and top with a second strip of dough. Form ravioli by pressing around each filling to form a seal. Dust with flour and cut into squares with a pastry wheel. Crimp the edges of the ravioli with a fork to ensure that they are sealed properly. Alternatively you can cut out the wraps using a 2-inch cookie cutter.
- Bring a large pot of salted water to a boil. Cook the ravioli for 5 minutes in a rapidly boiling salted water. Drain and gently toss with the sauce. Sprinkle some grated Parmesan and chopped chives on top if desired. Serve immediately.

http://schneiderchen.de | © 2011 | http://angiesrecipes.blogspot.com

http://schneiderchen.de | © 2011 | http://angiesrecipes.blogspot.com
Buckwheat Wasabi Crackers with Walnuts and Sesame Seeds
 http://schneiderchen.de | © 2011 | http://angiesrecipes.blogspot.com

http://schneiderchen.de | © 2011 | http://angiesrecipes.blogspot.com
These gluten-free crackers, a tasty and healthy blend of buckwheat, walnuts, sesame seeds and spiced with wasabi (Japanse mustard), thin, crisp, and have an earthy flavour and an intense and rich sesame taste.
Buckwheat Wasabi Crackers with Walnuts and Sesame Seeds
adapted from All Day I Dream About Food
|
- Preheat the oven to 160C/320F. Line a baking sheet with parchment paper. Combine together ground buckwheat, ground walnuts, toasted sesame seeds, baking powder and salt in a mixing bowl.
- In another bowl, whisk together the sesame oil, wasabi paste and egg. Pour the oil mixture to the flour mixture. Mix until a dough forms.
- Place the dough between two sheets of parchment papers and roll out to a rectangle approximately 2mm thick. With a sharp knife, cut into 2-inch squares or cut out with a round cookie cutter and place each one on the prepared baking sheet. Bake 30 minutes until firm and crisp. Turn off the oven and leave crackers in the oven for 30 minutes before transfering them to the wire racks to cool.

http://schneiderchen.de | © 2011 | http://angiesrecipes.blogspot.com

http://schneiderchen.de | © 2011 | http://angiesrecipes.blogspot.com