
Black Rice Yoghurt Bread
 © 2020 | http://angiesrecipes.blogspot.com
 |
 |
 © 2020 | http://angiesrecipes.blogspot.com

http://schneiderchen.de | © 2020 | http://angiesrecipes.blogspot.com
By adding rice to the bread you’ll get a softer crumb, and by using black rice you’ll get a lovely rustic colour and interesting nutty flavour too. The texture is amazingly soft and tender, thanks to the moisture of forbidden black rice with yoghurt and rendered chicken fat. The bread is delicious when eaten plain or with butter or toasted as a breakfast item or for sandwiches.
|
- Add all ingredients, in the order listed, into the bread machine loaf pan.
- Place pan in bread machine and select dough program, then start. After 3-5 minutes of kneading, gently scrape down the dry ingredients stuck on the sides of the pan with a spatula.
- The bread machine will beep when done. Turn out the dough onto a lightly floured work surface. Press the dough into a rectangle that is as long as a standard-size loaf pan. Roll the dough tightly from the narrow end, jelly-roll style. Pinch the ends and seam to seal. Place into the loaf pan lined with baking paper.
- Cover the loaf with a clean towel, and let it rise until it has doubled in size. Preheat the oven to 190C/375F. When the loaf has risen, brush the surface with water and bake for 30 minutes until nicely golden brown.

http://schneiderchen.de | © 2020 | http://angiesrecipes.blogspot.com
 © 2020 | http://angiesrecipes.blogspot.com

http://schneiderchen.de | © 2020 | http://angiesrecipes.blogspot.com
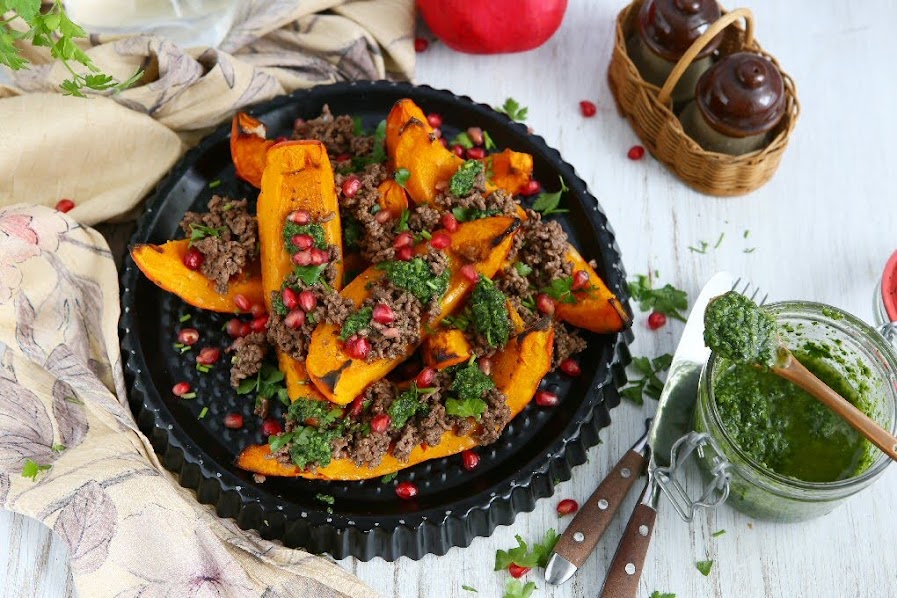
Spicy Roast Hokkaido with Lamb and Zhoug
 © 2020 | http://angiesrecipes.blogspot.com
 |
 |

http://schneiderchen.de | © 2020 | http://angiesrecipes.blogspot.com
Zhoug / Zhug (Pronounced Zoog) is a hot green sauce (aka “Middle Eastern pesto”) originating in Yemeni cuisine that’s a go-to condiment for falafel and is eaten with bread for those who want heat with every bite. It’s a must with Shakshuka. Here I have paired it with roasted Hokkaido pumpkin for a no-fuss side that’s a winner with lamb flavoured with cinnamon, cayenne and pomegranate molasses.
| Zhoug / Hot Green Sauce | |
|---|---|
|
|
- Toast the cardamom pods in a dry skillet over medium heat for 2 or 3 minutes, shaking the pan occasionally. Place the cardamom pods in a mortar and smash with a pestle to crack open the pods. Spread the cracked pods out, so you can pick out the shells and discard. Dry-roast caraway seeds and cloves in a frying pan over medium-high heat until fragrant, about 1 minute.
- Coarsely crush cardamom, caraway seeds and cloves with a mortar and pestle. Or whirl the seeds in a coffee grinder for 15-20 seconds or so. Add green chilli, garlic and salt and pound until broken down. Add coriander and half the oil, pound to break down leaves, then stir in lemon juice and remaining oil and season to taste. Chill until ready for use.
- Preheat oven to 180C fan forced /350F. Line a large oven tray with baking paper. Place pumpkin wedges, skin-side down, on oven tray. Brush the pumpkin wedges with 1 tablespoon of olive oil and season generously with salt and pepper. Bake for 40 minutes until the wedges are tender.
- Meanwhile make lamb topping. Heat the remaining olive oil in a frying pan over medium heat, cook shallot, cinnamon and cayenne, stirring for 3 minutes. Increase heat to high, add ground lamb, cook, stirring occasionally, for 5 minutes or until browned and cooked through. Stir in pomegranate molasses, season to taste.
- Arrange the hokkaido wedges on a large serving platter. Spoon lamb topping over and serve topped with zhoug, fresh cilantro leaves and pomegranate seeds if using.

http://schneiderchen.de | © 2020 | http://angiesrecipes.blogspot.com
 |
 |

http://schneiderchen.de | © 2020 | http://angiesrecipes.blogspot.com
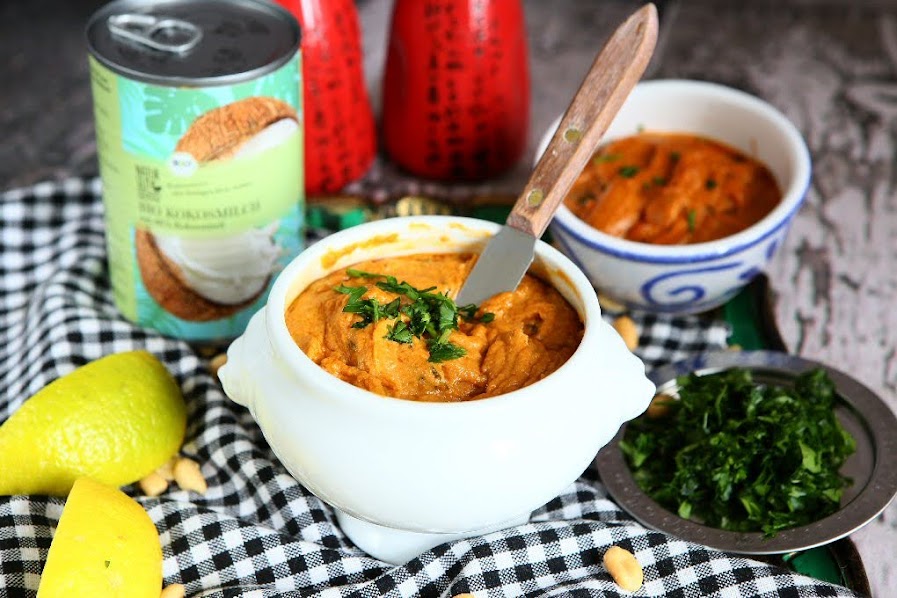
Savoury Thai Peanut Sauce
 © 2020 | http://angiesrecipes.blogspot.com
 |
 |
This healthy peanut sauce is made with coconut milk, creamy peanut butter, and Thai red curry paste. It can be used as a dipping sauce, salad dressing, for noodles, vegetables, spring rolls, or with chicken satay. You can even use it as a spread for crackers and filling for bread too.
|
- Heat sesame oil in a saucepan over medium heat. Add in curry paste and stir briefly. Pour in coconut milk and cook for 2 minutes.
- Add in peanut butter, rice vinegar, date syrup and lime juice. Cook, stirring, for 5-10 minutes. Season with salt and lime juice. Garnish with chopped cilantro.
- Serve as a dipping sauce for chicken skewers, vegetables or boiled eggs, as a spread for crackers or as a bread filling.

http://schneiderchen.de | © 2020 | http://angiesrecipes.blogspot.com

http://schneiderchen.de | © 2020 | http://angiesrecipes.blogspot.com
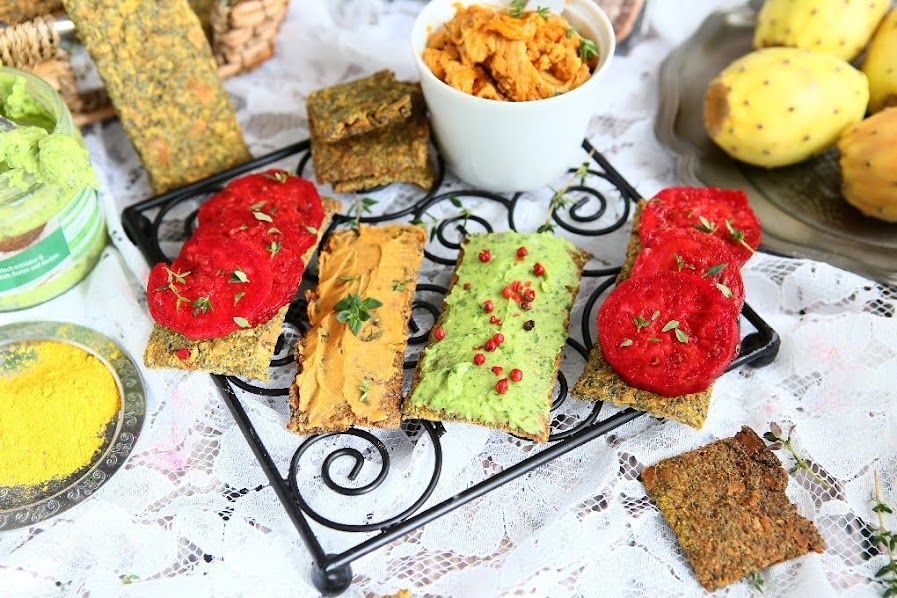
Curry Rye Oat Crackers
 © 2020 | http://angiesrecipes.blogspot.com
 © 2020 | http://angiesrecipes.blogspot.com
 |
 |

http://schneiderchen.de | © 2020 | http://angiesrecipes.blogspot.com
These curry rye crackers are light and crispy! A wonderfully delicious way to enjoy some healthy grains and seeds. The curry can easily be replaced with many different seasonings (Italian herbs, caraway, cardamom, fennel seeds or 5-spice) to make different flavours. You can enjoy them as a snack with your favourite dips and spreads or pair them with soups for the lunch. I have made these into large rectangles but feel free to cut into triangles or rounds.
|
- In a mixing bowl, combine together the rye flour, rolled oats, sea salt, curry powder, seeds and almond slices. Add in melted butter or olive oil and water. Mix to a sticky dough. Cover and set aside for an hour.
- Preheat the oven to 200C/400F. Divide the dough into two portions. Place each portion of dough between 2 sheets of baking paper. Roll into a rectangle, about 1/8-inch / 3-mm thick. Using a knife, partially slice through the dough in desired shapes. Repeat with another portion of dough.
- Bake each in the middle of hot oven for 15 minutes. Lower the oven temperature to 180C/350F and bake for a further 20-30 minutes until crisp.
- Allow to cool completely on baking sheet before breaking along score lines into individual crackers. Store airtight at room temperature for up to 2 weeks.

http://schneiderchen.de | © 2020 | http://angiesrecipes.blogspot.com

http://schneiderchen.de | © 2020 | http://angiesrecipes.blogspot.com
 |
 |

http://schneiderchen.de | © 2020 | http://angiesrecipes.blogspot.com
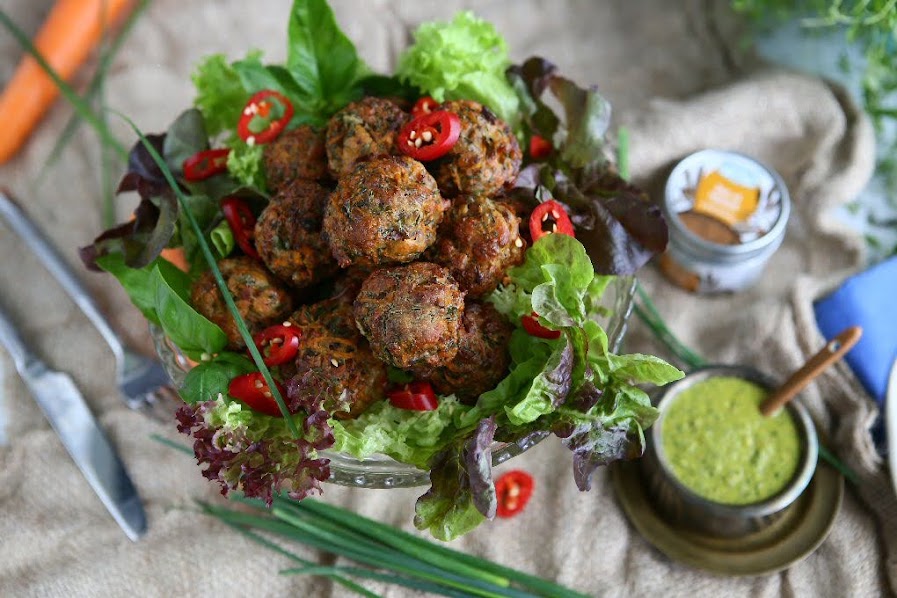
Baked Carrot Halloumi Balls with Ras el Hanout and Salsa Verde
 © 2020 | http://angiesrecipes.blogspot.com
 |
 |
 © 2020 | http://angiesrecipes.blogspot.com
 © 2020 | http://angiesrecipes.blogspot.com
These delicious carrot halloumi balls are great for snacking or as an appetizer. I find they taste the best served warm with a fresh homemade salsa verde over a bed of seasonal salad. Another way to serve them is pair them with zoodles tossed with pesto for a healthy low carb dinner.
Ras el hanout means “the head of the shop” in Arabic. It’s a mix of the the best spices that the spice seller has. If you can't find it, then I would recommend using a simplified mix of 1 part of cumin, 1/2 part of each coriander, ginger and paprika or cayenne powder. My another two favourite alternatives are baharat and garam masala because they both share many common ingredients.
| Salsa Verde | |
|---|---|
|
|
- Preheat the oven to 200C/400F. Line a baking tray with a piece of aluminum foil coated with some olive oil.
- Place all the ingredients for the salsa verde in a bowl. Stir to combine and chill until ready to use.
- Put the grated carrot and halloumi, along with the herbs, ras el hanout, spelt flour and egg into a mixing bowl and season well with black pepper and just a little salt.
- Work the mixture with your hands to combine it well, then take roughly 1 tbsp of the mixture and roll it into a ball. Repeat with the remaining mixture. You will have 18 balls.
- Place the prepared carrot balls into the prepared pan. Spray or brush them with olive oil. Bake for 25-30 minutes until golden brown and crisp. Serve with salad and salsa verde or your favourite sauce.

http://schneiderchen.de | © 2020 | http://angiesrecipes.blogspot.com
 |
 |
 © 2020 | http://angiesrecipes.blogspot.com
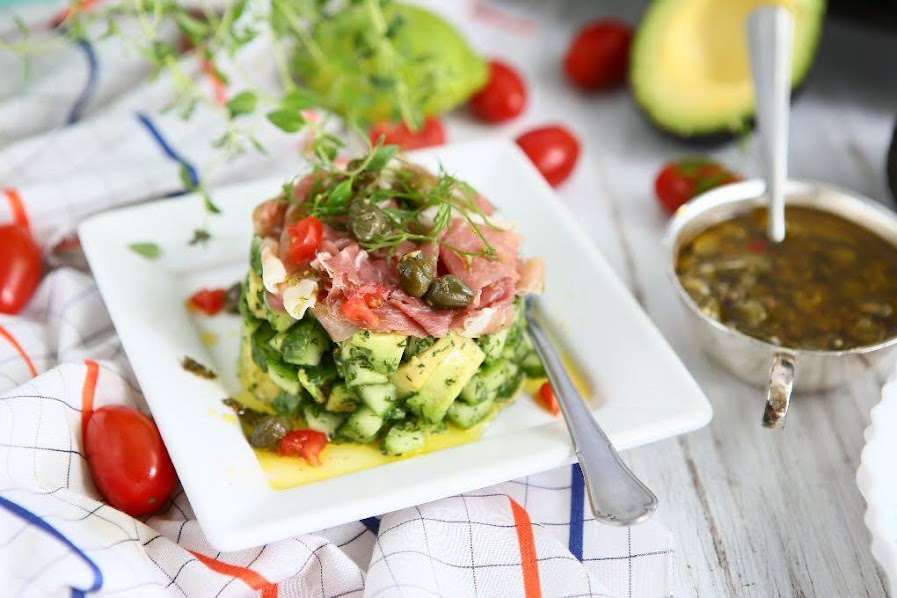
Cucumber Avocado Tartare with Parma Ham
 © 2020 | http://angiesrecipes.blogspot.com
 |
 |

http://schneiderchen.de | © 2020 | http://angiesrecipes.blogspot.com
Prosciutto di Parma is complemented by creamy avocado, crunchy cucumber, fresh herbs and a very flavourful Dijon-caper dressing. The tartare can be plated using a ring mould or simply eaten in a bowl. Serve these up with your favourite crackers or thin crusty bread.
We like cucumbers as they have so many wonderful health benefits. You certainly can replace them with asparagus, bell peppers or beetroots.
| Dijon Caper Vinaigrette | |
|---|---|
|
|
- With a sharp knife, cut the avocado in half. Remove the pit and peel the skin right off. Cut the flesh into small dices. Wash and dry the cucumber. Cut in half lengthwise, using a small spoon scoop out seeds. Cut the cucumber into small pieces.
- In a bowl gently mix together the diced avocado, cucumber, dill, lime juice and Worcestershire sauce.
- Place Dijon, honey, vinegar, olive oil and capers in a bowl. Stir to combine. Season with salt and pepper. The dressing can be refrigerated for a week.
- Spoon 1/3 of the salad in a ring mold and gently press down. Place the molded salad at the top center of the platter. Top with 2-3 slices of Parma ham. Drizzle some dressing over and garnish with fresh herbs and grape tomatoes. Repeat with the remaining salad and ham.

http://schneiderchen.de | © 2020 | http://angiesrecipes.blogspot.com
 |
 |

http://schneiderchen.de | © 2020 | http://angiesrecipes.blogspot.com
Twisted Brazil Nut Bread
 © 2020 | http://angiesrecipes.blogspot.com
 |
 |
 © 2020 | http://angiesrecipes.blogspot.com
I'm especially fond of making specialty breads like this one and find that they make excellent Christmas gifts for family and friends. It's basically just a sweet yeast dough filled with a luscious Brazil nut filling, which is rather easy to prepare too, and shaped into a beautiful twist, adding a touch of elegance to any festive table.
|
|
- Heat the milk in a saucepan over low heat to 20C/82F. Crumble the fresh yeast into the lukewarm milk together with 1 teaspoon of the coconut sugar. Set aside for 10 minutes or until bubbles appear on surface.
- In the bowl of your stand mixer, sift in the flour and add remaining sugar, and salt. Add in diced butter, egg yolks and the yeast mixture. Mix at slow speed until everything comes together. Increase the speed and knead until smooth and elastic, about 7 minutes.
- Turn out the dough and shape into a dough ball. Brush the mixing bowl lightly with oil to grease. Return the dough to the bowl and turn to coat in oil. Cover with a damp tea towel and set aside in a warm, draught-free place to prove until dough doubles in size, 1-2 hours.
- Meanwhile prepare the filling. Mix together the ground Brazil nuts, coconut sugar, and lemon zest in a mixing bowl. Stir in rum and cream until combined. Whip the egg whites and salt until stiff. Fold the whipped egg white into the nut mixture until well blended. Cover with a plastic film and set aside.
- Punch down the centre of the dough with your fist. Turn onto a lightly floured surface and knead for 10 minutes or until smooth. Set aside for 10 minutes to rest.
- Line a 26cm springform pan with baking paper. Set aside. Roll dough on a lightly floured surface into a rectangle, roughly 50x25-cm. Spread the prepared nut mixture evenly over dough, leaving 1cm border around edges. With the long edge facing you, tightly roll up dough in jelly roll fashion. Place the roll seam side up and use a sharp knife to cut the roll lengthwise in half along the seam. Tightly weave the two pieces together, leaving the cut sides exposed. Form into a wreath by firmly pinching two ends together. Gently transfer the wreath into the prepared pan.
- Cover with a plastic film or kitchen towel and let rise until doubled for about an hour. Preheat the oven to 180C/350F. Bake in centre of oven until bread is deep golden, about 35 minutes. Cool slightly. Dust with icing sugar before serving.

http://schneiderchen.de | © 2020 | http://angiesrecipes.blogspot.com

http://schneiderchen.de | © 2020 | http://angiesrecipes.blogspot.com

http://schneiderchen.de | © 2020 | http://angiesrecipes.blogspot.com
 © 2020 | http://angiesrecipes.blogspot.com


