
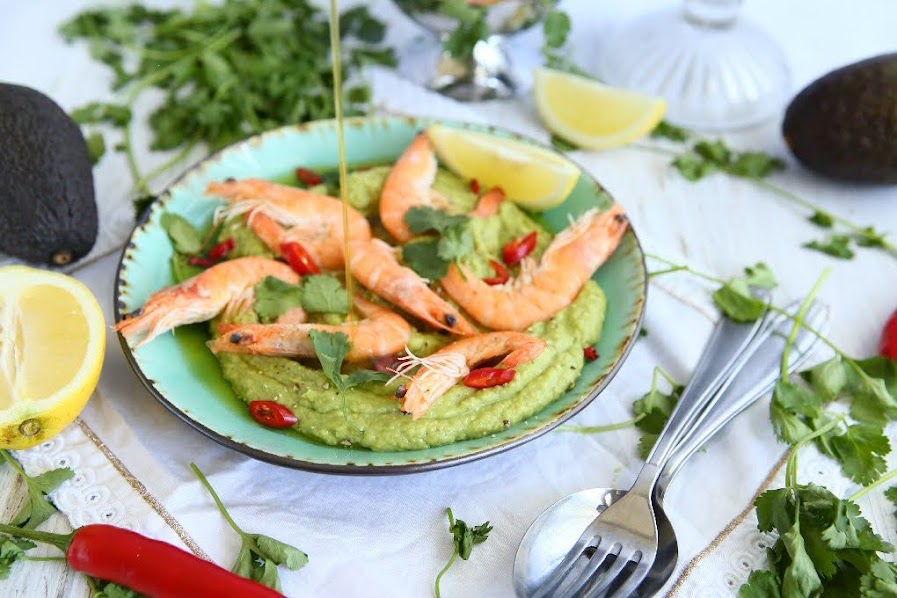
Chilli Honey Prawn Platter with Avocado Whip
 © 2020 | http://angiesrecipes.blogspot.com
 |
 |

http://schneiderchen.de | © 2020 | http://angiesrecipes.blogspot.com
Ready in just 15 minutes, this recipe is easy and super-fast yet jam-packed full of layers of delicious flavours.
The sweet and spicy flavours of the honey chili sauce are perfect with the prawns. And the light and creamy avocado whip comes together with just 5 ingredients and complements the whole dish so deliciously. It can be served as a dip or as a sauce. Add your own touches with fresh herbs like coriander, basil or parsley.
I used ready-cooked prawns from ALDI, but you can of course get some raw jumbo prawns and cook yourself.
| Chilli-Honey Sauce | Avocado Whip | |
|---|---|---|
|
|
|
- To make the chilli-honey sauce, in a medium bowl, combine chilli, garlic, shallot, 2 tbsps of lemon/lime juice, honey and oil. Season chilli-honey sauce with salt and more lime juice, if necessary.
- To make the whipped avocado crema, in a food processor or blender, process or blend avocado, sour cream, lemon/lime juice, garlic and salt until completely smooth. Spread crema in an even layer over a serving platter.
- Coarsely chop 1 tbsp of the coriander. Add to the chilli-honey sauce with the prawns and toss to coat evenly.
- Spoon the prawn mixture over the avocado crema on the platter. Sprinkle with the remaining coriander. Drizzle the rest of sauce over.

http://schneiderchen.de | © 2020 | http://angiesrecipes.blogspot.com

http://schneiderchen.de | © 2020 | http://angiesrecipes.blogspot.com
Frisée Salad with Blue Cheese, Avocado and Soft-boiled Eggs
 © 2020 | http://angiesrecipes.blogspot.com
 |
 |

http://schneiderchen.de | © 2020 | http://angiesrecipes.blogspot.com
Frisée (pronounced "free-ZAY") is a variation of endive. It has a slightly bitter flavour, similar to radicchio, or Belgian endive, but a lot milder.
This keto friendly, gluten-free, deliciously healthy and different salad is full of flavour and texture and makes a stunning salad starter for any festive occasion or as a light, yet satisfying workday dinner. If you don't find this distinctive curly lettuce in your grocery store, just pick up some salad mixes, like mesclun or your favourite mix of baby greens.
I have added wasabi (Japanese horseradish) for some heat and a bit of garden herbs for the freshness to the homemade mayonnaise. Feel free to use your favourite salad dressing instead.
| Salad | Wasabi Herb Mayonnaise |
|---|---|
|
|
- Bring a small saucepan of water to a boil and fill a small bowl with ice water. Carefully lower the eggs into the boiling water and cook for 6 minutes for soft-cooked. Transfer the eggs to the ice water to cool. Carefully peel the eggs. Cut the eggs in half lengthwise.
- Meanwhile, prepare the dressing. Blend all the ingredients together. Chill until ready for use.
- Trim the root end from the frisée and coarsely chop the frisée. Thinly shred the radicchio. Cut the red onion in half and thinly slice. Cut the avocado in half. Remove the pit, scoop out the flesh, and cut the flesh into bite-size pieces.
- In a large bowl, toss together the frisée, radicchio, red onion, avocado, and blue cheese. Transfer the salad to individual plates and top with the eggs and apricot slices if using. Serve with wasabi herb mayonnaise.

http://schneiderchen.de | © 2020 | http://angiesrecipes.blogspot.com

http://schneiderchen.de | © 2020 | http://angiesrecipes.blogspot.com
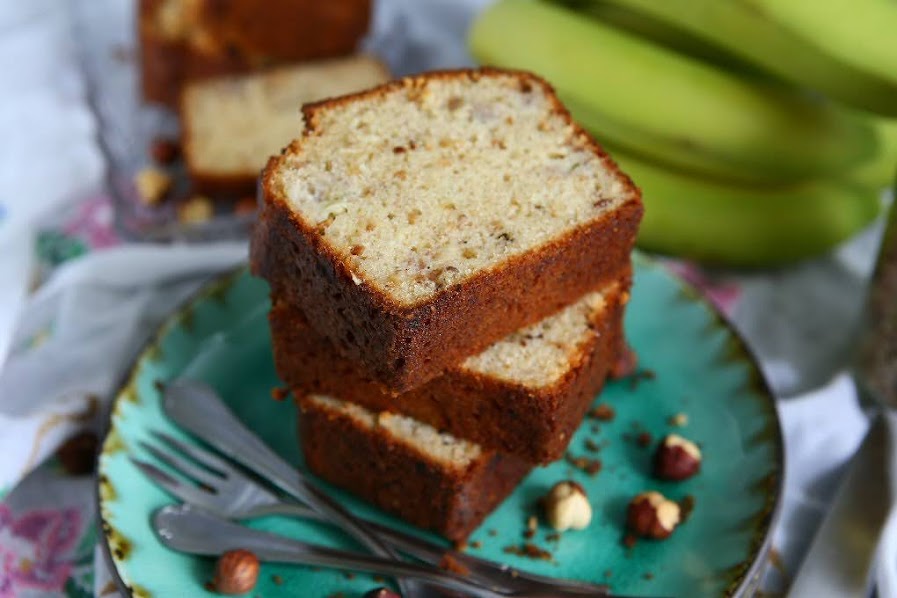
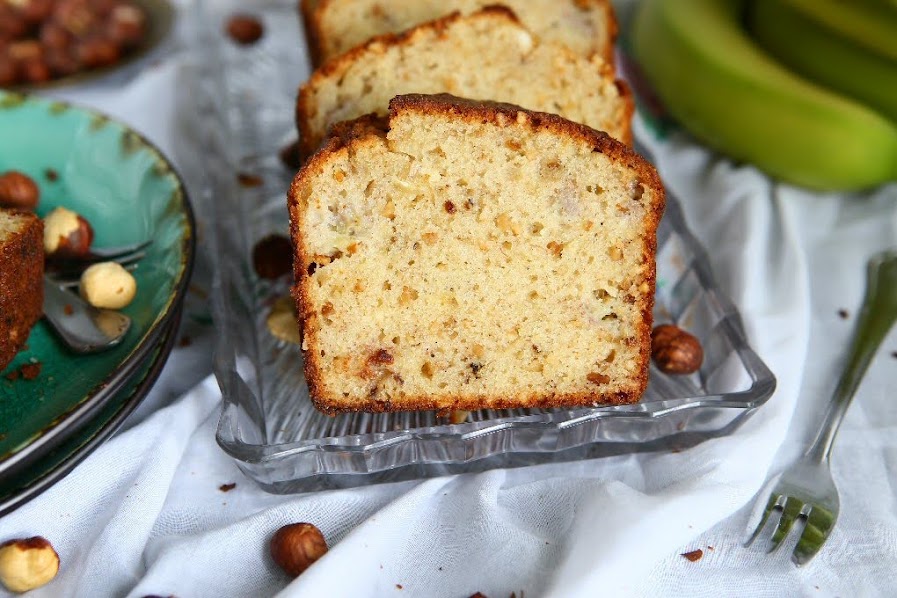
Spiced Olive Oil Banana Bread with Hazelnuts
 © 2020 | http://angiesrecipes.blogspot.com
 |
 |
http://schneiderchen.de | © 2020 | http://angiesrecipes.blogspot.com
 © 2020 | http://angiesrecipes.blogspot.com
A very easy quick bread to make, healthy and increidly moist thanks to the oilve oil and Greek yoghurt. I flavoured the bread with cardamom, cinnamon and ginger powder, but you can also use your favourite spices, like nutmeg or allspice. Chopped hazelnuts were added for extra crunch, feel free to use other nuts or chocolate. If you want to use honey or maple syrup instead of raw sugar, then reduce the olive oil to 80 ml as honey and maple syrup add a lot of moisture to the batter. This recipe is very versatile and forgiving, so you can easily adapt it to suit your own taste.
|
|
- Preheat the oven to 175/350FC. Lightly grease a 10cm x 20cm loaf pan and line base and sides with parchment paper.
- Sift flour, cardamom, cinnamon, ginger, baking powder, and salt into a bowl with the raw sugar, then add in the chopped hazelnuts.
- In a separate bowl, mash the bananas with a fork, then stir in the eggs, yoghurt and olive oil. Add into the dry ingredients and gently stir together until they're just combined - don't overmix.
- Scrape the batter into prepared pan. Place in the oven and bake for 50 minutes until golden brown and a skewer inserted in the centre comes out clean. Cool the loaf in pan 10 minutes, then turn out onto a wire rack to cool. Slice and enjoy!

http://schneiderchen.de | © 2020 | http://angiesrecipes.blogspot.com
 |
 |

http://schneiderchen.de | © 2020 | http://angiesrecipes.blogspot.com
Watermelon Salad with Cucumber and Gorgonzola
 © 2020 | http://angiesrecipes.blogspot.com
 |
 |
 © 2020 | http://angiesrecipes.blogspot.com
Juicy, sweet watermelon adds a burst of colour and freshness to this simple cucumber and Gorgonzola salad. Enjoy it as an appetizer or pair it along with some burger patties or grilled chicken for a healthy summer feast. Use rich and tangy Feta or milder goat cheese instead if you ain't fance for sharper blue cheese.
| Mint Yoghurt Dressing | Mango Chilli Dressing | |
|---|---|---|
|
|
|
- To make mint yoghurt dressing. Blend yoghurt, mint leaves, garlic and ginger in a blender until well combined. Transfer to a bowl and season to taste with sea salt and freshly ground black pepper. Cover with plastic wrap. Store in the fridge until ready for use.
- To make spicy mango dressing. Blend together the mango, chilli peppers, lime juice, ACV, honey and basil leaves until smooth and combined. Season with salt and pepper. Store in the fridge until ready for use.
- Use a vegetable spiraliser to cut cucumber into noodle-like strands. Place a small bowl of either dressing in the centre of a large round serving platter. Place watermelon and cucumber noodles around dressing on the platter. Sprinkle with blue cheese and some fresh mint or basil leaves. Serve immediately.

http://schneiderchen.de | © 2020 | http://angiesrecipes.blogspot.com
 |
 |

http://schneiderchen.de | © 2020 | http://angiesrecipes.blogspot.com
Detox Nettle Green Tea Pullman Loaf
 © 2020 | http://angiesrecipes.blogspot.com
 |
 |
 © 2020 | http://angiesrecipes.blogspot.com
Braided Loaf with the same dough

http://schneiderchen.de | © 2020 | http://angiesrecipes.blogspot.com
 © 2020 | http://angiesrecipes.blogspot.com
Unlike the classic Pullman bread (or pain de mie in French), this butter-enriched Pullman bread with detox nettle green tea and raisins is soft, tender and fluffy with a crisp golden crust. This bread is rather easy to make, but only takes slightly longer because I let the dough rise (2nd rise) in the fridge overnight so the flavours develop. This recipe is good enough for a 13x4-inch pullman pan, but mine is slightly smaller, so I weighted 750 grams of dough for the pan and use the rest to make 2 dinner buns. I have also baked a braided loaf with the same dough, and a lot more raisins.
|
- Crumble the fresh yeast in the lukewarm milk in a bowl. Set aside for 10 minutes. Place plain flour, detox tea, sugar, and salt in the bowl of your stand mixer with a dough hook.
- Add in eggs and milk-yeast mixture. Mix on low for 3 minutes. Increase the speed to the second level and mix for about four minutes more. Next, add the softened butter one cube at a time. Once all the butter is in, knead again for 2 minutes until smooth and elastic and soft. Add in raisins and knead briefly.
- Remove the dough from the mixer and shape into a smooth ball. Lightly grease the mixer bowl and return the dough to the bowl. Cover with plastic wrap. Leave to rise in a warm place for about an hour or until doubled in volume. Turn out and punch the dough down. Cover again and let rise in the fridge for 6 hours or overnight.
- Next day, remove the dough from the fridge and turn out onto a lightly floured work surface. Gently knead the dough so it became smooth and soft. At this point, I divide the dough into 750 grams for the pullman (26x12x9cm) and the rest I shaped into 2 dinner buns. I have also baked a braided loaf with the same dough, but a lot more raisins.
- Roll out the dough into a rectangle, and roll it up just like you do the jelly roll and pinch the seam together. Place into the greased pullman pan with seam side down. Cover with plastic wrap and place it in the refrigerator for at least 12 hours, but not more than 18 hours. The dough should reaches about 1/2 inch from the top of the pan. Next day remove the bread from the fridge and allow it to warm to room temperature while waiting for your oven to preheat. (Or you can just leave the bread in a warm place to proof until it reaches about 1/2 inch from the top of the pan. This could take from 90-120 minutes.) Cover the loaf with the pan lid.
- Preheat the oven 190/375F. Place the loaf pan on the center rack in the hot oven. Bake the pullman sandwich loaf for about 40 minutes until nicely golden brown. Remove the loaf from the pan and let cool on a wire rack. Allow the bread rest for at least an hour before you cut into slices.

http://schneiderchen.de | © 2020 | http://angiesrecipes.blogspot.com

http://schneiderchen.de | © 2020 | http://angiesrecipes.blogspot.com
 |
 |
 © 2020 | http://angiesrecipes.blogspot.com
Cherry Radish Top Twisted Bread Wreath with Cranberries

http://schneiderchen.de | © 2020 | http://angiesrecipes.blogspot.com
 |
 |

http://schneiderchen.de | © 2020 | http://angiesrecipes.blogspot.com
Don't throw out your radish leaves! They re not only edible and delicious, also very nutritious. Very rich in vitamins, minerals and fiber. Besides making pestos, smoothies, or soups, you can puree them and add it to the dough that results in a lovely bread with a vibrant, green texture. It is a brillant way to sneak leafy greens into your kids' diet. I am using cranberry jam and craisins for the filling, but if you prefer a savoury version, a red pesto with extra portion of Parmesan would be a nice substitute here.
|
- Place chopped radish tops in a blender. Add in almond milk, and salt and process until well blended.
- Measure 200 ml of milk-radish greens mixture and pour into the bowl of your stand mixer fitted with the dough hook. Stir in melted butter and egg until combined.
- Add spelt flour, sugar and active dry yeast. Mix at slow speed until everything comes together. Increase the speed and knead until smooth and elastic, about 7 minutes.
- Turn out the dough and shape into a ball. Lightly grease the mixing bowl with a bit of olive oil and return the dough to the bowl. Cover loosely with a damp kitchen towel. Let rest until dough is doubled in size, about 1 hour.
- Roll the dough on a lightly floured surface into a 45x30cm rectangle. Spread the cranberry jam over dough, leaving 1cm border around edges. Sprinkle the chopped cranberries over and tightly roll up dough from the long side in jelly roll fashion.
- Use a sharp knife to cut the log, seam side up, lengthwise in half. Tightly weave the two pieces together, leaving the cut sides exposed. Form into a wreath, firmly pinching two ends together. Gently tranfer the wreath into a springform pan or a parchment-lined baking tray. Cover with a damp kitchen towel and let rise until doubled, 1-2 hours.
- Preheat the oven to 180C/350F. Bake the bread in the center of the oven until golden brown, about 35 minutes. Cool slightly. Dust with icing sugar before serving.

http://schneiderchen.de | © 2020 | http://angiesrecipes.blogspot.com
 |
 |

http://schneiderchen.de | © 2020 | http://angiesrecipes.blogspot.com

http://schneiderchen.de | © 2020 | http://angiesrecipes.blogspot.com
Spring Salad with Surimi and Blackberries
 © 2020 | http://angiesrecipes.blogspot.com
 |
 |

http://schneiderchen.de | © 2020 | http://angiesrecipes.blogspot.com
Vibrant, colourful and fresh..this is a tasty way to enjoy some seasonal salads and berries. Surimi is made with white fish (for example pollock or cod) with flavour similar to that of crab, shrimp, lobster and other shellfish. You can easily replace them with some scallops or prawns here.
| Dressing | |
|---|---|
|
|
- Rinse the cucumber, dry and cut in half lengthways. Use a teaspoon to scoop out the seeds, and discard. Cut the cucumber into thin slices. Wash the cherry radishes, dry, and cut into thin slices.
- Combine salad mix, sliced cucumber and radishes into a large bowl. Top with the blackberries and surimi.
- In a small bowl, mix together the lime juice, crème fraîche, horseradish cream and kefir. Season with salt and pepper. Serve the salad with the prepared dressing.

http://schneiderchen.de | © 2020 | http://angiesrecipes.blogspot.com

http://schneiderchen.de | © 2020 | http://angiesrecipes.blogspot.com


