
Giant Chocolate Cookie with Cacao Nibs and Flaky Salt
 © 2021 | http://angiesrecipes.blogspot.com
 |
 |
 © 2021 | http://angiesrecipes.blogspot.com
This incredibly delicious and dangerously addictive oversized chocolate cookie is soft, chewy and loaded with milk chocolate and cacao nibs with crisp edges that’s designed to feed a crowd and perfect for sharing. The combination of sea salt, sweet milk chocolate and bitter cacao nibs create an amazing sweet and salty contrast. To make it even more festive and decadent, serve with a large scoop of your favourite ice cream or chantilly cream.
|
- Preheat oven to 180C/350F. Stir together spelt flour, cocoa, baking powder, and salt in a large bowl. Set aside.
- With an electric beater, beat the butter, coconut sugar and vanilla sugar until light and fluffy. Add egg and vanilla, and beat on medium speed until well combined, about 1 minute. Gradually beat in flour mixture, beating until just combined, about 1 minute. Fold in chopped chocolate and 2/3 of the cacao nibs.
- Transfer cookie dough to a large sheet of parchment paper. Cover top with another sheet of parchment and roll out dough into a 9-inch round, trimming edge as needed. Remove and discard top layer of parchment and transfer the cookie dough round on parchment paper to a large baking sheet. Sprinkle with sea salt and remaining cacao nibs, pressing lightly into dough to adhere.
- Bake for 15-18 minutes until just set around edges. Remove the cookie from the oven and allow to cool completely before cutting into wedges.

© 2021 | http://angiesrecipes.blogspot.com
 |
 |

© 2021 | http://angiesrecipes.blogspot.com

© 2021 | http://angiesrecipes.blogspot.com

© 2021 | http://angiesrecipes.blogspot.com
Spicy Kidney Bean Dip with Dark Chocolate
 © 2021 | http://angiesrecipes.blogspot.com
 |
 |
 © 2021 | http://angiesrecipes.blogspot.com
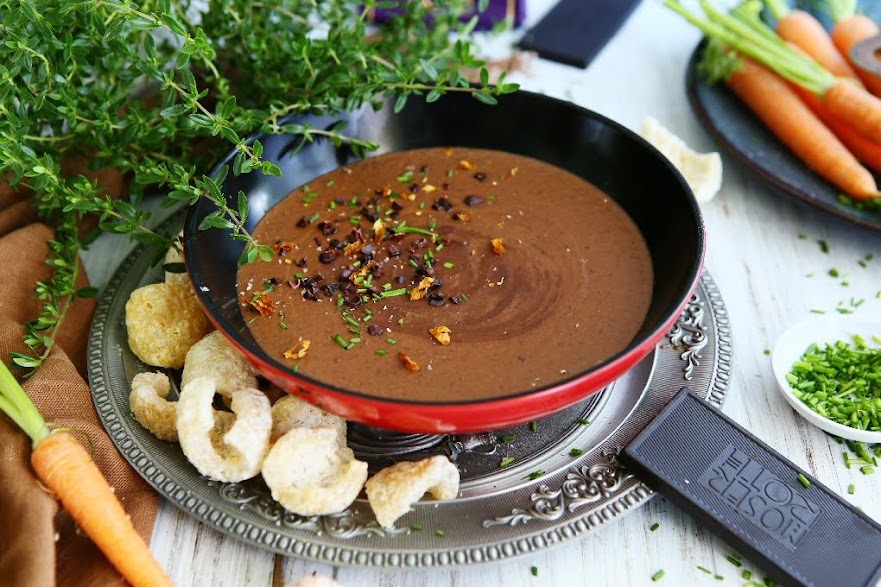
This is a creamy, spicy bean dip made with red kidney beans, tomato and dark chocolate. It's a snap to put together and packs loads of flavours. Enjoy it with chips, homemade crackers or crudités as an appetizer or a snack between meals.
|
- Heat the olive oil in a saucepan. Add in chopped onion and minced garlic. Cook, stirring, until aromatic, for 2 minutes.
- Add in chopped tomato, chopped chilli pepper, and red kidney beans. Stir briefly. Pour in red wine and broth or water. Season with cumin, salt and pepper. Simmer for 10 minutes.
- Puree the mixture with an immersion blender until smooth. If you prefer a chunky dip, then use a potato masher to mash everything together. Stir in chopped chocolate. Set aside to cool.
- Stir lime juice and tabasco into the mixture. Transfer to a serving plate. Granish with cacao nibs, chives and chilli flakes.

© 2021 | http://angiesrecipes.blogspot.com

© 2021 | http://angiesrecipes.blogspot.com
Pomegranate Apricot Brownies
 © 2021 | http://angiesrecipes.blogspot.com
 |
 |
 © 2021 | http://angiesrecipes.blogspot.com
 © 2021 | http://angiesrecipes.blogspot.com
With chewy edges, gooey center, and so rich chocolate flavour, these gorgeous foolproof fruity chocolate brownies are guaranteed to disappear in no time. The pomegranate seeds and apricot cut through the sweetness, and a dollop of creme fraiche or a scoop of white chocolate ice cream would make this even more decadent. I baked them for about 38 minute and it came out really gooey and fudgy. If you like your brownies a little less 'wobbly', then bake for 3-5 more minutes.
|
- Preheat the oven to 180C/350F. Grease and line a 22cm x 28cm pan with baking paper.
- Place butter and chocolate in a medium saucepan over low heat. Cook, stirring occasionally with a wooden spoon until melted and smooth. Remove from the heat and cool for 5 minutes.
- Place eggs and sugar in a large bowl. Whisk until well combined. Sieve flour and cocoa over the egg mixture and gently fold to combine. Gradually pour in chocolate mixture, stirring to combine.
- Pour the batter into prepared pan and scatter the top with pomegranate seeds and chopped apricots. Bake on the middle shelf for 35-40 minutes or until just cooked through. Set aside to cool completely. Cut into squares to serve.

© 2021 | http://angiesrecipes.blogspot.com
 |
 |

© 2021 | http://angiesrecipes.blogspot.com
Cherry Labneh Tart with Pistachios and Honey
 © 2021 | http://angiesrecipes.blogspot.com
 |
 |
 © 2021 | http://angiesrecipes.blogspot.com
 © 2021 | http://angiesrecipes.blogspot.com
Labneh, a thick strained yoghurt, is the base for the filling in a sweet vanilla flavoured tart crust, which is then sealed with a thin layer of melted white chocolate couverture to prevent the pastry getting soggy. You can use mascarpone instead of the yoghurt cheese or a mix of two for the filling. All the seasonal berries, currants, or stone fruits are fantastic as the topping. The cherry labneh tart is then finished off with a sprinkle of chopped raw pistachios that not only makes it look pretty but also adds extra flavour.
| Crust | Filling |
|---|---|
|
|
- For pastry, whiz spelt flour, sugar, butter and a pinch of salt in a food processor to fine crumbs. Add egg and extra egg yolk and pulse until a smooth dough forms. Enclose in plastic wrap and chill for 30 minutes.
- Preheat the oven to 180C/350F. Grease a 22cm loose-bottomed tart pan. Roll out pastry on a lightly floured surface until 4mm thick, then use to line pan. Trim excess, leaving 2mm above the sides. Chill for 30 minutes. Line the pastry with baking paper and fill with pastry weights. Bake for 15 minutes, then remove weights and paper. Bake for a further 5 minutes or until golden. Remove and set aside.
- Melt the white chocolate couverture and spread thinly over the tart case. Set aside until the crust is completey cool and the chocolate set.
- Combine labneh and icing sugar in a bowl, then spread into case. Top with cherries, pistachios and drizzle with honey, if using, to serve.

© 2021 | http://angiesrecipes.blogspot.com
 |
 |

© 2021 | http://angiesrecipes.blogspot.com
Chocolate Peanut Pull-Apart Bread
 © 2021 | http://angiesrecipes.blogspot.com
 |
 |
 © 2021 | http://angiesrecipes.blogspot.com

© 2021 | http://angiesrecipes.blogspot.com
The dough is a breeze to make, slightly sweetened with sugar and enriched with melted butter and egg. I used a mixture of dark chocolate, roasted peanuts and butter for the filling. You can replace peanuts with other nuts or simply use chunky peanut butter with cinnamon chips. Nutella and chopped hazelnuts would be great as the filling too. The bread is best enjoyed warm, while the chocolate still warm and fluid, but it still tastes wonderful after it cools.
| Dough | Filling & Topping |
|---|---|
|
|
- Combine milk and yeast, stir and set aside at room temperature for 10 minutes, untill is gets foamy.
- In the bowl of your stand mixer, add in egg, melted butter, sugar, scraped vanilla seeds and yeast/milk mixture. Stir on slow speed to combine. Add in flour and salt and beat at slow speed for 5 minutes until the dough comes together. Increase the speed and knead until dough is smooth and elastic.
- Transfer to a greased bowl, cover with plastic wrap and let it proof at room temperature, until it almost doubles its size.
- Grease and line a 30x11cm loaf pan with parchment paper. Set aside.
- Lightly flour a work surface and roll out the dough into 50x30cm / 20x12 inch rectangle. Brush the rectangle with melted butter. Sprinkle the chopped peanuts and chocolate over.
- Using a very sharp knife or a pizza cutter, slice the dough vertically into 6 equal sized strips from top to bottom. Stack 6 strips on top of each other, and cut into 6 sections. Place them accordion like into the prepared loaf pan.
- Cover the loaf pan with a clean kitchen towel, and allow to rise again in a warm place for 45 minutes. Preheat the oven to 180C/350F.
- Place the butter pieces on the top and sprinkle the brown sugar over. Bake the dough for 32-40 minutes in the middle of or until a deep golden brown. Let the bread cool in the pan for 10 minutes then place on cooling rack to cool completely.

© 2021 | http://angiesrecipes.blogspot.com
 |
 |

© 2021 | http://angiesrecipes.blogspot.com

© 2021 | http://angiesrecipes.blogspot.com
White Chocolate Latte Macchiato Scones
 © 2021 | http://angiesrecipes.blogspot.com
 |
 |
 © 2021 | http://angiesrecipes.blogspot.com
There are few things more delicious and satisfying to eat than fresh, fluffy scones straight from the oven. White chocolate and latte macchiato make these light, buttery and fluffy scones especially tempting and satisfying. Serve them while still warm slathered with luxurious whipped mascarpone and fresh seasonal berries for an ultimate breakfast or over a cup of tea or coffee anytime you feel like treating yourself!
|
- Line a large baking tray with parchment paper, set aside. Preheat the oven to 200C/400F.
- In a large bowl add spelt flour, vanilla sugar, baking powder, latte macchiato and sea salt. Stir to combine.
- Cut in cold butter and using a pastry cutter or your hands/fingers, rub the butter into the flour mixture until it resembles coarse crumbs. Add in cream and egg and stir until until mixture comes together (do not over mix). Add in white chocolate chunks and mix until evenly distributed.
- Turn dough out onto a well-floured work surface and form into a round circle about 25cm in diameter. Transfer the circle of scone dough to the prepared baking sheet. Cut into 6-8 equal wedges, then separate wedges and arrange them evenly on the baking tray.
- Brush the top of the scones with extra cream and bake in the preheated oven for 20-22 minutes until scones are nicely golden. Serve them with whipped mascarpone and strawberries.

© 2021 | http://angiesrecipes.blogspot.com
 |
 |

© 2021 | http://angiesrecipes.blogspot.com


