
Featured Recipe: 35 Recipes to make the most of Asparagus Season

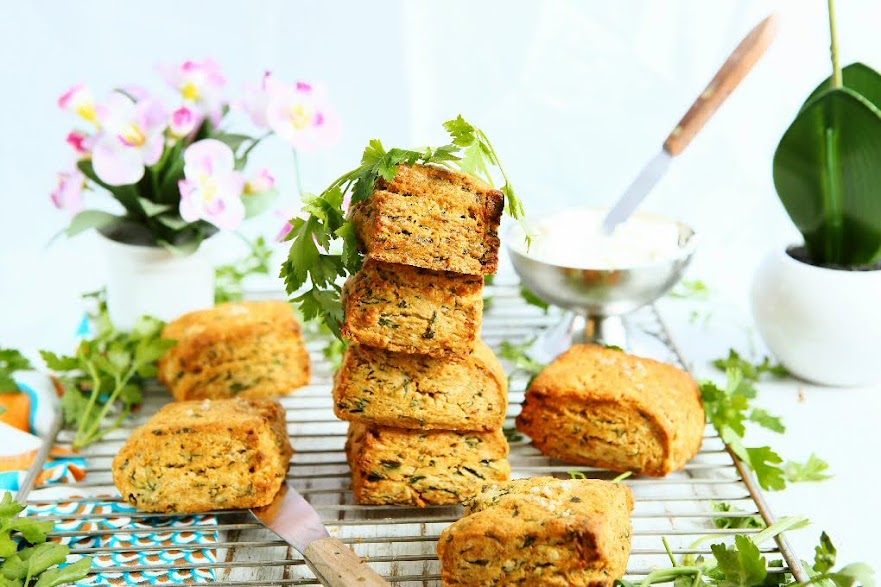
Sour Cream Biscuits with Parsley and Schmaltz
 © 2021 | http://angiesrecipes.blogspot.com
 |
 |
 © 2021 | http://angiesrecipes.blogspot.com
 © 2021 | http://angiesrecipes.blogspot.com
These sour cream biscuits with parsley are buttery and flaky with a soft, pillowy center. Sour cream adds a rich, tangy flavour, and its acidity helps make the biscuits incredibly tender. However, if you don't have any sour cream on hand, you can also use plain Greek yoghurt or even cream cheese. Rendered chicken fat, aka schmarltz, adds umami-rich, yet not overpowering flavour to the biscuits too. Instead of parsley, you can try scallions, chive, dill, arugula or a mixture of your favourite herbs for these savoury biscuits. The dough should be gently kneaded before being shaped, cut and baked. This allows gluten to develop, giving the biscuits a higher rise, and it also distributes the butter so the biscuits will be flaky instead of dense. The are best served hot or warm, plain or with extra butter or sour cream.
|
- Whisk rye, spelt, coconut sugar, salt, and pepper in a large bowl to combine. Add chilled chicken fat and diced butter and toss to coat. Use your fingertips to rub the chicken fat and butter into the dry ingredients until the mixture resembles fine breadcrumbs. Add chopped parsley and toss to evenly distribute.
- Create a well in the center and add in sour cream. Using a fork, mix until incorporated and the mixture just begins to hold together. Turn onto a lightly floured surface. Knead gently until the dough comes together. Pat the dough into an 8x4" rectangle, about 1" thick.
- Working from a short side, fold dough in thirds as you would a letter. It doesn’t need to overlap perfectly. Pat dough into another 8x4" rectangle, then fold dough in thirds like a letter one more time. Pat dough back into an 8x4" rectangle and cut in half lengthwise. Cut each half crosswise into 4 squares for a total of 8 biscuits.
- Place the biscuits on a parchment lined baking tray. Cover with a plastic wrap and chill for 15 minutes. Preheat the oven 220C/425F.
- Brush tops gently with melted butter and sprinkle with sea salt. Bake biscuits until golden brown, 20–22 minutes. Serve warm with sour cream or more butter.

© 2021 | http://angiesrecipes.blogspot.com

© 2021 | http://angiesrecipes.blogspot.com

© 2021 | http://angiesrecipes.blogspot.com

© 2021 | http://angiesrecipes.blogspot.com
Zucchini Buckwheat Muffins with Feta and Dijon Mustard
 © 2021 | http://angiesrecipes.blogspot.com
 |
 |
 © 2021 | http://angiesrecipes.blogspot.com
Not only are these easy savoury zucchini and buckwheat muffins ideal for afternoon break, they're great at busting after-school hunger too. They are made with a mixture of spelt and buckwheat flour, so they are much healthier, not gluten free though. Use all purpose gluten free flour instead of white spelt flour if you are gluten intolerant or have a celiac disease. Crème fraîche and olive oil help keep yield muffins that are soft, tender and moist. Add in some walnuts if you want more texture, but these muffins have plenty even without them thanks to the Feta, Dijon mustard and spices.
|
- Coarsly grate the zucchini and place them in a bowl. Add in salt and set aside for 30 minutes. Squeeze as much of the liquid out as possible.
- Preheat the oven 200C/400F. Grease and flour a giant 6-cup muffin pan. Set aside.
- In a mixing bowl, add white spelt flour, buckwheat flour, baking powder and baking soda. Make a well in centre.
- Whisk olive oil, eggs, coconut sugar, crème fraîche, mustard, oregano, garlic powder and paparika in a jug and pour into the well. Add zucchini and cubed feta. Stir until just combined. Divide the batter among prepared muffin cups.
- Bake for 25-30 minutes or until a skewer inserted into the centres comes out clean. Set aside in the pan for 5 minutes to cool slightly. Serve warm or at room temperature.

© 2021 | http://angiesrecipes.blogspot.com

© 2021 | http://angiesrecipes.blogspot.com

© 2021 | http://angiesrecipes.blogspot.com
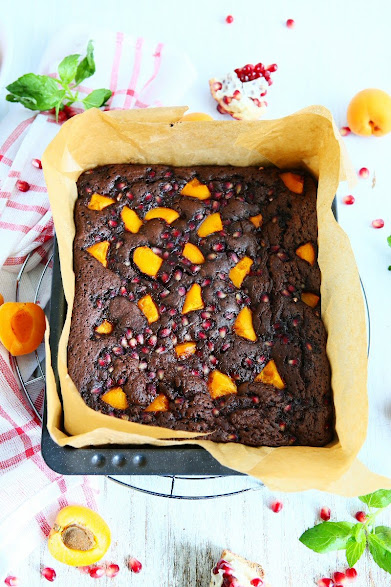
Pomegranate Apricot Brownies
 © 2021 | http://angiesrecipes.blogspot.com
 |
 |
 © 2021 | http://angiesrecipes.blogspot.com
 © 2021 | http://angiesrecipes.blogspot.com
With chewy edges, gooey center, and so rich chocolate flavour, these gorgeous foolproof fruity chocolate brownies are guaranteed to disappear in no time. The pomegranate seeds and apricot cut through the sweetness, and a dollop of creme fraiche or a scoop of white chocolate ice cream would make this even more decadent. I baked them for about 38 minute and it came out really gooey and fudgy. If you like your brownies a little less 'wobbly', then bake for 3-5 more minutes.
|
- Preheat the oven to 180C/350F. Grease and line a 22cm x 28cm pan with baking paper.
- Place butter and chocolate in a medium saucepan over low heat. Cook, stirring occasionally with a wooden spoon until melted and smooth. Remove from the heat and cool for 5 minutes.
- Place eggs and sugar in a large bowl. Whisk until well combined. Sieve flour and cocoa over the egg mixture and gently fold to combine. Gradually pour in chocolate mixture, stirring to combine.
- Pour the batter into prepared pan and scatter the top with pomegranate seeds and chopped apricots. Bake on the middle shelf for 35-40 minutes or until just cooked through. Set aside to cool completely. Cut into squares to serve.

© 2021 | http://angiesrecipes.blogspot.com
 |
 |

© 2021 | http://angiesrecipes.blogspot.com
Green Pasta Salad with Pine Nuts
 © 2021 | http://angiesrecipes.blogspot.com
 |
 |
 © 2021 | http://angiesrecipes.blogspot.com
A quick, easy green pasta salad chock full of the tasty, nutrient-rich ingredients with a creamy salad dressing. You can make this flavourful pasta ahead of time, then keep it in your fridge until time to serve. I use whole spelt pasta, but you can choose a variety that meets your nutritional requirements-regular wheat pasta or gluten-free pasta made from rice, lentils or beans.
| Salad Dressing | |
|---|---|
|
|
- Mix everything for the dressing in a bowl. Taste and season. Chill until ready for use.
- Fill a saucepan for the pasta with about 800ml of water. Place over high heat and bring it to a boil. Add 2 teaspoonfuls of salat to the boiling water. Add in pasta and cook until al dente, about 8 minutes. In the last minute of cooking, add frozen peas. Drain the pasta and peas and return to the saucepan.
- Add in arugula, chives and two thirds of the dressing. Gently toss everything together. Season and taste. Place them on a large serving platter. Scatter the roasted pine nuts over and enjoy!

© 2021 | http://angiesrecipes.blogspot.com

Easy Spelt Carrot Bread
 © 2021 | http://angiesrecipes.blogspot.com
 |
 |
 © 2021 | http://angiesrecipes.blogspot.com
This easy, quick carrot bread would make a great breakfast with Greek yoghurt and fresh seasonal fruit. The grated carrot and honey give this bread wonderful soft crumb texture and mild sweetness. If you want to pamper yourself with something extra and richer, top the bread with a generous smear of (nut) butter or even cream cheese frosting!
|
- Preheat the oven to 190C/375F. Grease a 21x10x8cm loaf pan and line the bottom and sides with parchment paper.
- In a mixing bowl, whisk together the flours, baing powder, spices, and salt. Peel and grate the carrots, set aside.
- Place honey, eggs, and olive oil in another bowl. Beat until combined. Add the flour mixture in 2 batches and stir with a spatula until just combined. Add in carrot and raisins. Fold to combine.
- Scrape the batter into the prepared baking pan. Top with seedy crackers or walnuts. Bake for about 50 minutes or until a toothpick comes out clean that is inserted in the center and the top is golden brown and crunchy. Remove from the oven and let cool in the pan for 10 minutes before turning out onto a wire rack to cool completely before slicing.

© 2021 | http://angiesrecipes.blogspot.com
 |
 |

© 2021 | http://angiesrecipes.blogspot.com

© 2021 | http://angiesrecipes.blogspot.com
Cherry Labneh Tart with Pistachios and Honey
 © 2021 | http://angiesrecipes.blogspot.com
 |
 |
 © 2021 | http://angiesrecipes.blogspot.com
 © 2021 | http://angiesrecipes.blogspot.com
Labneh, a thick strained yoghurt, is the base for the filling in a sweet vanilla flavoured tart crust, which is then sealed with a thin layer of melted white chocolate couverture to prevent the pastry getting soggy. You can use mascarpone instead of the yoghurt cheese or a mix of two for the filling. All the seasonal berries, currants, or stone fruits are fantastic as the topping. The cherry labneh tart is then finished off with a sprinkle of chopped raw pistachios that not only makes it look pretty but also adds extra flavour.
| Crust | Filling |
|---|---|
|
|
- For pastry, whiz spelt flour, sugar, butter and a pinch of salt in a food processor to fine crumbs. Add egg and extra egg yolk and pulse until a smooth dough forms. Enclose in plastic wrap and chill for 30 minutes.
- Preheat the oven to 180C/350F. Grease a 22cm loose-bottomed tart pan. Roll out pastry on a lightly floured surface until 4mm thick, then use to line pan. Trim excess, leaving 2mm above the sides. Chill for 30 minutes. Line the pastry with baking paper and fill with pastry weights. Bake for 15 minutes, then remove weights and paper. Bake for a further 5 minutes or until golden. Remove and set aside.
- Melt the white chocolate couverture and spread thinly over the tart case. Set aside until the crust is completey cool and the chocolate set.
- Combine labneh and icing sugar in a bowl, then spread into case. Top with cherries, pistachios and drizzle with honey, if using, to serve.

© 2021 | http://angiesrecipes.blogspot.com
 |
 |

© 2021 | http://angiesrecipes.blogspot.com
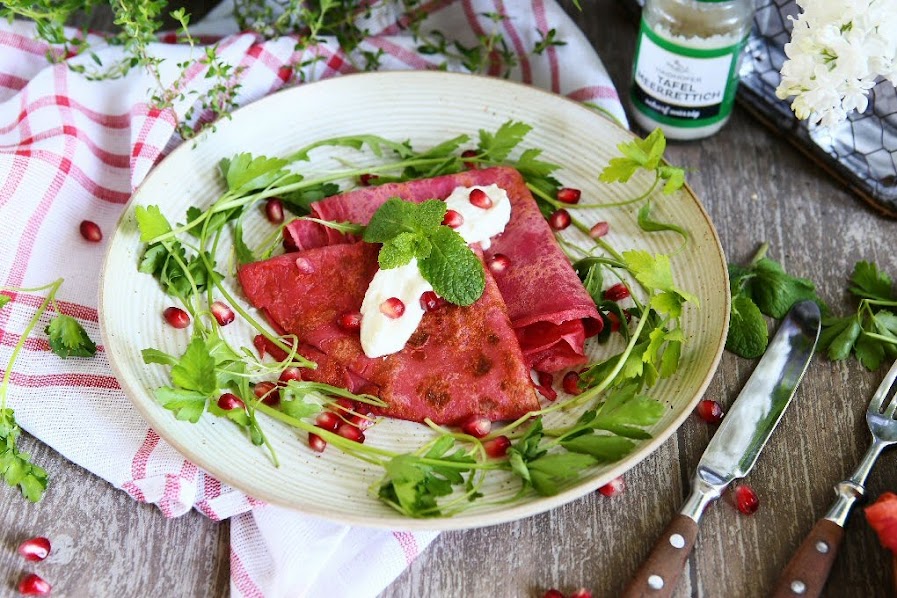
Beetroot Spelt Crepes with Horseradish Labneh
 © 2021 | http://angiesrecipes.blogspot.com
 |
 |
 © 2021 | http://angiesrecipes.blogspot.com
This beautiful vegetarian pancake recipe is easy but indulgent and very delicious made with beet juice and spelt, then filled with a horseradish labneh, rolled and served with some leafy greens and pomegranate seeds. They make a perfectly light and yummy lunch. You won't be disappointed. If you're not sure if horseradish is your thing, start with just a tablespoon. Add in some chopped fresh herbs if desired.
|
- Mix labneh, horseradish cream, and lemon juice in a medium bowl. Season with salt and lots of pepper. It can be made a couple of days ahead. Cover and chill.
- Sift the spelt flour into a mixing bowl. Whisk together the beet juice, milk and egg in a jug until combined. Gradually add egg mixture to the flour in the bowl, whisking until smooth and combined. Cover. Set aside for 30 minutes.
- Spray a 22-cm non-stick frying pan with coconut oil. Pour 1/5 of the batter into pan. Swirl to cover base. Cook for 2 minutes or until light golden. Turn. Cook for 30 seconds. Transfer to a plate. Cover to keep warm. Repeat with remaining mixture to make 5 crepes.
- Spread 2 tablespoons of horseradish labneh evenly onto the crepe. Roll up firmly to enclose the filling. Serve immediately with leafy greens and pomegranate seeds.
© 2021 | http://angiesrecipes.blogspot.com

© 2021 | http://angiesrecipes.blogspot.com


