
Wild Garlic Pesto Swirled Rolls
 © 2022 | http://angiesrecipes.blogspot.com
 © 2022 | http://angiesrecipes.blogspot.com
 |
 |
 © 2022 | http://angiesrecipes.blogspot.com
These herbal rolls are swirled with a homemade wild garlic pesto and perfect for a picnic or for dipping into soup. They are super soft and an easy dinner roll recipe to make. If you love wild garlic and are a fan of pesto, you will enjoy this! Add an extra sprinkle of Parmigiano-Reggiano over the pesto if you want extra cheesy swirls and of course any kind of pesto would be great for this recipe.
| Pesto Swirled Rolls | Wild Garlic Pesto |
|---|---|
|
|
- Rinse and roughly chop the wild garlic leaves. Blitz the wild garlic leaves, grated Parmigiano-Reggiano, garlic, lemon zest and pine nuts to a rough paste in a food processor. Season, and with the motor running slowly, add in olive oil. Taste, season and add in lemon juice. Transfer the pesto to a clean jar and top with the extra olive oil. Will keep in the fridge for two weeks. You just need half of the pesto for the filling. Use the remaining to serve the buns or use it in other recipes.
- In a saucepan, add milk, butter and coconut sugar. Melt over low-medium heat, stirring frequently until the butter is melted and sugar dissolved. Turn off the heat and set aside to cool until warm to touch. Brush an 11-inch / 28-cm bundt pan with olive oil.
- In the bowl of your table mixer fitted with the dough-hook, add the warm milk mixture. Sprinkle the dried yeast on top, then add eggs, flour and salt. Stir on low speed until just combined, then increase the speed and mix until the dough begins to form a ball and pulls away from the sides of the bowl. The dough should be elastic, soft and stretchy.
- Remove the dough and shape into a ball. Lightly grease the mixing bowl with a bit of olive oil. Return the dough ball inti the greased mixing bowl and cover loosely with cling wrap or a damp kitchen towel. Let rest for 45 minutes in a warm spot until it's almost double in size.
- Once the dough has risen, punch it down with your fist and roll out the dough into an 20x12-inch / 50x30-cm rectangle. Spread half of the pesto filling out evenly over the dough, leaving a 1-inch / 2.5-cm border on sides. Beginning at the long side, tightly roll up the dough towards you and pinch the edges together to seal.
- Cut the sealed roll into 12 equal portions. Place the rolls into the prepared bundt pan. Cover the pan again with a damp towel or cling wrap, and leave it in a warm place to rise for 30 minutes. Preheat the oven to 180C/350F.
- Once the rolls have risen, brush the top with the beaten egg and sprinkle with chopped hazelnuts. Bake in the middle of hot oven for about 22-25 minutes until golden and cooked through. Cool on a wire rack for 5 minutes before removing from the pan and slicing. Serve it with the remaining pesto sauce if desired.

© 2022 | http://angiesrecipes.blogspot.com
 |
 |

© 2022 | http://angiesrecipes.blogspot.com

© 2022 | http://angiesrecipes.blogspot.com
Easy Melt&Mix Date Bars with Macadamia Nuts and Mahlep
 © 2022 | http://angiesrecipes.blogspot.com
 © 2022 | http://angiesrecipes.blogspot.com
 |
 |
 © 2022 | http://angiesrecipes.blogspot.com
This quick and delicious treat is perfect for an afternoon snack, a breakfast bite or an indulgent but healthy dessert. A classic melt and mix date bars recipe made with date syrup (or golden syrup), coconut sugar (light brown sugar is a good substitute), butter (or coconut oil if you prefer), macadamias (or nut of your choice), and dates, of course. The real star of these cookie bars is mahlep.
Mahlep, Mahalepi or Mahlab, used mainly in holiday breadmaking, cookies and pastries in the Middle East countries, is an aromatic baking spice made from the seeds of the mahaleb cherry, aka rock cherry, prunus mahaleb, and St. Lucy's cherry. Mahlep tastes a bit like cherries, bitter almond with a hint of rose and vanilla. Once baked, it becomes fruity and rich, but subtle. The seeds either have to be ground or boiled as an infusion and strained to obtain the most flavor. You can find it in Greek and Middle Eastern food shops or Amazon. (I got mine from a local Turkish store), As it comes from a seed, powdered mahlab is more vulnerable to get rancid and spoiled, so it’s best to buy it in small quantities, and store it in a cool, dry place. Whole mahlab whole seeds store well in the freezer for a very long time. Grind it just before using for best results.
Dandelion Salad with Bacon, Egg and Parmigiano Reggiano
 © 2022 | http://angiesrecipes.blogspot.com
 |
 |
 © 2022 | http://angiesrecipes.blogspot.com
 © 2022 | http://angiesrecipes.blogspot.com
A freshly picked dandelion salad is one of the joys of spring, made with crispy bacon, boiled eggs and the 30-month Parmigiano Reggiano, that help smooth the strong and assertive bitterness of danelions and characteristically bitter edge of radicchio. You could use all dandelions if you prefer or substitue baby spinach or arugula greens. Besides bacon, salami or other sausages are great for this salad too.
| Salad | Dressing |
|---|---|
|
|
- In a medium skillet over low heat, cook bacon until brown and crisp, 5 to 8 minutes. Using a slotted spoon, transfer bacon to a paper towel, reserving fat.
- Return the skillet to the heat, add the minced shallot and sauté, stirring occasionally, for a minute, until slightly softened. Add the hazelnut oil, mustard, vinegar and broth and stir for about 1 minute, until bubbling and just the slightest bit reduced, scraping up the browned bits from the bottom of the pan. Taste and season.
- Meanwhile boil the eggs in boiling water for about 8 minutes for hard-boiled eggs. Drain and rinse egg briefly under cool water until cool enough to handle. Peel and cut the egg in half.
- Toss the dandelion greens and radicchio with salad dressing. Arrange on serving plates with the eggs, bacon and shave some Parmigiano-Reggiano over. Serve immediately.

© 2022 | http://angiesrecipes.blogspot.com

© 2022 | http://angiesrecipes.blogspot.com

Roggenmischbrot German Mixed Rye Bread with Honey
 © 2022 | http://angiesrecipes.blogspot.com
 |
 |
 © 2022 | http://angiesrecipes.blogspot.com
 © 2022 | http://angiesrecipes.blogspot.com
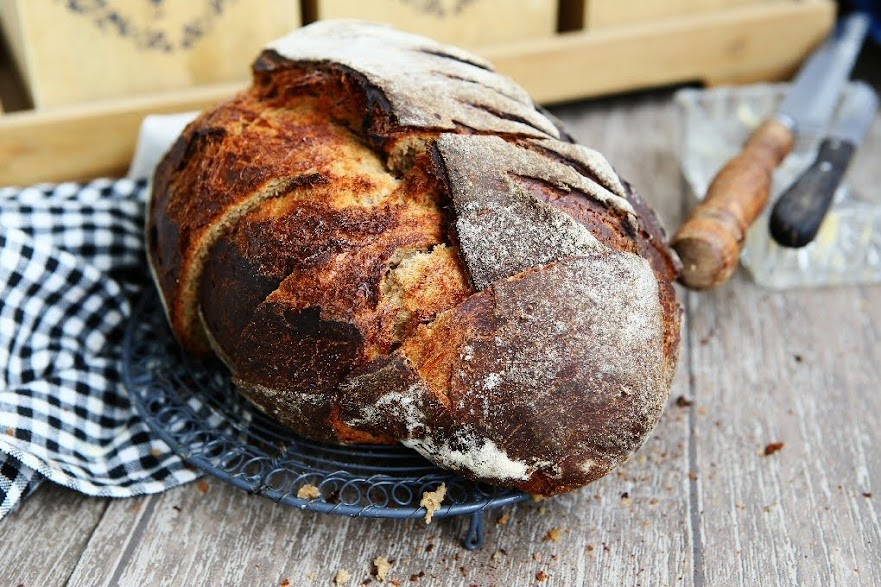
One of the great pleasures of living in Europe is the wide array of breads in various forms, tastes, textures and colours available. Healthy rye bread is gaining popularity because of its wholesomeness, high nutritional value and may be more beneficial in weight loss than wheat. Breads made with rye flour have a longer shelf life and taste fresh longer than breads made with wheat flours. It is also often combined with other flours because of its low protein / gluten content.
Many so-called rye breads are actually a mixture of rye and wheat, or some other grain that’s easier to work with. Rye bread in Germany, according to the law, must be made with no less than 90% rye. Any bread with a lower percentage of rye flour is called Mischbrot, either Roggenmischbrot / mixed rye bread or Weizenmischbrot / mixed wheat bread.
Rye flour is darker than wheat flour and it has higher amounts of vitamins B and E. Earthy, tangy rye bread is often made with additions like honey, malt syrup, or cocoa powder, which add colour, aroma and flavour. Very often bread seasoning / bread spice / Brotgewürz, like caraway, dill, fennel, anis, coriander, or cardamom, is added to the dough according to personal or regional preference, and they make the bread particularly tasty, aromatic and also aid digestion.
While you can make bread with 100% rye, which is difficult to work or knead and the crumb tends to be denser, heavier and tighter, though taste more distinctly of rye, very digestible and nutritious if made as a sourdough. That means it needs a lot of help if you aim to get a fluffy, airy product. One of commen practices is the addition of some wheat flour. Wheat flour can be added in any ratio that suits your taste and liking to help form a better gluten structure and get a good rise but still keeps good rye flavour and aroma.
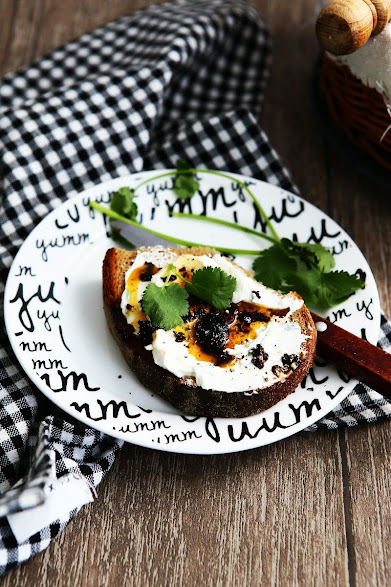
Light and soft inside with a very crunchy crust, this bread is a great choice for corned beef, roast beef, or pastrami sandwiches slathered with grainy mustard and topped with cheese. It freezes very well too. Wrap it in plastic wrap and aluminum foil, then store in a freezer bag for up to three months. Thaw at room temperature and reheat in the oven if desired.
Rye Mix Bread with Honey
inspired by Roggen-Krustenbrot mit Honig
|
- In the mixing bowl of your table mixer fixed with a dough hook, add rye flour, bread flour, sourdough, honey, and fresh yeast. Mix at slow speed while you slowly add in water until the ingredients roughly come together. Increase the speed to medium and stir for 5 minutes. Now add in salt and continue to mix for a further 2 minutes until the a firm dough forms.
- Turn out onto a work surface and shape into a ball. Grease the mixing bowl with a bit of olive oil and return the dough ball to the bowl. Cover with a plastic wrap and let it rise in a warm, moist environment until double in volume.
- Fold the edges of the dough inwards several times and let the dough rise again for 1 hour.
- Lightly flour your work surface and gently shape the dough into an oval batard or round ball. Place the shaped dough into a well floured bread basket with the seam sides up. Cover the dough with a slightly moist kitchen towel and let rise for about an hour.
- Meanwhile preheat the oven to 240C/470F with a pizza stone on the 2nd bottom rack and a baking tray at the bottom.
- Turn the puffy dough onto a floured parchment paper or the floured back of a baking sheet. Use a sharp knife, razor blade, or bread lame to score a couple of lines across the dough. (here is a scoring tutorial just in case you are interested) Place the dough onto the pizza stone and throw a few ice cubes into the baking tray at the bottom to generate some steam.
- Close the oven door immediately and bake the bread for about 15 minutes. Lower the oven temperature to 210C/410F and bake for 30-35 more minutes until the bread crust is deep golden brown. Remove and cool the bread on a wire rack.

© 2022 | http://angiesrecipes.blogspot.com

© 2022 | http://angiesrecipes.blogspot.com

© 2022 | http://angiesrecipes.blogspot.com
© 2022 | http://angiesrecipes.blogspot.com
How to make Wild Garlic Salt
 © 2022 | http://angiesrecipes.blogspot.com
 © 2022 | http://angiesrecipes.blogspot.com
 |
 |
 © 2022 | http://angiesrecipes.blogspot.com
 © 2022 | http://angiesrecipes.blogspot.com
A great way to make the most of the very short wild garlic season is to find delicious ways to preserve them so that they can be enjoyed all year round. The deep intense flavour of wild Garlic foraged from the forests on the Rhine blended with sea salt makes this seasoning really healthy and addictive. This flavoured salt gives every dish that certain something extra and can be enjoyed in a variety of ways. It's ideal as a finishing salt for barbecued meats, sprinkled over fresh vegetables, on pasta, or baked into fresh bread. Use sea salt for your infused salt. It is much more aromatic and contains no additives such as iodine, which can lend a bitter taste to foods salted with table salt. Whether you take a small or large crystals is up to you. Coarse sea salt with wild garlic is perfect for the spice mill.
|
- Rinse the wild garlic leaves and pat them dry using kitchen paper or a kitchen towel. Roughly chop the wild garlic leaves.
- Place the chopped garlic leaves in a food processor. Add in 100 grams of sea salt. Blend them into a smooth paste.
- Pour the remaining salt into a bowl and add the wild garlic paste. Mix thoroughly until all of the salt is consistently green throughout.
- Spread out the mixture in a thin layer on a baking sheet lined with parchment paper. Let the wild garlic sea salt dehydrate in the oven for about 2-3 hours at 50C/120F degrees. You can also dehydrate the infused salt in your dehydrator. Check the salt once an hour and mix to make the salt dehydrate completely. If weather allows, dry the mixture in the sun for 24 hours or until completely dry.
- Place the wild garlic sea salt in an airtight container and leave it in a cool, dry, dark location. The flavoured salt does not have an expiry date but will lose its intensity over time. If you store it properly, it can potentially have an indefinite shelf life. But for optimal flavour and colour, use it up in 2-3 years or just until next wild garlic season.

© 2022 | http://angiesrecipes.blogspot.com
 © 2022 | http://angiesrecipes.blogspot.com
 |
 |

© 2022 | http://angiesrecipes.blogspot.com

© 2022 | http://angiesrecipes.blogspot.com

© 2022 | http://angiesrecipes.blogspot.com
Wild Garlic and Ginger Butter
 © 2022 | http://angiesrecipes.blogspot.com
 |
 |
Wild Garlic in the Woods
 © 2022 | http://angiesrecipes.blogspot.com
 © 2022 | http://angiesrecipes.blogspot.com
Wild garlic, aka ramsons, or ramps, or bear’s garlic (Bärlauch), is expensive to buy (100 g=2 Euro) but free to forage. Just make sure you’re picking the right thing: the leaves of wild garlic are easily mistaken for lily of the valley (Maiglöckchen), and also autumn crocuses (Herbstzeitlose). They are both poisonous and neither of these two smell or taste like garlic or chives. The best way to identify wild garlic is by smell. Crush a leaf in your hand and the aroma should smell strongly of garlic.
Wild garlic is used traditionally throughout Europe as a spring tonic due to its blood-purifying properties, similarly to bulb garlic, it is also thought to lower cholesterol and blood-pressure, which in turn helps to reduce the risk of diseases such as heart attack or stroke.
Picked wild garlic leaves will keep for 3-4 days in dark and cook place (a plastic bag in the salad draw of your fridge is ideal), but the flowers are best used on the day they are picked. The whole plant of this punchy springtime herb is edible and can be used in pestos, garlic butter, soups, tarts, marinades and more. This wild garlic flavoured butter is extremely versatile – use to spread onto a sourdough bread, to make garlic pull-apart bread or gnocchi, to toss with pasta or melted over a griddled steak or baked potato.
Wild Garlic and Ginger Butter
inspired by this recipe on Küchengötter
|
- Peel and finely chop the ginger, preferably press it through a garlic press. Wash the wild garlic thoroughly, then spin dry them using a salad spinner. Finely chop the dried wild garlic. Peel the garlic and press through a garlic press.
- Place the softened butter in a bowl with salt, then juice the lime and add to the butter. Add in ginger, wild garlic and garlic.
- Mix all the ingredients with a hand mixer until combined. The flavoured butter is now ready to use if you're cooking with it straight away.
- Or spoon out the soft butter into a log at the bottom quarter of a cling film and wrap very tightly round the butter, then roll up the rest of the cling film around it. Roll the wrapped butter across the table until you have a smooth log shape. Tie a knot at each end, ensuring you have squeezed out all the air. Chill for at least one hour or until needed. You can freeze the log for a month and cut off slices as needed.

© 2022 | http://angiesrecipes.blogspot.com

© 2022 | http://angiesrecipes.blogspot.com

© 2022 | http://angiesrecipes.blogspot.com
Whole Baked Mackerel
 © 2022 | http://angiesrecipes.blogspot.com
 |
 |
 © 2022 | http://angiesrecipes.blogspot.com
Mackerel is an underrated fish that’s packed full of flavour, beneficial omega-3 fatty acids, vitamin B-12 and other important nutrients that can benefit your health while being a budget-friendly and sustainable option too. Buy at its freshest, when in season if you can. Good mackerel will have a shining eyes, colourful skin, blood-red gills and a firm, muscular feel. Their flesh is rich, dark and oily and must be eaten very fresh. Despite the simplicity of the recipe, roasted mackerel with fresh herb, potato, and tomatoes makes a perfect oven-to-table family meal!


