
Beetroot Bread Rolls with Cacao Nibs and Dulce de Leche
 © 2021 | http://angiesrecipes.blogspot.com
 |
 |
 © 2021 | http://angiesrecipes.blogspot.com
 © 2021 | http://angiesrecipes.blogspot.com
Flavoured with energy-boosting, antioxidants-loaded beetroot juice and stuffed with rich, creamy caramelized milk (aka dulce de leche), this homemade bread pull-apart is the treat for the whole family. It's perfect for breakfast, snack or even dessert.
|
- Place the beetroot juice and butter in a heatproof jug and microwave on High for 1 minute or until the butter has melted. Stir well and set aside to cool slightly.
- Combine the 380 grams of flour, coconut sugar, yeast, cacao nibs and salt in the mixing bowl of your stand mixer fitted with a dough hook on low speed. Add in beetroot juice-butter mixture and egg yolk. Mix for 15 minutes or until very smooth and elastic. If the dough is still sticky, add a little bit more flour, a couple of teaspoons at a time.
- Transfer to a lightly-oiled bowl. Cover with a clean tea towel and set aside for 60-90 minutes or until dough doubles in volumn.
- Grease a regular loaf pan and line with baking paper. Set aside.
- Turn the dough onto a lightly floured surface and knead until dough returns to its original size. Divide into 12 even portions. Cover and rest for 5 minutes.
- Flatten a piece of dough ball and place a teaspoon of dulce de leche in the centre. Bring the edges of the dough up and over to enclose the filling. Roll into a smooth ball. Repeat with the rest of dough balls and filling. Place them into the prepared loaf pan.
- Cover loosely with a clean tea towel. Set aside for 45 minutes or until dough balls have risen almost to the top edge of the pan.
- Preheat the oven to 190C/375F. Brush the surface of bread with the reserved egg white and sprinkle the desiccated coconut flakes over. Bake for 25-30 mins or until golden brown and cooked through. Remove and cool briefly before turning out onto a wire rack. Serve warm or at room-temperature.

© 2021 | http://angiesrecipes.blogspot.com
 |
 |

© 2021 | http://angiesrecipes.blogspot.com
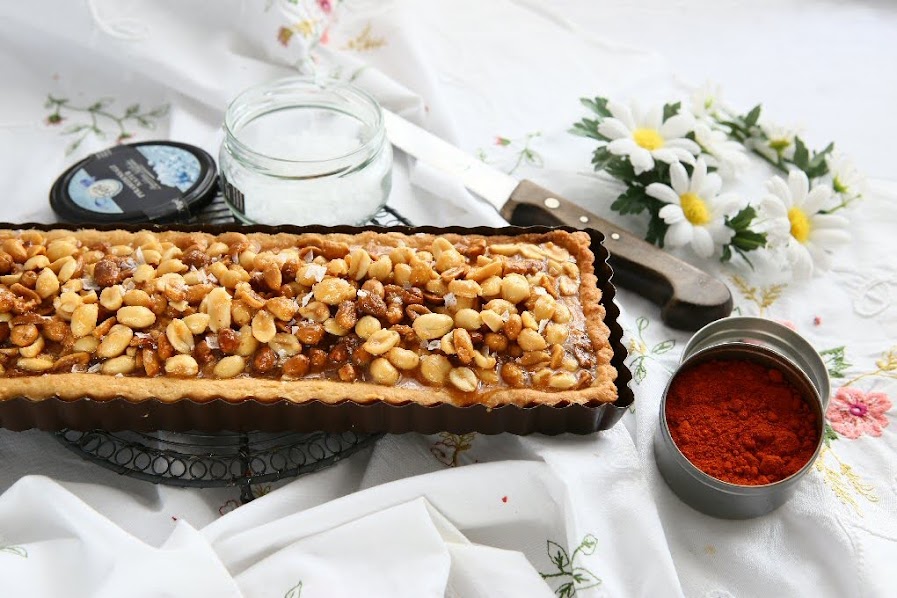
Honey Caramel Peanut Tart
 © 2021 | http://angiesrecipes.blogspot.com
 |
 |
 © 2021 | http://angiesrecipes.blogspot.com
 © 2021 | http://angiesrecipes.blogspot.com
A buttery shortbread cookie tart cradling luscious creamy honey caramel infused with cayenne pepper and loaded with salted roasted peanuts. The tart is great on its own or served with fresh whipped cream on the side.
| Pastry | Honey Caramel Peanut Filling |
|---|---|
|
|
- For the pastry, process the flour, icing sugar, salt and butter in a food processor until mixture resembles fine breadcrumbs. Add egg yolk and water. Process until mixture just comes together. Turn onto a work surface. Knead gently until just smooth. Shape into a disk. Wrap the dough disk in plastic and chill for 1 hour.
- Preheat oven to 200C/400F. Roll out dough between 2 sheets of baking paper until 4mm thick. Line a 35x11 cm rectangular fluted tart tin and a 12cm round fluted tart tin with removable base with pastry. Line with baking paper and pastry weights or beans. Bake for 15 minutes. Remove paper and weights or beans and bake for a further 15 minutes for the rectangular one, and 8-10 minutes for the small round one or until golden. Set aside to cool.
- Cook sugar, honey and water in a medium heavy-based saucepan over low heat, stirring until sugar dissolves. Increase heat to medium. Simmer, without stirring, for 7 minutes or until mixture reaches 173C/345F on a sugar thermometer. Quickly stir in heavy cream, butter, cayenne pepper and nuts. Continue cooking until the mixture reaches 248F/120C. Remove from the heat and quickly pour into tart. Sprinkle with sea salt.
- Set aside to cool to room-temperature. Cover with plastic wrap and place in the fridge for 1 hour. Cut tart into wedges and serve with whipped cream, if desired.

© 2021 | http://angiesrecipes.blogspot.com
 |
 |

© 2021 | http://angiesrecipes.blogspot.com

© 2021 | http://angiesrecipes.blogspot.com
Pizza Bundt Cake
 © 2021 | http://angiesrecipes.blogspot.com
 |
 |
 © 2021 | http://angiesrecipes.blogspot.com
Try this easy pizza flavoured savoury bundt cake recipe that will knock your socks off! It has the perfect combination of flavours and super easy to make too. Passata is an uncooked tomato purée that has been strained of seeds and skins. But if you have some regular pizza sauce, homemade or store-bought, feel free to use it, just cut down the salt to 1/3 teaspoon.
|
- Slice the pitted olives into rings. Cut the prosciutto or salami and bell pepper into small pieces. Finely grate the hard cheese.
- Preheat he oven to 180C/350F. Grease and flour a 24-cm heart-shaped bundt pan and shake off the extra flour. I use a 24-cm heart-shaped springform pan with a small empty stoneware mustard jar in the center. You can fill the jar with some pie weights (beans or rice work great) so it won't move.
- Stir together the eggs, dried oregano and grated cheese in a mixing bowl. Slowly beat in the olive oil and tomato passata until well combined.
- Sift together the flour, baking powder and salt. Add the sifted flour mixture into the egg mixture. Stir until the mixture is barely combined. Fold in prosciutto, bell pepper and olive rings.
- Scrape the batter into the prepared pan. Bake the cake in the lower 3rd rack (just below center) of hot oven for about 40 minutes until nicely golden brown.
- Take out the gugelhupf and place on a wire rack for 10 minutes. Invert and cool completely before slicing.

© 2021 | http://angiesrecipes.blogspot.com

© 2021 | http://angiesrecipes.blogspot.com
 |
 |
 © 2021 | http://angiesrecipes.blogspot.com
All Spice Chicken Wings

© 2021 | http://angiesrecipes.blogspot.com
 |
 |
 © 2021 | http://angiesrecipes.blogspot.com
For the ultimate comfort food you can't beat these fingerlicking delicious spiced wings served with a sweet honey sauce. These juicy, flavour-packed wings are perfect whether you're enjoying them as an easy family meal, snack for your favourite show or simply because you are in the mood for some good food.
| Honey Mustard Sauce | |
|---|---|
|
|
- Combine the spices and olive oil with some salt and pepper. Place chicken in a bowl with the marinade and toss well to combine. Cover and chill for at least 4 hours or overnight if time permits.
- Combine honey, mustard and mayonnaise in a bowl. Season. Preheat the oven to 190C/375F and line a large baking tray with baking paper.
- Arrange the chicken wings on the tray and bake for 40 minutes until golden and cooked through. Sprinkle with chopped spring onions and serve with the honey mustard sauce.

© 2021 | http://angiesrecipes.blogspot.com
 |
 |
 © 2021 | http://angiesrecipes.blogspot.com
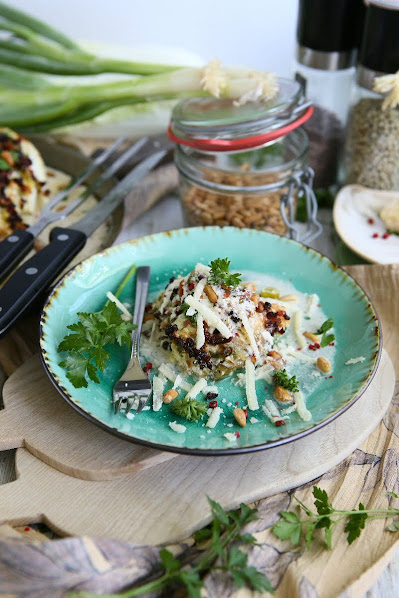
Chinese Cabbage Gratin - #Keto#Gluten Free
 © 2021 | http://angiesrecipes.blogspot.com
 |
 |
 © 2021 | http://angiesrecipes.blogspot.com
A creamy vegetable gratin made with Chinese cabbage half and scallions in a Parmesan - Mascarpone sauce with bacon bits. It's keto friendly, naturally gluten-free and so delicious. If you've not got Chinese cabbage on hand, use savoy or white cabbage instead.
Chinese cabbage is a nutrient dense, low-calorie, low-carb, high-fiber food that is an excellent source of vitamin C, antioxidants and minerals. It can also be helpful in controlling chronic inflammation when eaten regularly.
|
- Preheat the oven to 200C/400F. Cut the cabbage in half lengthwise. Place one half in a quiche form or oven-safe pan. Season the cabbage half with salt and pepper. Cut the spring onions into fine rings.
- Mix together whipping cream, beef broth or water, mascarpone and chopped spring onions. Season with salt and pepper.
- Pour the sauce over the Chinese cabbage half. Sprinkle the bacon bits and grate the Parmesan over. Bake for 30-35 minutes until bacon is crisp and the cheese golden brown.
- Transfer to a wire rack and cool for 5-10 minutes before serving garnished with chopped parsley, toasted pine nuts and pink peppercorns.

http://schneiderchen.de | © 2021 | http://angiesrecipes.blogspot.com

http://schneiderchen.de | © 2021 | http://angiesrecipes.blogspot.com
 © 2021 | http://angiesrecipes.blogspot.com
Maple glazed candied Walnuts
 © 2020 | http://angiesrecipes.blogspot.com
 |
 |

http://schneiderchen.de | © 2020 | http://angiesrecipes.blogspot.com
Candied walnuts are a great addition to salads, soups, breakfast oatmeal, or yoghurt and make a perfect party snack. The use of these sweet nuts is just endless. You can use almonds, pecans, Brazil nuts or any other kind of whole nuts.
|
- Preheat oven to 180C/350F. Spread out the walnuts on a baking sheet and bake for 5-8 minutes, or until lightly toasted.
- Heat a large skillet over medium heat. Once the skillet is hot, add the butter and stir until melted. Add the maple syrup, molasses, black salt, and stir quickly to combine with the melted butter.
- Add the toasted walnuts and toss well in the maple syrup mixture. Cook for 5 minutes, stirring frequently to prevent burning, until the walnuts are evenly coated with the mixture.
- Line a baking sheet with parchment paper. Spread out the walnuts onto the prepared baking sheet, breaking up any clumps. Allow the nuts to cool completely before using or storing. They stay fresh for 2 weeks in an airtight container at room temperature.

http://schneiderchen.de | © 2020 | http://angiesrecipes.blogspot.com
 |
 |

http://schneiderchen.de | © 2020 | http://angiesrecipes.blogspot.com


