
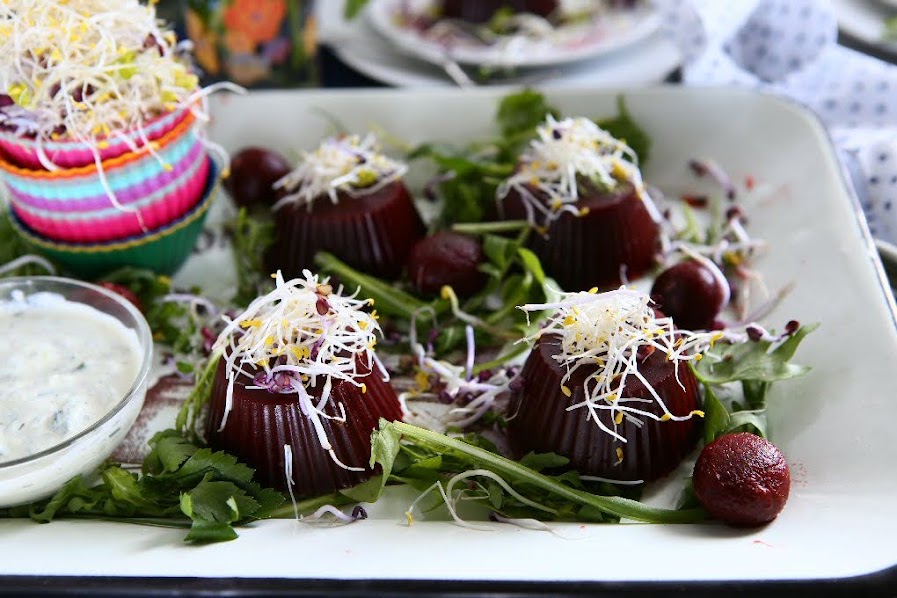
Spiced Beetroot Jelly with Sprouts and Sour Cream Dressing
 © 2020 | http://angiesrecipes.blogspot.com
 |
 |
 © 2020 | http://angiesrecipes.blogspot.com
Jellied beetroot with sprouts is a super tasty, refreshing appetizer that would lifts up your mood, whet your appetite and makes you feel good. The fun combination of beetroot and sprouts with a creamy horseradish sour cream dressing that's a cinch to make and perks up any dish.
Beetroot is delicious and is a rich source of antioxidants, minerals and vitamins. If you love this humble root vegetable, you can't go wrong with this. Sprouts (I am using alfalfa and radish sprouts) are also a nutrient-dense food. One cup of alfalfa sprouts has a mere 8 calories and is a good source of vitamin K. In a nutshell, this dish is a nutritional powerhouse!
| Sour Cream Dressing | |
|---|---|
|
|
- Soak the leaf gelatin in a bowl of cold water for 10 minutes or until soft. Meanwhile peel and finely dice the shallot and beetroot. Place them in a saucepan with vegetable broth. Cook for about 20 minutes until softened. Use an immersion blender to process until smooth. Season the puree with salt, pepper, allspice, nutmeg and blackcurrant jelly.
- Warm up the white wine or beetroot juice in your microwave. Remove the softened gelatin from bowl and squeeze out excess water. Dissolve the gelatin in the wine or beet juice. Now add this to the beetroot puree and mix until well combined.
- Divide the mixture into 6 silicone muffin cups and chill at least 5 hours or overnight until firm.
- Whisk together sour cream and yoghurt together. Add in dill and horseradish cream. Season with salt, pepper and lemon juice.
- Turn out the jelly onto serving plates. Drizzle sour cream dressing over and serve with some sprouts and fresh herbs.
 © 2020 | http://angiesrecipes.blogspot.com

http://schneiderchen.de | © 2020 | http://angiesrecipes.blogspot.com
 © 2020 | http://angiesrecipes.blogspot.com
Oxtail Soup - Gluten Free, Keto
 © 2020 | http://angiesrecipes.blogspot.com
 |
 |
 © 2020 | http://angiesrecipes.blogspot.com
Oxtail Soup is a clear broth soup that makes use of oxtail as the main ingredient, together with fresh ginger, star anise, chilli pepper flakes, pak choi, spring onions, and cilantro. The oxtail is the tail of a steer, usually skinned and cut into several sections. It's marbled with fat and the meat is gelatinous and flavourful, therefore it's ideal for slow cooking, braising or in soups.
|
- Preheat the oven to 200C/400F. Place the oxtails on a baking tray and roast for 30 minutes. Remove the roasted oxtails from the oven and place them in the Instant Pot with ginger slices, star anise, peppercorns, beef broth and water. Cover and set to “Soup”, 30 minutes.
- When the oxtails are done cooking, let the pressure release naturally. If you’re in a hurry, just release the pressure manually after 30 minutes has elapsed.
- Arrange pak choi in 2 soup bowls. Add in a piece of oxtail or two, and then ladle the soup into the soup bowls. Garnish with lime wedges, crushed red pepper flakes, ginger matchsticks, cilantro, and green onions.

http://schneiderchen.de | © 2020 | http://angiesrecipes.blogspot.com

http://schneiderchen.de | © 2020 | http://angiesrecipes.blogspot.com
 |
 |
 © 2020 | http://angiesrecipes.blogspot.com
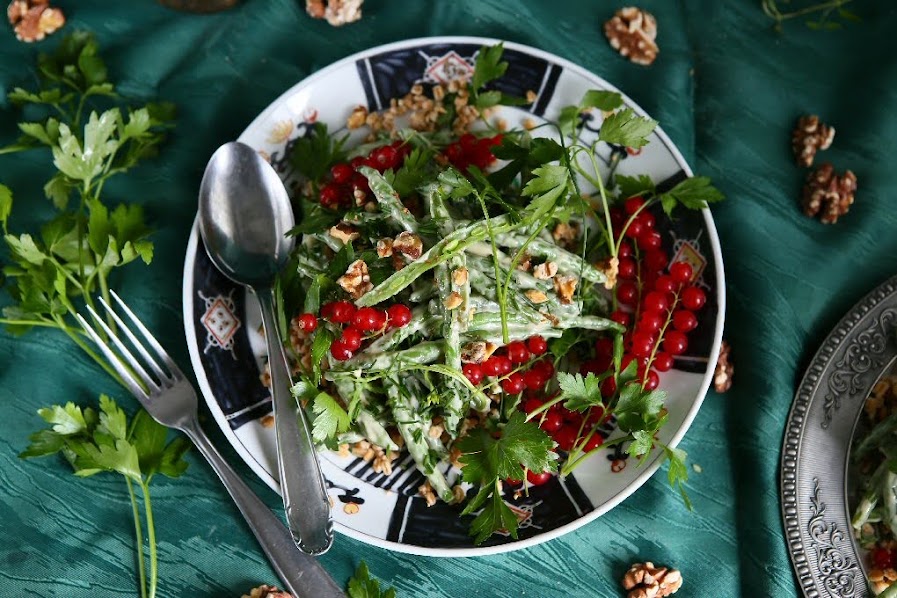
Haricots Verts and Freekeh with Tahini Dressing
 © 2020 | http://angiesrecipes.blogspot.com
 |
 |
 © 2020 | http://angiesrecipes.blogspot.com
A high-fiber whole grain, freekeh (Grünkern) is spelt that's harvested while still soft, young and green, then sun-dried and smoked. It is very rich in nutrients and perfect as a side dish like rice, for salads, cold or warm, and the freekeh flour makes fantastic bread.
Freekeh is sold as “whole” and as “cracked.” The cracked freekeh cook faster because it's been broken into smaller pieces. I usually buy whole green wheat directly from the farm. Freekeh and haricots verts can be cooked 2 days ahead. Cover and chill separately.
| Tahini Dressing | |
|---|---|
|
|
- Cook green wheat freekeh in a large saucepan of salted simmering water until al dente, 12–15 minutes for cracked and 30–35 for whole. Drain and rinse under cold water. Set aside.
- Meanwhile, cook haricots verts in a small pot of boiling salted water until crisp-tender, about 4 minutes. Drain and transfer to a large bowl of ice water; let cool. Drain, then pat dry.
- In a medium skillet over medium heat, heat walnut halves until browned and fragrant, stirring occasionally, about 2 to 5 minutes. Remove from skillet and coarsely chop.
- Whisk garlic, lemon juice, olive oil, tahini, maple syrup, and water in a bowl. Season with salt. Add freekeh and haricots verts and toss gently to coat. Season with salt.
- Divide the green wheat and haricots verts into two serving plates. Top with fresh herbs, red currants if using and sprinkle chopped walnuts over.

http://schneiderchen.de | © 2020 | http://angiesrecipes.blogspot.com
 |
 |

http://schneiderchen.de | © 2020 | http://angiesrecipes.blogspot.com
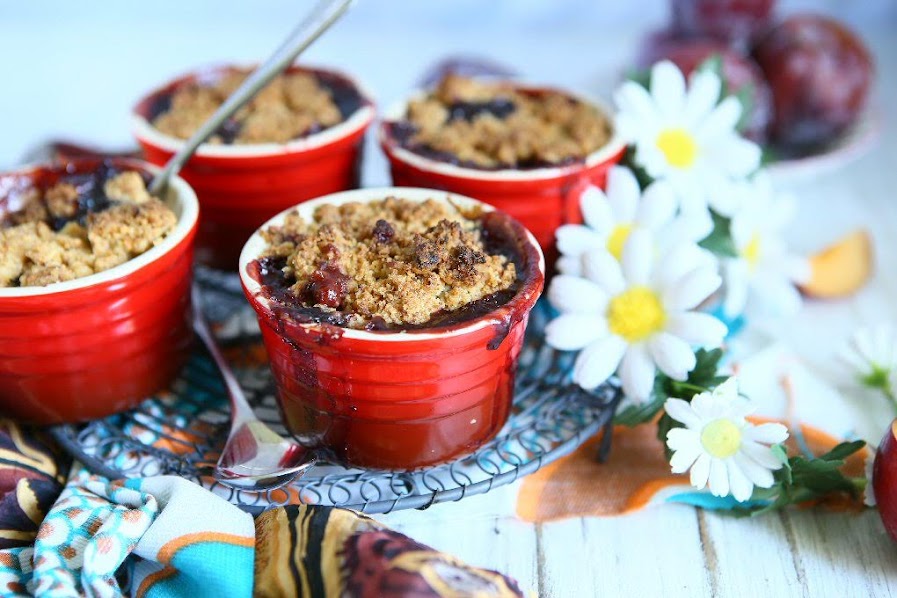
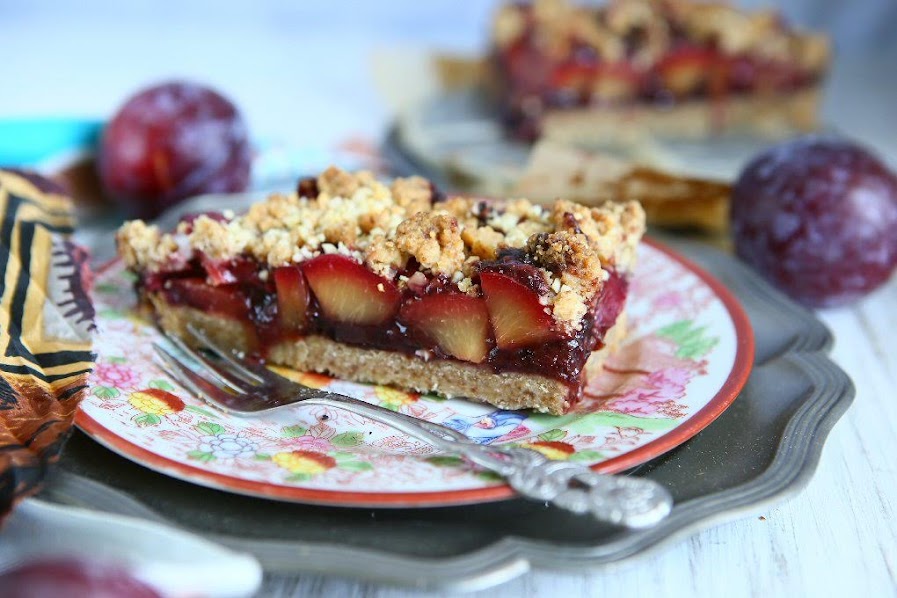
Plum Hazelnut Crumble Cake
 © 2020 | http://angiesrecipes.blogspot.com
 © 2020 | http://angiesrecipes.blogspot.com
 |
 |
 © 2020 | http://angiesrecipes.blogspot.com
The cake requires only half of the plum filling. The rest I used to make 4 individual ramekin crumble. So you might want to make an extra portion of streusel for the ramekins later. They're excellent with a scoop of vanilla ice cream or chantilly cream. A scrumptious single-serving dessert without the mess, perfect for portion control, satisfying, and guilt-free.
| Filling | Crust and Crumble |
|---|---|
|
|
- Melt the butter in a heavy-based pan and add the remaining filling ingredients, except 2 plums. Simmer for 10-15 minutes or until the plums are cooked, some of the liquid evaporates and the mixture becomes a bit jammy. Set aside to cool.
- Heat oven to 190C/375F, and line a 20-22cm springform pan with parchment paper. In a mixing bowl, stir together the spelt flour, hazelnut meal, coconut sugar and sea salt. Cut in butter and vanilla paste. Rub everything together until the mixture forms streusel-like crumbs.
- Press 2/3 of the crust into the bottom of the prepared pan, reserving the rest for the topping.
- Spread cooled plum jam in an even layer over crust. Top with the chopped plums, then sprinkle remaining streusel mixture over top of fruit. (the cake requires only half of the plum filling. Use the rest to make individual ramekin crumbls or for breakfast) Sprinkle some chopped hazelnuts over if using.
- Bake until jam bubbles at edges and topping is lightly browned, 30 to 35 minutes. Cool completely before slicing into bars or wedges.

http://schneiderchen.de | © 2020 | http://angiesrecipes.blogspot.com

http://schneiderchen.de | © 2020 | http://angiesrecipes.blogspot.com
 © 2020 | http://angiesrecipes.blogspot.com
 |
 |
 © 2020 | http://angiesrecipes.blogspot.com
Roquefort Walnut Banana Cake
 © 2020 | http://angiesrecipes.blogspot.com
 |
 |
 © 2020 | http://angiesrecipes.blogspot.com
Pair Roquefort with banana in a cake? Yes, the combination works surprisingly well and tastes so good. The blue cheese adds just right amount of depth and robust flavor to the banana bread which is moist, soft and so delicious. Once cooled, the cake is then topped with a simple thin glaze and walnuts for a perfect dessert your family will love.
Roquefort is a blue mold cheese made from sheep milk from France. If it's too intense for you, then use the Gorgonzola mild, Cambozola Black or Danish Blue instead.
| Cake | Glaze and Topping, optional |
|---|---|
|
|
- Preheat oven to 180C/160C fan-forced/350F. Grease a 20cm x 10cm x7cm loaf pan. Line base and sides with baking paper. Set aside. Whisk together spelt flour, baking soda and salt.
- In a mixing bowl, combine together the melted butter, erythritol and coconut sugar. Add in eggs, vanilla and lemon juice. Mix well.
- Stir flour mixture into the butter mixture until smooth. Fold in the crumbled Roquefort, walnuts and bananas. Spread the batter evenly into the prepared pan. Smooth the surface.
- Bake in the middle of the hot oven for 50 minutes, cover the cake with a piece of parchment paper or aluminum foil until a toothpick inserted into the center of the loaf comes out clean, about 10 minutes. Remove and cool the cake in the pan for 5 minutes before turning onto a wire rack to cool completely.
- Whisk icing sugar, cream and vanilla extract together in a bowl. Stand for 2 minutes or until slightly thickened. Using a spatua or spoon, spread icing over top of cake. Sprinkle the chopped walnuts over. Set aside for 30 minutes to set. Slice and enjoy!

http://schneiderchen.de | © 2020 | http://angiesrecipes.blogspot.com
 |
 |

http://schneiderchen.de | © 2020 | http://angiesrecipes.blogspot.com

http://schneiderchen.de | © 2020 | http://angiesrecipes.blogspot.com
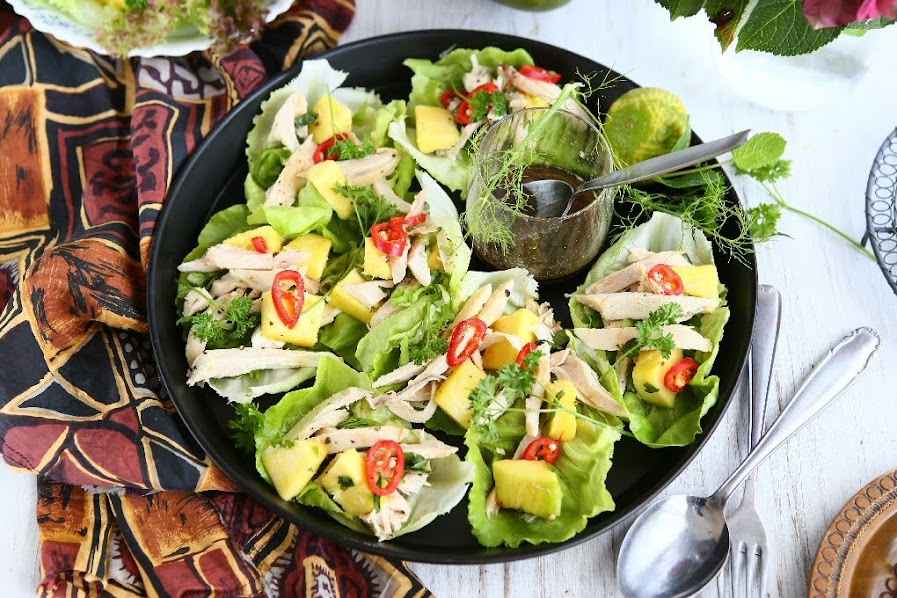
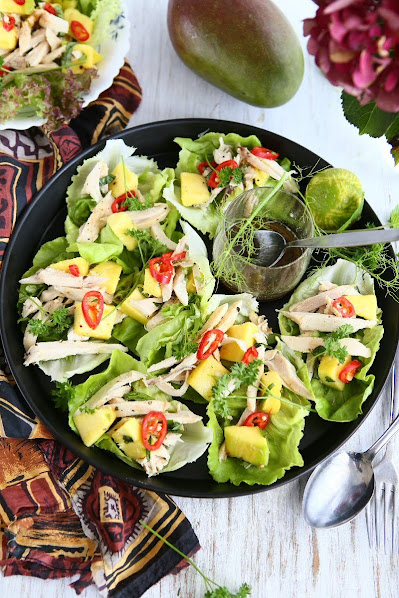
Coconut Chicken Salad with Mango
 © 2020 | http://angiesrecipes.blogspot.com
 |
 |
 © 2020 | http://angiesrecipes.blogspot.com
For an appetiser that's bursting with freshness and packed full of flavour, you can't go past these Asian inspired lettuce cups with coconut milk poached chicken and mango salad. Poaching chicken breast in lemongrass-coconut milk ensures that it's tender, moist and flavourful. With sweet juicy mangoes and a sweet tangy lime dressing, this salad will be a guaranteed hit with your family.
| Dressing | Salad |
|---|---|
|
|
- Stir the dressing ingredients together in a small bowl or a glass. Chill until ready for use.
- Place the chicken breast, lemongrass paste and coconut milk in a saucepan. Add enough water to cover the chicken. Bring to a simmer over high heat. Reduce the heat to low and simmer for 8-10 minutes or until chicken is cooked through. Set aside in the poaching liquid to cool completely.
- Remove chicken from the pan and coarsely shred the chicken. (the poaching coconut liquid can be used to cook rice or bake bread) Place them in a bowl together with the mango, lime juice, zest, spring onion, cilantro or parsley and chilli pepper. Combine and season.
- Arrange the lettuce leaves on a serving platter. Fill with spoonfuls of salad and drizzle over the dressing.

http://schneiderchen.de | © 2020 | http://angiesrecipes.blogspot.com

http://schneiderchen.de | © 2020 | http://angiesrecipes.blogspot.com


