
Detox Nettle Green Tea Pullman Loaf
 © 2020 | http://angiesrecipes.blogspot.com
 |
 |
 © 2020 | http://angiesrecipes.blogspot.com
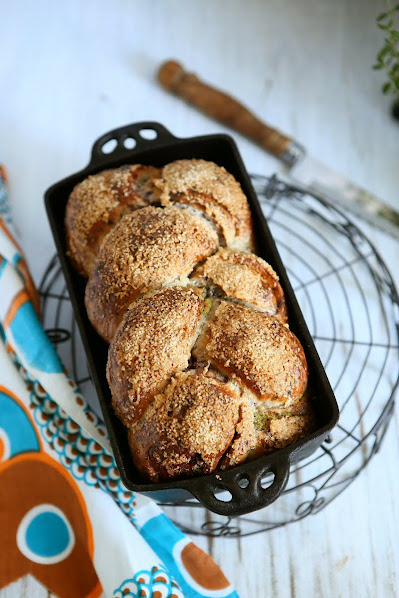
Braided Loaf with the same dough

http://schneiderchen.de | © 2020 | http://angiesrecipes.blogspot.com
 © 2020 | http://angiesrecipes.blogspot.com
Unlike the classic Pullman bread (or pain de mie in French), this butter-enriched Pullman bread with detox nettle green tea and raisins is soft, tender and fluffy with a crisp golden crust. This bread is rather easy to make, but only takes slightly longer because I let the dough rise (2nd rise) in the fridge overnight so the flavours develop. This recipe is good enough for a 13x4-inch pullman pan, but mine is slightly smaller, so I weighted 750 grams of dough for the pan and use the rest to make 2 dinner buns. I have also baked a braided loaf with the same dough, and a lot more raisins.
|
- Crumble the fresh yeast in the lukewarm milk in a bowl. Set aside for 10 minutes. Place plain flour, detox tea, sugar, and salt in the bowl of your stand mixer with a dough hook.
- Add in eggs and milk-yeast mixture. Mix on low for 3 minutes. Increase the speed to the second level and mix for about four minutes more. Next, add the softened butter one cube at a time. Once all the butter is in, knead again for 2 minutes until smooth and elastic and soft. Add in raisins and knead briefly.
- Remove the dough from the mixer and shape into a smooth ball. Lightly grease the mixer bowl and return the dough to the bowl. Cover with plastic wrap. Leave to rise in a warm place for about an hour or until doubled in volume. Turn out and punch the dough down. Cover again and let rise in the fridge for 6 hours or overnight.
- Next day, remove the dough from the fridge and turn out onto a lightly floured work surface. Gently knead the dough so it became smooth and soft. At this point, I divide the dough into 750 grams for the pullman (26x12x9cm) and the rest I shaped into 2 dinner buns. I have also baked a braided loaf with the same dough, but a lot more raisins.
- Roll out the dough into a rectangle, and roll it up just like you do the jelly roll and pinch the seam together. Place into the greased pullman pan with seam side down. Cover with plastic wrap and place it in the refrigerator for at least 12 hours, but not more than 18 hours. The dough should reaches about 1/2 inch from the top of the pan. Next day remove the bread from the fridge and allow it to warm to room temperature while waiting for your oven to preheat. (Or you can just leave the bread in a warm place to proof until it reaches about 1/2 inch from the top of the pan. This could take from 90-120 minutes.) Cover the loaf with the pan lid.
- Preheat the oven 190/375F. Place the loaf pan on the center rack in the hot oven. Bake the pullman sandwich loaf for about 40 minutes until nicely golden brown. Remove the loaf from the pan and let cool on a wire rack. Allow the bread rest for at least an hour before you cut into slices.

http://schneiderchen.de | © 2020 | http://angiesrecipes.blogspot.com

http://schneiderchen.de | © 2020 | http://angiesrecipes.blogspot.com
 |
 |
 © 2020 | http://angiesrecipes.blogspot.com
Cherry Radish Top Twisted Bread Wreath with Cranberries

http://schneiderchen.de | © 2020 | http://angiesrecipes.blogspot.com
 |
 |

http://schneiderchen.de | © 2020 | http://angiesrecipes.blogspot.com
Don't throw out your radish leaves! They re not only edible and delicious, also very nutritious. Very rich in vitamins, minerals and fiber. Besides making pestos, smoothies, or soups, you can puree them and add it to the dough that results in a lovely bread with a vibrant, green texture. It is a brillant way to sneak leafy greens into your kids' diet. I am using cranberry jam and craisins for the filling, but if you prefer a savoury version, a red pesto with extra portion of Parmesan would be a nice substitute here.
|
- Place chopped radish tops in a blender. Add in almond milk, and salt and process until well blended.
- Measure 200 ml of milk-radish greens mixture and pour into the bowl of your stand mixer fitted with the dough hook. Stir in melted butter and egg until combined.
- Add spelt flour, sugar and active dry yeast. Mix at slow speed until everything comes together. Increase the speed and knead until smooth and elastic, about 7 minutes.
- Turn out the dough and shape into a ball. Lightly grease the mixing bowl with a bit of olive oil and return the dough to the bowl. Cover loosely with a damp kitchen towel. Let rest until dough is doubled in size, about 1 hour.
- Roll the dough on a lightly floured surface into a 45x30cm rectangle. Spread the cranberry jam over dough, leaving 1cm border around edges. Sprinkle the chopped cranberries over and tightly roll up dough from the long side in jelly roll fashion.
- Use a sharp knife to cut the log, seam side up, lengthwise in half. Tightly weave the two pieces together, leaving the cut sides exposed. Form into a wreath, firmly pinching two ends together. Gently tranfer the wreath into a springform pan or a parchment-lined baking tray. Cover with a damp kitchen towel and let rise until doubled, 1-2 hours.
- Preheat the oven to 180C/350F. Bake the bread in the center of the oven until golden brown, about 35 minutes. Cool slightly. Dust with icing sugar before serving.

http://schneiderchen.de | © 2020 | http://angiesrecipes.blogspot.com
 |
 |

http://schneiderchen.de | © 2020 | http://angiesrecipes.blogspot.com

http://schneiderchen.de | © 2020 | http://angiesrecipes.blogspot.com
Spring Salad with Surimi and Blackberries
 © 2020 | http://angiesrecipes.blogspot.com
 |
 |

http://schneiderchen.de | © 2020 | http://angiesrecipes.blogspot.com
Vibrant, colourful and fresh..this is a tasty way to enjoy some seasonal salads and berries. Surimi is made with white fish (for example pollock or cod) with flavour similar to that of crab, shrimp, lobster and other shellfish. You can easily replace them with some scallops or prawns here.
| Dressing | |
|---|---|
|
|
- Rinse the cucumber, dry and cut in half lengthways. Use a teaspoon to scoop out the seeds, and discard. Cut the cucumber into thin slices. Wash the cherry radishes, dry, and cut into thin slices.
- Combine salad mix, sliced cucumber and radishes into a large bowl. Top with the blackberries and surimi.
- In a small bowl, mix together the lime juice, crème fraîche, horseradish cream and kefir. Season with salt and pepper. Serve the salad with the prepared dressing.

http://schneiderchen.de | © 2020 | http://angiesrecipes.blogspot.com

http://schneiderchen.de | © 2020 | http://angiesrecipes.blogspot.com
Stuffed Braided Loaf with 3 Fillings
 © 2020 | http://angiesrecipes.blogspot.com
Using plain flour and whole spelt flour |
Using just plain wheat flour |
 |
 |
 © 2020 | http://angiesrecipes.blogspot.com
 © 2020 | http://angiesrecipes.blogspot.com
A soft, tender braided bread filled with matcha-tahini, nutella (next time I am going to try a poppy seed filling for a better colour contrast) and cherry jam. It might look tricky and complicated to make, but it's actually very simple. Braiding and 3 different fillings help create a impressive-looking loaf that is easy to make! You can bake this with just plain wheat flour or use a mix of plain flour and whole spelt for a nuttier flavour.
| Dough | Fillings |
|---|---|
|
|
- Warm up the milk and butter in a saucepan over low heat until the butter melted. Set aside to cool the mixture briefly.
- In the bowl of your stand mixer fitted with a dough hook, mix together the flour, dried yeast, sugar, salt and vanilla powder. Add in milk-butter mixture and the egg, reserving a tablespoon for the topping. Stir at slow speed for a couple of minutes until the dough comes together. Increase the speed and knead the dough until smooth and elastic.
- Turn out the dough and shape into a ball. Lightly grease the mixing bowl with a bit of olive oil. Return the dough into the bowl. Cover the bowl with a clean kitchen towel and set aside at a warm place for about 1 hour until it's double in size.
- Mix the honey tahini with matcha powder until well combined. Grease a 26x12cm loaf pan and set aside.
- Turn out the dough onto a lightly floured work surface and roll out to a 45cmx45cm square. Divide it into 3 even pieces, 15cmx45cm. Spread each rectangle with a different filling, leaving 2cm free edge of dough free from the filling. Roll each into a log and pinch the edges together.
- Braid 3 logs and form into a braided loaf by bringing two ends together under the loaf. Place it into the prepared loaf pan. Cover with towel and let rise about one hour.
- Preheat oven to 190C/375F. Brush the bread with the reserved egg. Sprinkle the top with raw sugar if using.
- Bake the bread in the middle of hot oven for about 30 minutes until golden-brown. Bread should have a nice hollow sound when thumped on the bottom. Cool on a rack for at least one hour before slicing.

http://schneiderchen.de | © 2020 | http://angiesrecipes.blogspot.com
Using just plain wheat flour |
Using plain flour and whole spelt flour |
 |
 |

http://schneiderchen.de | © 2020 | http://angiesrecipes.blogspot.com
 © 2020 | http://angiesrecipes.blogspot.com
 © 2020 | http://angiesrecipes.blogspot.com
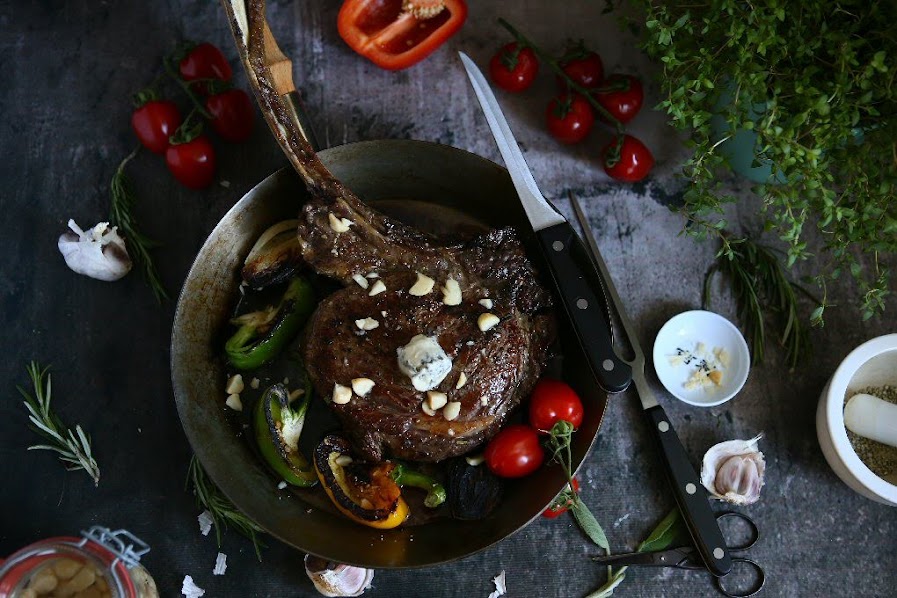
Reverse Seared Tomahawk Steak with Blue Cheese Butter and Macadamia
 © 2020 | http://angiesrecipes.blogspot.com
 |
 |
 © 2020 | http://angiesrecipes.blogspot.com
Tomahawk Steak is a cut of ribeye beef that includes the rib bone, which, when cooked, adds a variety of flavour and succulence to the meat. It is named after the tomahawk axe that it resembles.
Traditionally you sear a steak over a very high heat, and then finish the cooking in the oven until the desired doneness. Reverse searing, which is the perfect method for cooking a medium-rare or medium steak, is the reverse of this process.
The reverse sear I am using here is a 2-step process:
1.) Slow-roasting the steak in the oven at 120C/250F for 30-40 minutes.
2.) Searing it in a blazing hot skillet (cast iron or heavy stainless steel) to finishing it off.
| Gorgonzola Butter | |
|---|---|
|
|
- To make the blue cheese butter, add the butter to a bowl, stir in the blue cheese, garlic, thyme leaves and season to taste with salt and freshly ground black pepper. Keep this butter at room temperature for serving.
- Lightly coat the steak with herb infused avocado oil (or olive oil) and generously rub the both sides with salt and freshly milled pepper.
- Preheat oven to 120C/250F. Place the steak on a wirerack set on a baking tray. Roast the steak for 30-40 minutes until it reaches an internal temperature of 50C/120F. Remove the steak from the oven. Tent it with foil and let the steak rest 10 minutes while you preheat your skillet.
- Heat a large skillet with 1 tablespoon of avocado oil on high until blazing hot. Carefully place the steak into the hot skillet and sear for 2 minutes on one side, then flip and sear for another 1 minute or until the internal temperature reaches your desired level of doneness. For medium-rare, you want an internal temperature of 57C/135F.
- Generously spoon the blue cheese butter over the steak, garnish with macadamia nuts, fresh herbs and serve alongside your choice of sides. Unlike with other methods, there is no need to let your steak rest before serving as you already did that before you seared them.

http://schneiderchen.de | © 2020 | http://angiesrecipes.blogspot.com
 |
 |

http://schneiderchen.de | © 2020 | http://angiesrecipes.blogspot.com
 © 2020 | http://angiesrecipes.blogspot.com
Smoked Wild Salmon Beetroot Wraps
 © 2020 | http://angiesrecipes.blogspot.com
 © 2020 | http://angiesrecipes.blogspot.com
 |
 |

http://schneiderchen.de | © 2020 | http://angiesrecipes.blogspot.com
Ready less than 10 minutes, these beetroot wraps with smoked wild salmon, avocado dip and salad are light, satisfying and full of flavour. They are easy to make and perfect for a healthy lunch at home or on the go.
|
- Place a piece of beetroot wrap onto a flat surface. Spread with some avocado dip or pesto sauce. Top with arugula or pointed cabbage. Arrange some smoked wild salmon atop.
- Roll up wrap firmly to enclose filling. Cut in half. Secure halves with baking paper and string. Repeat with another one. Serve with extra avocado dip if desired.

http://schneiderchen.de | © 2020 | http://angiesrecipes.blogspot.com

http://schneiderchen.de | © 2020 | http://angiesrecipes.blogspot.com

http://schneiderchen.de | © 2020 | http://angiesrecipes.blogspot.com
Blueberry Kefir Bundt Cake
 © 2020 | http://angiesrecipes.blogspot.com
 |
 |
 © 2020 | http://angiesrecipes.blogspot.com
A delicious, moist and tender bundt cake filled with juicy blueberries and iced with a blueberry-lemon glaze. You can simply dust it with powdered sugar too. This bundt Cake is a perfect dessert to celebrate the blueberry season.
| Cake | Glaze |
|---|---|
|
|
- Preheat the oven to 180C/350F. Generously butter and flour a 10-cup bundt pan.
- In a medium bowl, whisk the spelt flour, baking powder, and salt together and set aside. Add lemon juice to kefir and set aside.
- Mix sugar and lemon zest until well combined in a mixing bowl. Add the softened butter and beat with a hand mixer until light and fluffy, about 5 minutes.
- With the mixer on a low speed, add the eggs 1 at a time, scraping down the bowl between each addition. Beat in vanilla extract.
- Alternate 3 additions of flour and 2 additions kefir, beginning and ending with flour, scraping the bowl between additions. Do not over-mix or the cake would be dense and dry.
- Toss the blueberries with about 2 tablespoons of spelt flour to coat, and gently fold them into the cake batter. Spread batter in the pan and smooth the top.
- Bake for 60-70 minutes, rotating the cake after 30 minutes to make sure it browns evenly. The cake is done as soon as a toothpick comes out clean.
- Set cake pan on a wire rack to cool for 10 minutes, and invert cake onto rack to cool completely while you prepare the glaze.
- Mash the blueberries in the lemon juice with a fork. Press through a sieve to remove the skins. Sift in the confectioners' sugar to the juice and whisk until smooth. Add more sugar if you like a thicker glaze.
- Pour glaze over cake. Let the glaze set before serving. Cake can be stored, covered, at room temperature for 3–4 days.

http://schneiderchen.de | © 2020 | http://angiesrecipes.blogspot.com
 |
 |

http://schneiderchen.de | © 2020 | http://angiesrecipes.blogspot.com
 © 2020 | http://angiesrecipes.blogspot.com
Dairy Free Gluten Free Peanut Butter Tahini Fudge
 © 2020 | http://angiesrecipes.blogspot.com
 |
 |

http://schneiderchen.de | © 2020 | http://angiesrecipes.blogspot.com
Desserts made with peanut butter, tahini (aka sesame seed butter) are right up my alley, esp. when they are healthful and good for you like this fudge recipe which is refined sugar free, dairy free and naturally gluten free. It's smooth, amazingly delicious and simple to make. Coconut syrup was used to sweeten the fudge, but maple syrup would do the trick too. You can substitute cashew or almond butter for peanut butter.
|
- Prepare a mini-muffin pan with a 24 cup capacity. Line with praline paper liners. Set aside. You can also use 12 standard-size silicone muffin cups or a mix of two.
- In a medium saucepan over low heat, add the peanut butter, natural tahini, coconut oil and coconut syrup.
- Mix with a rubber spatula until smooth. Remove from heat and stir in vanilla paste.
- Spoon into the prepared muffin liners and chill for a few hours or until firm. Sprinkle lightly with sea salt flakes and enjoy! The fudge can be stored in an airtight container for up to 1 week.

http://schneiderchen.de | © 2020 | http://angiesrecipes.blogspot.com
 |
 |

http://schneiderchen.de | © 2020 | http://angiesrecipes.blogspot.com
Sweet Woodruff Blueberry Cheesecake
 © 2020 | http://angiesrecipes.blogspot.com
 © 2020 | http://angiesrecipes.blogspot.com
The Sweet Woodruff, a little aromatic plant growing in woods and near shady spots. In Germany, one of the specially delightful drinks ---- White Wine Punch/Maibowle (or Waldmeisterbowle, or Maiwein, or Maitrank) is prepared by steeping the fresh sweet woodruff and peppermints in white wine. They are drunk and enjoyed usually in May.
This no-bake cheesecake recipe is so creamy and delicious! A thick, silky smooth fresh German cheese and cream cheese filling in a buttery oat cookie crust, topped with fresh blueberries and a layer of sweet woodruff jelly. It’s an easy dessert recipe that will definitely please.
| Crust | Filling | Jelly Topping |
|---|---|---|
|
|
|


- Combine cookies and softened margarine, then press into the bottom of a 26-cm baking pan with a removable bottom. Chill crust for 30 minutes. Beat whipping cream until stiff peaks form and store in the fridge until ready for use.
- Combine Quark, cream cheese, sugars and milk in a mixing bowl. Whisk until well combined and smooth.
- Soak gelatin sheets in cold water for 5 minutes until softened. Gently squeeze out excess water. Melt it in a heat proof bowl placed over simmering water until dissolved. Combine first 4 tablespoons of cheese mixture with the melted gelatin, then blend with the rest of cheese mixture until smooth. Fold in the whipped cream and until fully incorporated. Pour the cheese mixture over the crust and arrange the blueberries on top. Cover and refrigerate several hours or overnight.
- Whisk together sugar and jelly powder in a medium pot. Pour in the water and cook over the slow heat until the sugar is dissolved. Remove and turn the heat off. Pour 1/3 of the jelly into a square shallow dish. Press and push a cookie mould into the set jelly to create the “heart”. Pour the rest of cool jelly over the cheesecake. Place some heart-shaped jelly over if desired. To serve, loosen cheesecake and place it on a serving plate. Decorate the side with heart-shaped jelly.


 © 2020 | http://angiesrecipes.blogspot.com
 © 2020 | http://angiesrecipes.blogspot.com
 © 2020 | http://angiesrecipes.blogspot.com


