
Yin Yang Butter Cookies


Two different flavours of cookies, orange and chocolate, put together in perfect harmony to create this playful, slice-and-bake yin-yang cookie.
The Yin-Yang is one of the most famous symbols represented in Taoism--a Chinese religion and philosophy.
| Butter Cookies | Chocolate Cookies |
|---|---|
|
|


- Cut the butter into smaller pieces and place them in a mixing bowl. Add caster sugar gradually at the side of the bowl while mixing, beating thoroughly after each addition. Switch to medium speed to beat sugar and butter until the mixture fluffy and pale. Scrape the bowl down to make sure everything is thoroughly combined. Beat in egg yolk and orange extract until smooth. Add in the flour and fold to combine. Wrap up the cookie dough and chill for 1 hour.
- Whisk together the flour, cocoa powder and salt in a bowl. Set aside. Cut the butter into smaller pieces and place them in another mixing bowl. Add caster sugar gradually at the side of the bowl while mixing, beating thoroughly after each addition. Switch to medium speed to beat sugar and butter until the mixture fluffy and pale. Scrape the bowl down to make sure everything is thoroughly combined. Beat in egg yolk and rum extract until smooth. Add in the cocoa flour mixture and fold to combine. Wrap up the chocolate cookie dough and chill for 1 hour.
- Divide each dough into 4 logs, about 1 inch in diameter, and reserve about 10 grams of each dough to make the dots. Press one side of each log with your thumb to make a comma shape. Cover and chill 1 hour until firm.
- Dust a work surface lightly with flour. Place one orange dough log with round side down on the work surface. Brush the side lightly with water and turn the chocolate dough log on top of the orange dough, creating the yin-yang pattern. Gently roll the log until round. Repeat with the remaining logs. Wrap and chill 1-2 hours until firm.
- Preheat the oven to 175C/350F. Cut the cookie logs into 5mm thick slices. Arrange the cookies on a parchment paper lined baking pan, about an inch apart. Pinch a bit of reserved chocolate dough, and roll it into a small round ball. Gently press it into the orange part of the cookies. Do the same with the reserved orange dough and press them into the chocolate part of the cookies. Bake in the center of preheated oven for about 12 minutes. Cool the cookies on the rack.


Rijstevlaai / Dutch Rice Pudding Pie
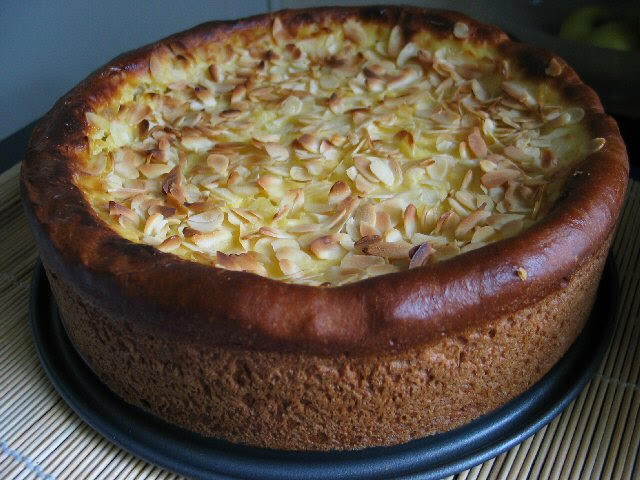
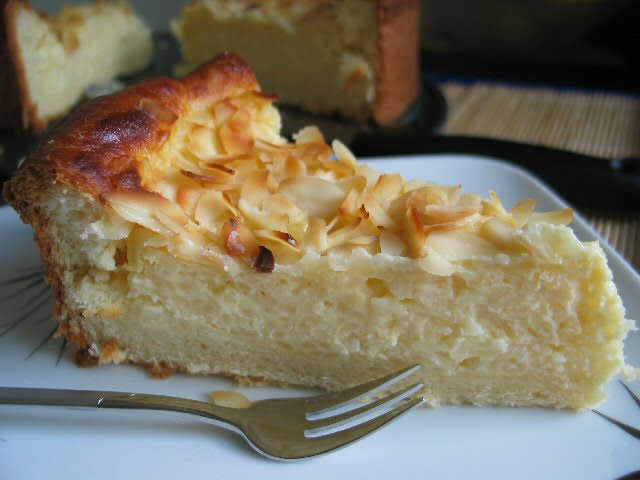
"Rijstevlaai" (pronounced as raced-a-fly or raced-a-fla, depending on where you are from in Holland) is a delicious, creamy rice pudding pie that uses yeast dough instead of a pastry crust. It's filled with short grain rice cooked in milk, enriched with eggs and sugar. It can be served plain or whipped cream and some chocolate shavings atop. Serve cold or at room temperature.
| Dough | Rice Pudding |
|---|---|
|
|
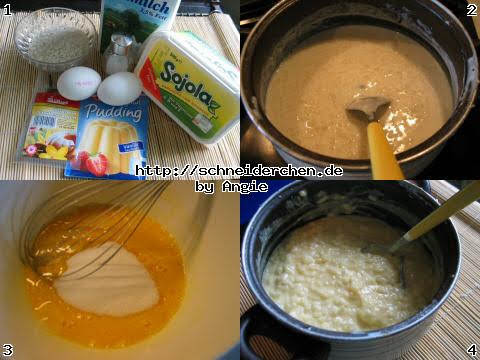
- In a bowl whisk together the milk, yeast and sugar. Combine flour and salt together in another mixing bowl. Pour the yeast mixture into the flour. Beat in egg and butter until the dough is fairly smooth. Cover with a cling film and let rise until doubled. Butter 10-inch-diameter springform pan. Press down the dough to release the air. Pat dough over bottom and sides of prepared pan. Cover and allow to rise until doubled.
- Bring milk to a boil in a large saucepan. Stir in rice, salt and vanilla bean, which can be used either whole or split to reveal the seeds and scraped into the rice. Bring them to a boil. Reduce heat to low and simmer uncovered until most of milk is absorbed and mixture is thick but still creamy, stirring frequently, about 30 minutes. Whip together 2 eggs, 80 grams sugar and pudding powder. Add the mixture into the rice and stir 2 minutes. Remove mixture from heat and cool to lukewarm.
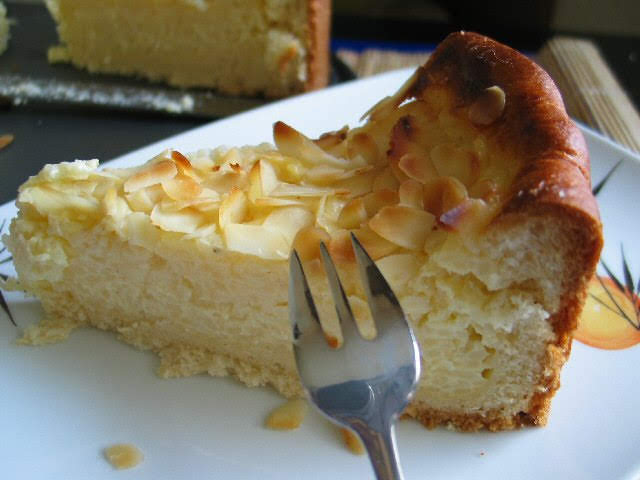
- Preheat oven to 200C/400F. Pour the rice pudding into the risen dough and sprinkle the almond slices on the top of the pudding if using. Bake in the middle of preheated oven for 1 hour. Cool the cake completely in tin placed on a wire rack.


Black Rice Banana Muffins with Chia Seeds (Gluten free, Dairy free, Refined sugar free)
 http://schneiderchen.de | © 2019 | http://angiesrecipes.blogspot.com
 |
 |
These healthy black rice muffins with chia & avocado oil are naturally gluten free, refined sugar free, and dairy-free. They’re so tender, fluffy, and very delicious too. Apart from that, they are sweetened naturally with 5 very ripe bananas. Bake a batch for breakfast, afternoon pick me up treat or anytime you have a dessert craving. Feel free to swap the black rice flour for brown rice or white rice flour.
|
|
- Grease 6-8 jumbo muffin cups with coconut oil or butter. Whisk together black rice flour, chia seeds, baking soda, baking powder, salt and spices in a large bowl.
- Mash the ripe bananas in another mixing bowl. Add in eggs, avocado oil, and sherry. Stir to combine. Add to the dry ingredients and stir until just incorporated. Fold in golden raisins.
- Divide the batter among the prepared muffin cups. Top with almond slices. Preheat the oven to 180C/350F.
- Bake the muffins in the middle of hot oven for about 20-22 minutes or until a skewer inserted in the muffins comes out clean.

http://schneiderchen.de | © 2019 | http://angiesrecipes.blogspot.com
 |
 |

http://schneiderchen.de | © 2019 | http://angiesrecipes.blogspot.com
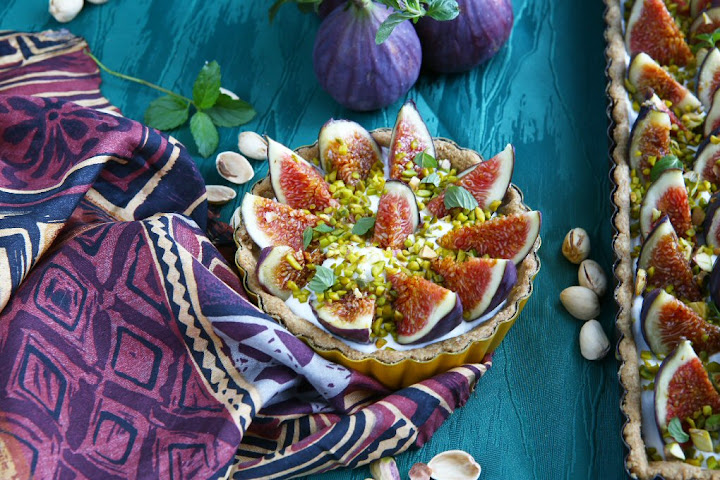
Fig and Coconut Tart with Pistachios and Mint
 http://schneiderchen.de | © 2015 | http://angiesrecipes.blogspot.com
 http://schneiderchen.de | © 2015 | http://angiesrecipes.blogspot.com
 |
 |
A sugar-free, delicious, and fruity dessert recipe from Lorraine Pascale via BBC Food - perfect for when fresh figs are in season. It's so easy to prepare and shows off those beautiful figs really well. Grapes are a good alternative to figs here, but you can make this tart with pretty much any fruit you like.
| Crust | Filling |
|---|---|
|
|
- Heap the einkorn flour on the counter and make a well. Put the diced butter, egg, and salt in the middle. With your fingertips, mix and cream the ingredients in the well. Draw the flour into the center and work the dough with your fingertips to a grainy texture. Add the cold water and mix in until the dough begins to hold together. Turn onto lightly floured surface. Knead gently until just smooth. Flatten into a disc. Wrap in plastic. Place in fridge for 30 minutes to rest.
- Roll out pastry on a lightly floured surface, then use to line a 20cm x 30cm rectangular fluted loose-bottomed tart pan. (I used a 10cm x 30cm rectangular and a 12cm round) Put in the fridge for about 15 minutes, or until firm.
- Preheat the oven to 180C/350F. Remove them from the fridge and cover with baking paper, fill with pastry weights or dried beans, and blind bake for 15 minutes if using two smaller baking pans, 20 minutes if using one large pan. Remove weights or beans and paper. Return to oven for 5 minutes until crisp and golden. Remove from the oven and set aside.
- Scoop coconut cream solids into a mixing bowl. Reserve remaining liquid for another use. Beat coconut cream and stevia using electric mixer on medium-high speed until stiff peaks form, about 5 minutes. Put the cream cheese into a separate bowl and fold the whipped coconut cream into the cream cheese. Put the filling in the tart case, then arrange the figs on top and scatter over the pistachio nuts and mint leaves.
 http://schneiderchen.de | © 2015 | http://angiesrecipes.blogspot.com

http://schneiderchen.de | © 2015 | http://angiesrecipes.blogspot.com

http://schneiderchen.de | © 2015 | http://angiesrecipes.blogspot.com
http://schneiderchen.de | © 2015 | http://angiesrecipes.blogspot.com
Stroopwafel Cream Hazelnut Rolls with Blueberry Glaze
 http://schneiderchen.de | © 2019 | http://angiesrecipes.blogspot.com
 |
 |

http://schneiderchen.de | © 2019 | http://angiesrecipes.blogspot.com
These tender, sweet rolls filled with a caramel wafel cream and finished with a blueberry glaze are super fluffy, light and absolutely delicious. The combination of colour and flavour is a nice change up from standard sweet rolls and they are equally perfect for breakfast or brunch. Plus they make fantastic use of fresh seasonal berries. A stroopwafel is a caramel sandwiched wafer originally from Holand. Feel free to use other cookie butter if you can't find Stroopwafel Cream.
| Dough | Blueberry Glaze |
|---|---|
|
|
- Blend blueberries and raw sugar into juice. Place the juice in the bowl of your stand mixer fitted with a dough hook. Add in egg, melted butter, salt and spelt flour. Crumble the fresh yeast over.
- Stir at slow speed until the dough roughly comes together. Increase the speed and knead the dough until smooth and elastic. Place in a greased bowl. Cover with a plastic film and set aside for 1 hour to rise.
- Grease and line the base of a 26cm springform pan with baking paper. Punch down the dough. Turn onto a lightly floured surface. Knead until smooth. Use a rolling pin to roll out to a 30cm x 40cm rectangle.
- Spread the stroopwafel cream over and sprinkle with chopped roasted hazelnuts. Starting from 1 long edge, roll up to enclose filling. Cut the roll into 8 portions. Arrange the rolls, cut-side up, in the pan. Cover. Set aside for 45 minutes to rise.
- Preheat the oven to 180C/350F. Bake for 25-30 minutes or until golden and cooked through. Remove from the oven and leave to cool.
- In the meantime, mix all the ingredients for the icing together and beat until smooth. Drizzle over the top of rolls while still warm and serve immediately.

http://schneiderchen.de | © 2019 | http://angiesrecipes.blogspot.com

http://schneiderchen.de | © 2019 | http://angiesrecipes.blogspot.com

http://schneiderchen.de | © 2019 | http://angiesrecipes.blogspot.com
Roasted Chicken Leg Quarters with Cherry Radishes and Mushrooms
 http://schneiderchen.de | © 2019 | http://angiesrecipes.blogspot.com

http://schneiderchen.de | © 2019 | http://angiesrecipes.blogspot.com
 |
 |
These budget friendly roasted chicken quarters are easy to make, juicy and delicious. Use your favourite seasonings, though sea salt and freshly-cracked pepper are enough to bring out their natural aromas and flavours. You can store these in the fridge in an airtight container for up to 3 days and reheat them in the oven to recrisp the skin. You can make this with a different cut of meat, but you will want to stick with a bone-in, skin-on cut because skin and bone add so much flavour to the dish.
|
- Preheat oven to 200C/400F. Dry the chicken leg quarters with paper towels and rub with 2 tablespoons of avocado oil. Evenly sprinkle black salt, peppers, garlic powder and chopped rosemary on both sides of each quarter and gently pat to make the seasonings stick. Arrange the chicken leg quarters in a baking tray lined with a piece of aluminum foil.
- Toss the mushrooms and cherry radishes with the remaining tablespoon of avocado oil. Season with salt and peppers. Add them to the chicken quarters in the baking tray.
- Bake for about 50 minutes, or until the chicken skin is crispy and golden brown. Different ovens bake differently so the exact time may vary. Remove the chicken from the oven, let rest for 5-10 minutes before serving.

http://schneiderchen.de | © 2019 | http://angiesrecipes.blogspot.com

http://schneiderchen.de | © 2019 | http://angiesrecipes.blogspot.com
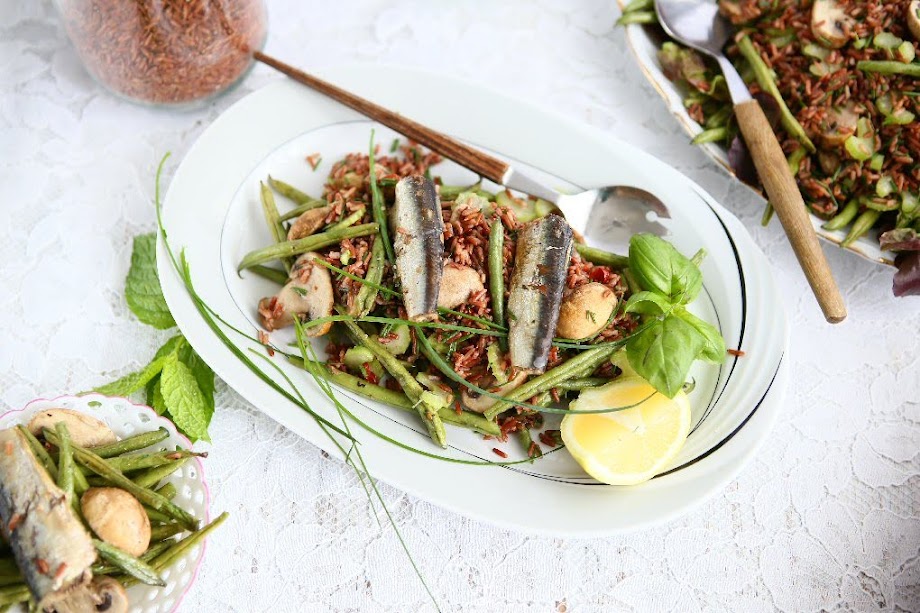
Red Rice Salad with Green Beans, Mushrooms and Sardines
 http://schneiderchen.de | © 2019 | http://angiesrecipes.blogspot.com
 |
 |
Chewy, nutty, nutritious, this delicious red rice salad is perfect for outdoor eating on those hot summer days. It is great served with grilled beef, chicken or fish and pack up any leftovers for lunch the next day. It actually tastes much better the next day. The nutty, earthy flavour and crunchy, firm texture of red rice elevate the dish instantly, but you can use any brown rice in its place.
|
- Boil the rice in plenty of salted water until just cooked, about 25 minutes. Drain.
- Meanwhile, prepare the roasted vegetables. Toss trimmed green beans and button mushrooms with 2 tablespoons of olive oil. Season with black salt and freshly ground peppers. Roast for 25 minutes or until tender.
- Place apple cider vinegar, lemon juice, the remaining olive oil and the minced garlic in a glass jar with a fitted lid. Season with salt and peppers and shake well.
- Tip the drained red rice into a large bowl. Pour the dressing over the warm rice and mix well. Let it soak in a little, then toss in the roasted vegetables together with roasting juice, sliced celery and chopped chives.
- To serve, place them over some salad greens and top with sardines.

http://schneiderchen.de | © 2019 | http://angiesrecipes.blogspot.com

http://schneiderchen.de | © 2019 | http://angiesrecipes.blogspot.com
Blackberry Chia Crumble Bars
 http://schneiderchen.de | © 2019 | http://angiesrecipes.blogspot.com
 |
 |

http://schneiderchen.de | © 2019 | http://angiesrecipes.blogspot.com
The base and topping are made with butter, spelt flour, almond, baking powder, a little coconut sugar, zero-calorie sweetener and lemon zest. The cookie dough is then enriched with an egg and perfectly firm to support the thick layer of berries, that are coated in coconut sugar, freshly squeezed lemon juice and chia seeds. You can easily make this all year round with seasonal fruit. The chia seeds helps to thicken the mixture and add another layer of nutrition. You can use 2 tablespoons of cornstarch instead.
| Crust | Black Berry Chia Filling |
|---|---|
|
|
- Preheat oven to 180C/350F. Grease a 26-cm / 10-inch springform pan or a 5cmx30x25cm cake pan. Line base and sides with baking paper.
- In a mixing bowl, add in coconut sugar, erythritol sweetener, almond meal, spelt flour, baking powder, salt and lemon zest. Whisk all the ingredients to combine. Use a for to blend in diced butter and egg. Dough would be crumbly. Pat two thirds of the mixture into the prepared pan.
- In a large bowl, combine coconut sugar, lemon juice and chia seeds. Add in berries and gently fold to combine.
- Spread the berry mixture onto the crust and crumble the remaining dough over the berry layer. Bake in preheated oven for 45-50 minutes, or until top is slightly brown. Cool completely before slicing.

http://schneiderchen.de | © 2019 | http://angiesrecipes.blogspot.com

http://schneiderchen.de | © 2019 | http://angiesrecipes.blogspot.com
 |
 |

http://schneiderchen.de | © 2019 | http://angiesrecipes.blogspot.com
Baked Zucchini with Parmesan
 http://schneiderchen.de | © 2019 | http://angiesrecipes.blogspot.com
 |
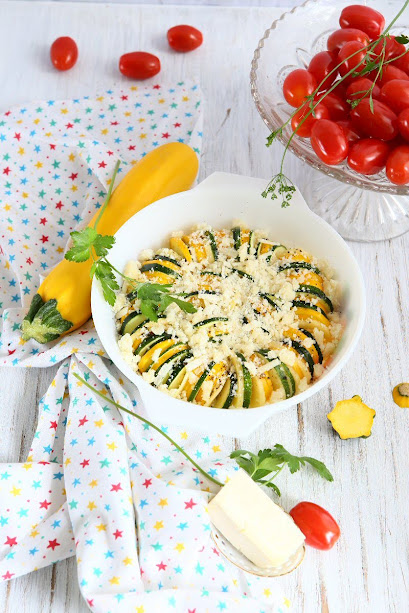 |
This easy delicious baked zucchini dish is the BEST way to use up summer zucchini when the season is in full force, esp. if your garden has blessed you with an abundance of this summer squash! Enjoy it with some salad leaves with a simple vinaigrette or with grilled chicken.
|
- Preheat oven to 180C/350F. Grease a 22cm round ovenproof dish with olive oil.
- Place sliced zucchini and potato in a large bowl. Add half of olive oil and toss to coat. Season with black salt pepper. Arrange the vegetable slices in a single layer in prepared dish, alternating between the green, yellow zucchini and potato slices, for a colour effect.
- Drizzle with remaining oil. Sprinkle with freshly grated Parmesan. Bake for 30 minutes or until golden and tender. Sprinkle with chopped parsley leaves to serve.

http://schneiderchen.de | © 2019 | http://angiesrecipes.blogspot.com
Zucchini Bread with Port Soaked Raisins and Brazil Nuts
 http://schneiderchen.de | © 2019 | http://angiesrecipes.blogspot.com
 |
 |

http://schneiderchen.de | © 2019 | http://angiesrecipes.blogspot.com
This amazing zucchini bread recipe is made healthier with spelt flour, a combination of coconut sugar and zero-calorie erythritol sweetener instead of refined sugar, and Brazil nuts--a good source of healthful fats, protein, fiber, and selenium. Tawny port soaked raisins add a delicious dimension to the bread that you should not pass up.
|
|
- Soak raisins in tawny port for an hour or overnight.
- Preheat oven to 160C320F. Grease and line a 30cmx11cmx7cm loaf pan. Sift flour, baking soda, baking powder and spices into a large bowl. Stir in coconut sugar, sugar sweetener.
- Make a well in the center and add in eggs, melted butter, vanilla, zucchini, Brazil nuts, port-soaked raisins and a pinch of salt. Stir with a wooden spoon until well combined, then spread into the prepared pan. Top with extra Brazil nuts.
- Bake on middle shelf of oven for 55 minutes or until a skewer comes out clean. Cool slightly in pan, then turn out onto a wire rack to cool completely. Slice and enjoy!

http://schneiderchen.de | © 2019 | http://angiesrecipes.blogspot.com
 |
 |

http://schneiderchen.de | © 2019 | http://angiesrecipes.blogspot.com
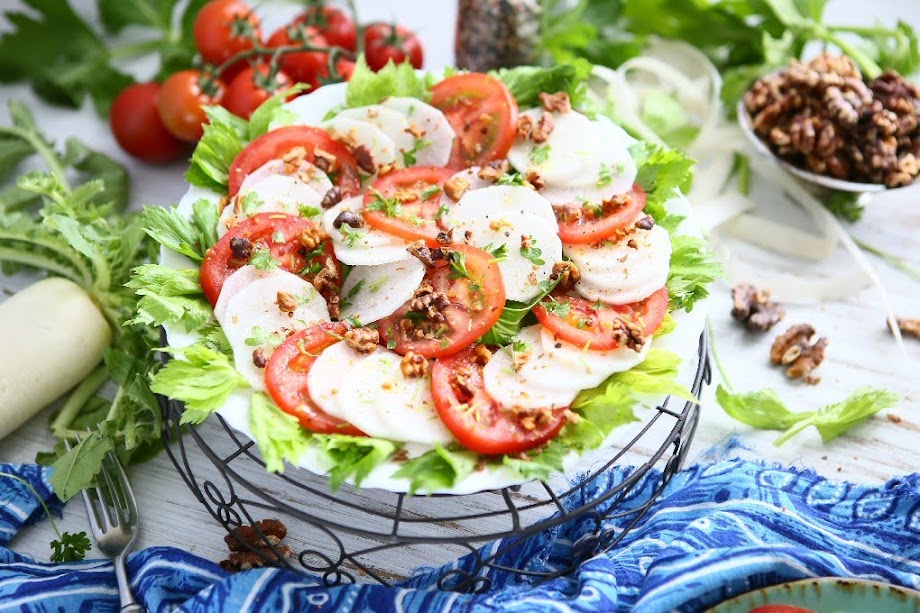
Radish Tomato Salad with Celery Leaves and Walnuts
 http://schneiderchen.de | © 2019 | http://angiesrecipes.blogspot.com
 |
 |
Light, fresh, and delicious...here is the recipe for radish salad, a simple summer treat that requires minimum preparation. Daikon radish has a mild flavour and adds great texture and crunch to a salad.You can also add some mango or stone fruit to make this salad fruity and sweet.
|
- Peel the radish and slice it into thin even disks. Place them in a bowl and toss with salt and wait 20 minutes. Press out excess water.
- Place celery leaves on serving plates. Rinse and dry the tomatoes. Cut them into slices too.
- Arrange the slices of radish and tomato in overlapping concentric circles on the celery leaves.
- Combine walnut oil and apple cider vinegar together and season with salt and pepper. Drizzle the salad with the dressing. Crumble the toasted walnuts over.

http://schneiderchen.de | © 2019 | http://angiesrecipes.blogspot.com

http://schneiderchen.de | © 2019 | http://angiesrecipes.blogspot.com
Slow Cooker Veal Tongue with Bok Choy Pesto
 http://schneiderchen.de | © 2019 | http://angiesrecipes.blogspot.com
 |
 |

http://schneiderchen.de | © 2019 | http://angiesrecipes.blogspot.com
Veal, or beef tongue, when done right, is very tender, juicy and delicious. I served it with some homemade bok choy pesto, but you can use other pesto or even salsa verde.
Veal tongue is high in fat, and like other organ meats, it is very nutrient dense (an excellent source of vitamin B12, zinc, iron and selenium). It has a unique, but mild flavour, tastes like muscle meat, fleshy, firm, but so much more tender and succulent. The tongue has a thick, bumpy skin and once cooked, it must be peeled while it's still warm. Don't let the meat cool too much, as the skin will stick.
| Bok Choy Arugula Pesto | |
|---|---|
|
|

- In a food processor, combine the toasted pine nuts, garlic, arugula, bok choy leaves, Parmesan, and 1 tsp salt and pulse to blend. With the machine running, pour in the olive oil through the food tube in a slow, steady stream and process until smooth, stopping to scrape down the sides of the bowl as needed. Taste and adjust the seasonings.
- Rinse the veal tongue under running water until the water runs clear and there’s no blood. Place veal tongue, onion, broccoli, fennel stalks, bay leaves, juniper berries, and parsley stems in your slow cooker. Generously season with sea salt. Pour in enough water to cover the veal tongue.
- Cook on Low for 8 hours or on high for 4-5 hours. Transfer veal tongue to a work surface and cool slightly. Peel the thick outer layer of skin off the veal tongue while it is still warm.
- To serve, cut the veal tongue crosswise into thin slices, and arrange on a platter in a single layer. Spoon the pesto sauce over and top with some fresh herbs, a generous drizzle of olive oil and some crushed red peppercorns.

http://schneiderchen.de | © 2019 | http://angiesrecipes.blogspot.com

http://schneiderchen.de | © 2019 | http://angiesrecipes.blogspot.com

http://schneiderchen.de | © 2019 | http://angiesrecipes.blogspot.com
White Chocolate Cherry Tart
 http://schneiderchen.de | © 2019 | http://angiesrecipes.blogspot.com
 |
 |

http://schneiderchen.de | © 2019 | http://angiesrecipes.blogspot.com
Coconut sugar sweetened spelt pastry filled with a decadent creamy filling of white chocolate ganache and cherries in this heavenly dessert. I absolutely adore this egg enriched spelt shortcrust paired with white chocolate and fresh cherries. They go together so well, and taste incredibly delicious. I garnished the tart with lemon thyme and cacao nibs, but you can leave them out or use chocolate chips instead.
| Crust | Filling |
|---|---|
|
|
- Whisk flour, salt and coconut sugar in a bowl. Add butter and rub in with your fingers until mixture resembles coarse meal with a few pea-size pieces remaining. Drizzle egg over butter mixture and mix gently with a fork until dough just comes together.
- Turn out dough onto a lightly floured surface and knead until smooth. Form dough into a disk. Wrap in plastic and chill until firm, at least 2 hours.
- Take dough out of the fridge and let it sit on the counter for a few minutes to soften slightly for easy rolling. Roll out the dough between 2 layers of plastic film into an 11-inch circle, then place gently into a 8-9-inch fluted tart pan. Trim the edges of the pastry to fit the tart pan. Cover the tart pan with plastic wrap and freeze for 30 minutes.
- Preheat the oven to 190C/375F. Line the frozen crust with baking paper and fill with enough dried beans to cover the bottom and side of the crust.
- Bake crust for 15 minutes, remove the parchment and pie weight. Bake for an additional 10-12 minutes or until the crust is golden brown. Remove and cool on a wire rack.
- For the filling, place the white chocolate, cream, and butter in a microwave-safe bowl, and heat in 20 second intervals, stirring after each one, until melted and smooth.
- Pour the chocolate filling into the tart crust. Garnish with lemon thyme, cherries and cacao nibs when the filling is set.

http://schneiderchen.de | © 2019 | http://angiesrecipes.blogspot.com
 |
 |

http://schneiderchen.de | © 2019 | http://angiesrecipes.blogspot.com


